Headstock Logo Solutuion?

Please put your pickup/wiring discussions in the Electronics section; and put discussions about repair issues, including "disappearing" errors in new instruments, in the Repairs section.
Post Reply
Steve Crawford
Posts: 8
Joined: Tue Jun 18, 2013 5:29 pm

Headstock Logo Solutuion?

Post by Steve Crawford »

Can anyone suggest a tutorial on routing a headstock for a logo inlay?

I want to use my name as a logo something like this image, but don't really want to use a transfer. I would like to rout the name out and probably fill it with coloured resin, the other smaller text could be transfers. Is this possible or is it too ambitious? Do you perhaps have any other suggestions?

Image

Cheers, Steve
User avatar
Mark Swanson
Posts: 1991
Joined: Thu Jan 05, 2012 11:11 am
Location: Grand Rapids, Michigan USA
Contact:

Re: Headstock Logo Solutuion?

Post by Mark Swanson »

Routing an filling with resin is not easy, and your routing needs to be VERY exact, more so than with an inlay, and usually isn't done because it's quite difficult to make it look good. I suggest just having some transfer decals made and finishing over them. Why use transfers for just a part of your design when the whole thing would look better if it were all transfer?
You could also have some inlays of your signature cut out by CNC machine and then just inlay them yourself, that would be easier than working with a resin.
  • Mark Swanson, guitarist, MIMForum Staff
User avatar
Bob Gramann
Posts: 1117
Joined: Fri Jan 06, 2012 11:08 am
Location: Fredericksburg, VA
Contact:

Re: Headstock Logo Solutuion?

Post by Bob Gramann »

I tried that once a long time ago. The filler migrated into the grain making the letters a bit fuzzier than I wanted. This is the way that I'm doing it now: http://www.mimf.com/library/Maple_inlay ... -2011.html
Jamie Unden
Posts: 144
Joined: Mon Feb 20, 2012 5:25 pm

Re: Headstock Logo Solutuion?

Post by Jamie Unden »

I did this as a prototype for the back of a set of custom dominoes but I used black epoxy and it came out great.
Randy Cordle
Posts: 30
Joined: Sat Jan 07, 2012 6:38 pm
Location: Central Illinois
Contact:

Re: Headstock Logo Solutuion?

Post by Randy Cordle »

Prepare your inlay first, then add it to the headstock overlay prior to gluing it the the neck.

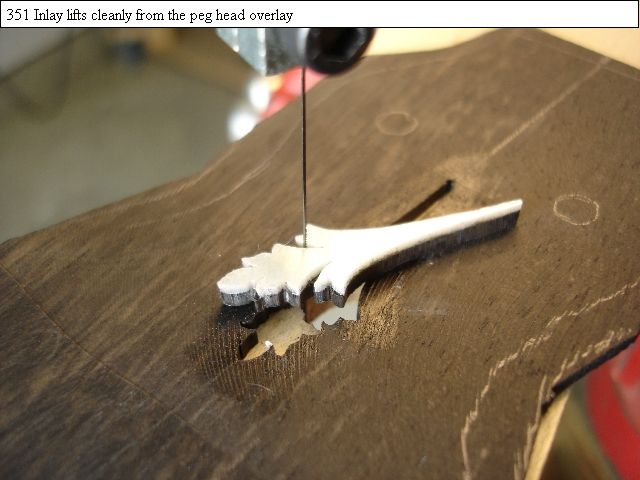
Glue your inlay to the surface with a bit of CA, cut around it to create the opening, flip the overlay over and clamp the inlay (with still-attached overlay shape) into a black epoxy-filled cavity, sand the excess height on the backside smooth when the epoxy is set.

It's quite easy to do quick and perfect inlays this way. If you're making multiple instruments you should be getting your logos already pre-cut from one of the custom work pearl supply houses, so it becomes very cost-effective to do it that way. Here's a shot of a pre-cut inlay going into a banjo peg head overlay.

Image
Lap steels, banjos, and mando family instruments for the world!
Arnt Rian
Posts: 216
Joined: Fri Jan 06, 2012 11:41 am
Location: Trondheim, Norway
Contact:

Re: Headstock Logo Solutuion?

Post by Arnt Rian »

If you order cnc'd logos, you can also have them cut the pocket in the headstock overlay. I have a stack of 'readymade' veneers with inlaid logos, in the wood types that I use most regularly, and extra logos that I can use for the unusual stuff.

The method that Randy shows above is close to how Gibson did it back in the day, if I understand it correctly.
Steve Crawford
Posts: 8
Joined: Tue Jun 18, 2013 5:29 pm

Re: Headstock Logo Solutuion?

Post by Steve Crawford »

Thanks for all the suggestions guys. Jury is out as to which way to go at the moment. However I'm liking a number of the ways that you guys have done it and also considering a 'hybrid method' whereby I use Bob Gramann's method to put the lettering into an ebony or walnut inset that I then place into my maple head sort of like this...

Image

or perhaps a plastic insert like this...

Image

Am I being stupid or clever, I don't know?
Any comments appreciated.

Cheers, Steve
User avatar
Barry Daniels
Posts: 3242
Joined: Thu Jan 05, 2012 10:58 am
Location: The Woodlands, Texas

Re: Headstock Logo Solutuion?

Post by Barry Daniels »

The wood inlay looks nice. I wouldn't go to all that work for the plastic insert though.
MIMF Staff
Arnt Rian
Posts: 216
Joined: Fri Jan 06, 2012 11:41 am
Location: Trondheim, Norway
Contact:

Re: Headstock Logo Solutuion?

Post by Arnt Rian »

My opinion? Too much going on, please simplify
User avatar
Mark Swanson
Posts: 1991
Joined: Thu Jan 05, 2012 11:11 am
Location: Grand Rapids, Michigan USA
Contact:

Re: Headstock Logo Solutuion?

Post by Mark Swanson »

I have actually done that and it worked ok for me. It's quite simple to inlay a round or oval section into the maple, but if you were to try and inlay a signature or any other type of inlay that had a complicated shape, you'd get gaps. Gaps need to be filled with a matching filler and in a dark wood this is usually not a problem but in a light wood like maple you can't match the fill color and it sticks out like a sore thumb.
  • Mark Swanson, guitarist, MIMForum Staff
Steve Crawford
Posts: 8
Joined: Tue Jun 18, 2013 5:29 pm

Re: Headstock Logo Solutuion?

Post by Steve Crawford »

Arnt Rian wrote:My opinion? Too much going on, please simplify
I'm thinking your right!

Cheers, Steve
Steve Crawford
Posts: 8
Joined: Tue Jun 18, 2013 5:29 pm

Re: Headstock Logo Solutuion?

Post by Steve Crawford »

Mmm - I'm now considering getting a laser etching/cutting machine. Then I could do some really fancy templates for routing as well as use a laser etched logo design straight into the wood. I'm also thinking that a laser could produce some really sexy etchings onto plain wood bodies... Think paisley designs or Fleur-de-lis or some incredible fantasy scenes for those 'prog rock' guitars. :)
Post Reply

Return to “Solid-Body and Chambered or Semi-Solid Electric Guitars and Bass Guitars”