
Hello:
I'm on my third instrument, a bass ukelele. I would like to put a bolt-on neck on this project. The lower bout is curved, so there would be some carving necessary to accommodate the bolt on neck. I visited the Taylor factory in El Cajon, CA and noted that they use bolt-on necks. My memory tells me that they carved a recess into the top for the fret board and also into the lower bout for the heel. And to facilitate adjustments, they installed a small shim under the fretboard and heel to facilitate adjustments.
This is what I am thinking of doing, but would like some advice.
Oh, yea...I carry my tools in the back of my pickup truck, which I tow behind my motorhome. I just don't have room for a drill press, so drilling the holes for this bolt-on neck will require some excitingly clever innovations. I'm thinking of cutting a groove into a piece of wood, then cross-cutting this piece and gluing it together with the grooves facing one-another. Then I'd have a drill guide to use. Any other ideas?
How about a bolt-on Uke neck?
How about a bolt-on Uke neck?
Frustrated luthier wanna-be
-
Bryan Bear

- Posts: 1390
- Joined: Fri Jan 06, 2012 1:05 pm
- Location: St. Louis, MO
Re: How about a bolt-on Uke neck?
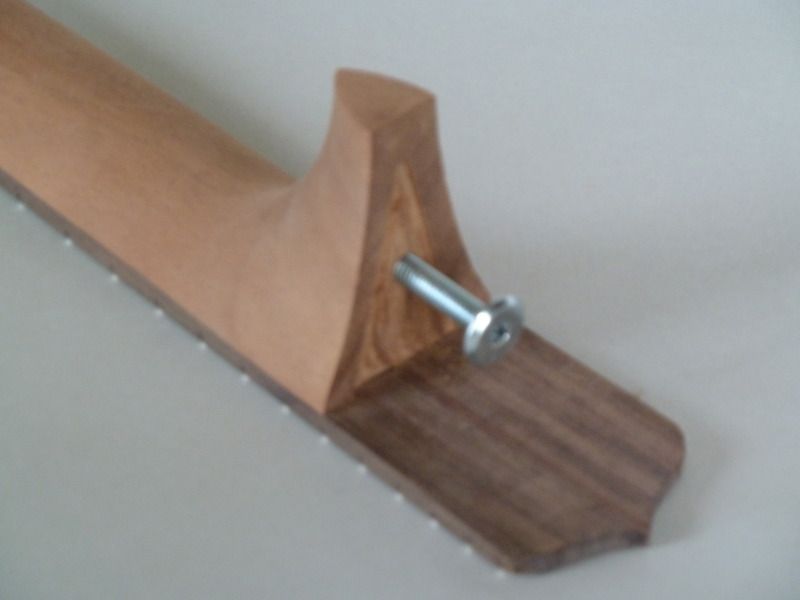
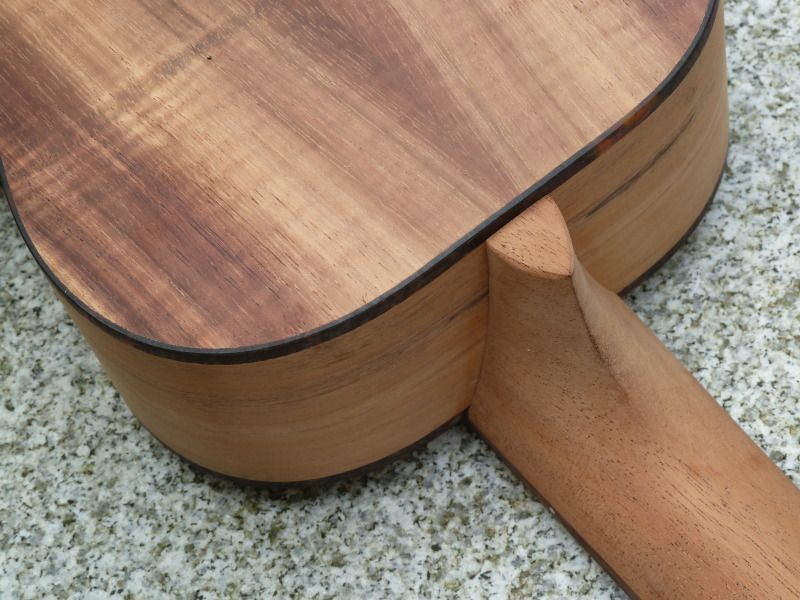
I've never used a drill press when doing a bolt on neck. The holes in the heel block are oversized to allow for fitting the heel and neck angle and a hand drill has always been easy enough. A Uke will only need one small bolt making it even easier. Make sure you have a plan for getting a tool to tighten the joint into that tiny soundhole. I also wouldn't bother with shims. Once you set the neck angle on a Uke you should never need to change it (which would still be easy to do sans shimming system).
Rather than cutting into the sides, relive the wood on the but joint face of the heel, leaving only about 1/8" around the perimeter. This will make it easier to floss the heel with sandpaper for a perfect fit to the curved sides. This flossing will also be how you adjust neck angle and yaw.
Rather than cutting into the sides, relive the wood on the but joint face of the heel, leaving only about 1/8" around the perimeter. This will make it easier to floss the heel with sandpaper for a perfect fit to the curved sides. This flossing will also be how you adjust neck angle and yaw.
PMoMC
Take care of your feet and your feet will take care of you.
Take care of your feet and your feet will take care of you.
Re: How about a bolt-on Uke neck?
Bryan: Thanks for the reply. I'll give it a try.
Frustrated luthier wanna-be
-
Clay Schaeffer
- Posts: 1674
- Joined: Fri Jan 06, 2012 12:04 pm
Re: How about a bolt-on Uke neck?
You could do it like they did lute necks - use a screw or a nail to attach the neck. Baroque violins had their necks nailed on also if IIRC.
-
Charlie Schultz

- Site Admin
- Posts: 1442
- Joined: Fri Dec 23, 2011 6:53 pm
- Location: St. Louis, MO
Re: How about a bolt-on Uke neck?
IIRC = "If I Recall Correctly"
Re: How about a bolt-on Uke neck?
When I bolt the neck on, what do I do with the fretboard that extends over the soundboard? Glue it down? Let it float?
Frustrated luthier wanna-be
-
Greg Robinson

- Posts: 686
- Joined: Fri Jan 06, 2012 1:54 pm
- Location: Coburg North, Victoria, Australia
Re: How about a bolt-on Uke neck?
I'd recommend tack glueing it with just a dab of white glue at each corner. This will prevent buzzes but facilitate removal if it is ever required. Oh, and feel free to finish under the fretboard extension too if you go this route.
MIMForum staff member - Melbourne, Australia
Re: How about a bolt-on Uke neck?
Bryan Bear wrote:
I am not sure how one "flosses" a neck to get it to fit the curvature of the Uke body. I've worked for hours trying to alter the neck so it'll fit. As close as I can get to "flossing" is to use carpet tape to affix a piece of 80-grit sandpaper to the uke and then scrubbing up and down to try to get a fit. It still isn't perfect. I may have to resort to a very small shim on one side. Any comments?Rather than cutting into the sides, relive the wood on the but joint face of the heel, leaving only about 1/8" around the perimeter. This will make it easier to floss the heel with sandpaper for a perfect fit to the curved sides. This flossing will also be how you adjust neck angle and yaw.
Frustrated luthier wanna-be
-
Wayne Brown
- Posts: 52
- Joined: Tue Jan 10, 2012 6:46 pm
- Location: Huntersville,NC
Re: How about a bolt-on Uke neck?
Ron,
To "floss" the neck joint, (I've never used this term before, but it is descriptive of the process) cut a piece of sandpaper or emery cloth about an inch or so wide and about a couple inches longer than the depth of your instrument body. I like to use 100 grit. Place your neck on the instrument body. Slide the sandpaper between the neck and body with the grit side toward the neck. With the neck against the body, pull the sand paper out. If your neck is in alignment, do this an equal number of times on each side. If not, do it more times on one side to bring it into alignment. It's a tedious process. Keep doing this till you get a perfect fit. That's my idea of "flossing".
To "floss" the neck joint, (I've never used this term before, but it is descriptive of the process) cut a piece of sandpaper or emery cloth about an inch or so wide and about a couple inches longer than the depth of your instrument body. I like to use 100 grit. Place your neck on the instrument body. Slide the sandpaper between the neck and body with the grit side toward the neck. With the neck against the body, pull the sand paper out. If your neck is in alignment, do this an equal number of times on each side. If not, do it more times on one side to bring it into alignment. It's a tedious process. Keep doing this till you get a perfect fit. That's my idea of "flossing".
-
Bryan Bear
- Posts: 1390
- Joined: Fri Jan 06, 2012 1:05 pm
- Location: St. Louis, MO
Re: How about a bolt-on Uke neck?
Wayne has it right. I like to put some packing tape on the back of the sandpaper to make it slide more easily. It is a bit tedious but not as bad as you might think. After a while you get a feel for how tight to hold the neck to the body to keep chater down. Definately relieve the neck heel leaving only 1/8"ish to contact the ribs, or it will take forever. I have even gotten a good fit on ribs that were not flat in either plane. I also use a wider piece of sand paper with an angle on one side so I can pull from different angles allowing me to sand one area more per stroke to adjust neck ange and center line.
PMoMC
Take care of your feet and your feet will take care of you.
Take care of your feet and your feet will take care of you.
Re: How about a bolt-on Uke neck?
i've spent literally hours trying to "floss" this friggin neck into a perfect fit and there is a tiny gap on one side near the fretboard end of the heel (maybe 1 mm). This heel is douglas fir and I am looking at the end grain. I've tried a shim, but this doesn't work. It's really vexing and I can't explain it. If I rest both items on a flat surface and hold a machinist's square against either surface I cannot see the gap with a naked eye. when I slide them together, it's there. AAAARGH:-(. The only thing I can think of is to bolt the neck on to see what this gap looks like and if I can tolerate it. Or, if I can't, shave a sliver with my plane and slide it in with a little glue on it. Oh, yea: the gap gets smaller on the end, so any sliver I put in there has to taper from almost nothing to nothing. Here's something interesting about douglas fir end grain: Super glue won't stick to it.
Frustrated luthier wanna-be
-
Michael Lewis
- Posts: 1475
- Joined: Thu Jan 12, 2012 1:22 am
- Location: Northern California USA
- Contact:
Re: How about a bolt-on Uke neck?
Super glue will stick if you make a couple applications to fill the end grain first. End grain poses the same situation with most glues as it is porous and will absorb the glue, which can cause a glue starvation of the joint, even with epoxy.
Re: How about a bolt-on Uke neck?
Okay, thanks for that bit of wisdom. I was looking for some way to remove the superglue and start over. I'll try another layer or two along with the tiniest of shims. It's been a bit of an aggravation.
Frustrated luthier wanna-be
-
Michael Lewis
- Posts: 1475
- Joined: Thu Jan 12, 2012 1:22 am
- Location: Northern California USA
- Contact:
Re: How about a bolt-on Uke neck?
Ron, you will benefit from learning to "chalk fit" parts. You rub chalk on one part and press the other to it, and the high spots pick up some of the chalk. Scrape off the chalk and a tiny bit of wood and do it again. Repeat until it fits. You can also use carbon paper, transfer paper, etc. This is not rocket science, but it will be right only when it IS right.
Re: How about a bolt-on Uke neck?
Tried the chalk fitting process and it revealed a spot that I didn't know was high. A little Dremel work took care of that. I'm on a learning curve on this "flossing" process. I first double-back taped some 80 grit sandpaper" to the Uke body, then worked the neck up and down. Then I tried "flossing" sideways by dragging 100-grit sandpaper across the heel. This worked much better. It is a very tedious process.
Frustrated luthier wanna-be
-
mike wingate
- Posts: 11
- Joined: Sat Jan 07, 2012 8:05 pm
Re: How about a bolt-on Uke neck?
I made a 25 foot radius alloy sanding block to seat the neck to the body. Both the body and base of neck were then slightly hollow. The underside of the neck has a slight V recess to remove the meat from the neck, so the body and neck compress together. I used a metal bolt and dowel to join the 2 together.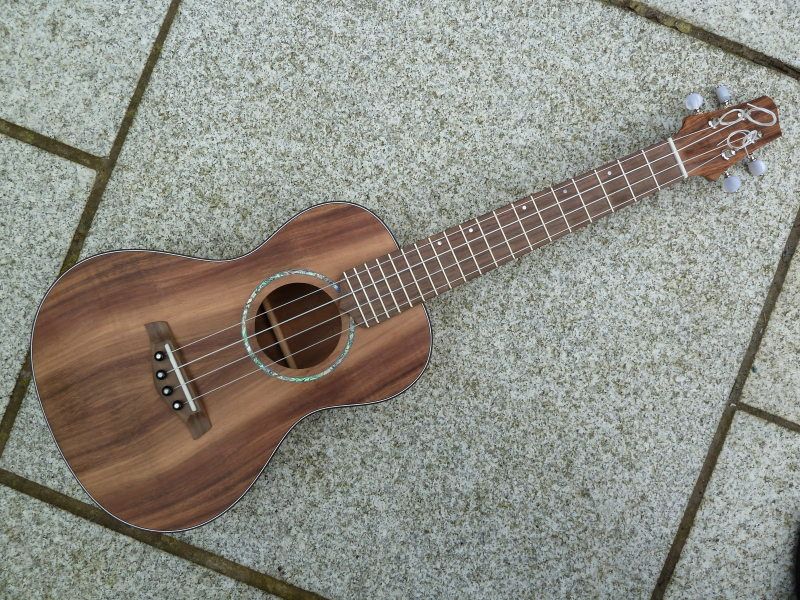
Last edited by Greg Robinson on Tue Jul 31, 2012 6:38 am, edited 1 time in total.
Reason: Repairing image tags.
Reason: Repairing image tags.
-
mike wingate
- Posts: 11
- Joined: Sat Jan 07, 2012 8:05 pm
Re: How about a bolt-on Uke neck?
more
Last edited by Greg Robinson on Tue Jul 31, 2012 6:42 am, edited 1 time in total.
Reason: Repairing tags
Reason: Repairing tags
-
mike wingate
- Posts: 11
- Joined: Sat Jan 07, 2012 8:05 pm
Re: How about a bolt-on Uke neck?
Last edited by Greg Robinson on Tue Jul 31, 2012 6:41 am, edited 1 time in total.
Reason: Repairing tags
Reason: Repairing tags