Hybrid Steinberger Bass Screwup

If you have a string instrument of any kind that needs fixing, a mistake you made in building a new instrument that you need to "disappear," or a question about the ethics of altering an older instrument, ask here. Please note that it will be much easier for us to help you decide on the best repair method if you post some pictures of the problem.
Post Reply
Alexander Higgins
Posts: 145
Joined: Mon Jan 20, 2014 7:17 pm

Hybrid Steinberger Bass Screwup

Post by Alexander Higgins »

Long time lurker, First Time poster here. I hope you all can help me fix my little problem. If you guys can't, nobody can.

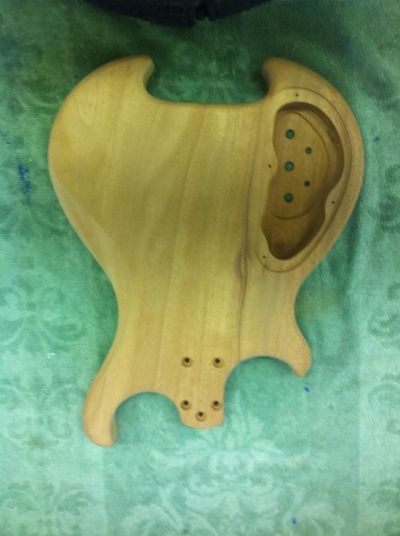
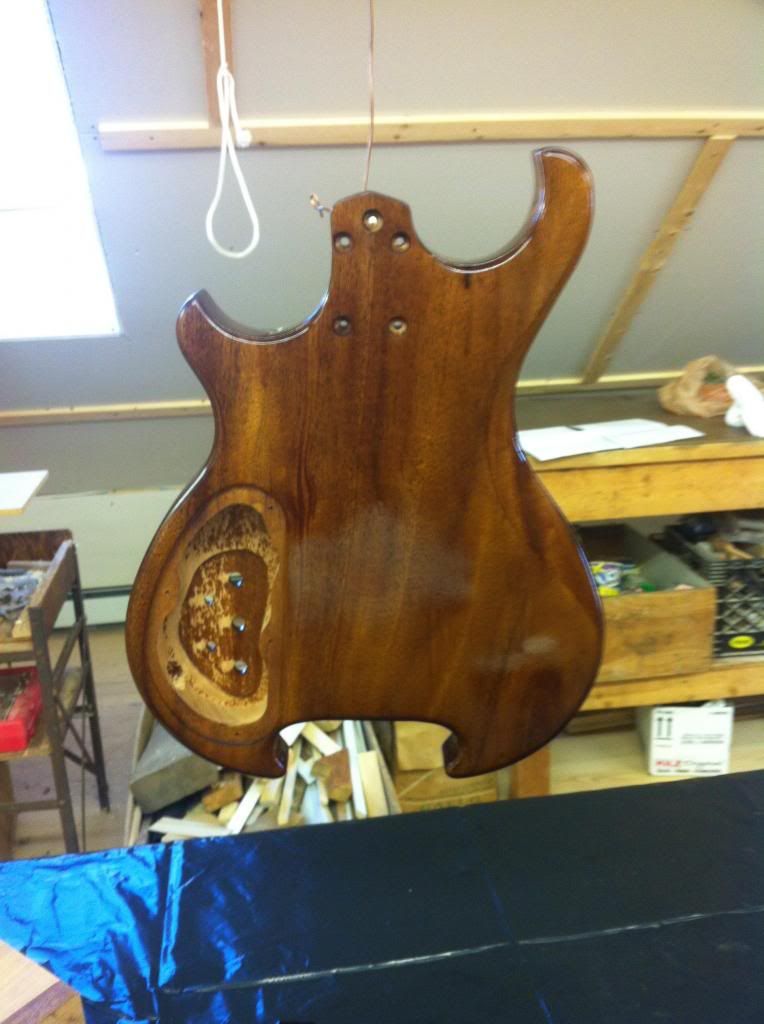
I have an original 1986 Steinberger XP2 bass, which had a wood body and headless graphite composite neck. I love the headless tuners, it NEVER goes out of tune, but always sounded a bit sterile. I designed a wood body for the neck and bridge tuner inspired by an Alembic Mark King bass. The "omega" cutout they have in the bridge area always made me think it could be adapted for a bridge tuner. I made up a template from hardboard and used it to cut out a mockup from 2 layers of 3/4" plywood just to see how it would balance:
Image

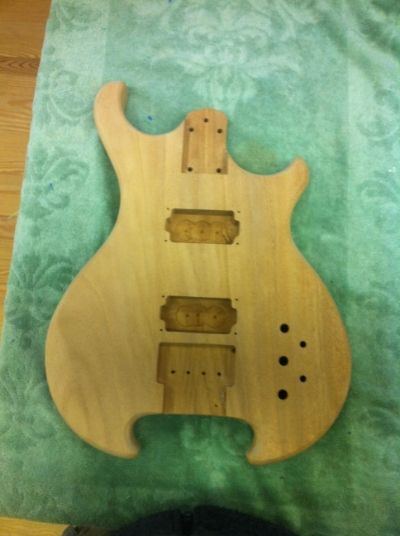
I cut out the body from a single piece of mahogany
Image
Image

The neck heel has a compound bevel profile, tapering from the fingerboard face down to the back by around seven degrees. This was done so the composite necks would pop out of the mold. The neck heel also tapers from the last fret heading up towards the nut, so the whole neck pocket is an assembly of beveled faces. PITA! Here's a shot of the neck heel against a square to illustrate:
Image

As it's my first build, I didn't know how to set up a jig for all the angled faces, so I routed a straight pocket vertically, but tapered front to back, figuring I could shim the little "triangles" of empty neck pocket along bottom of the neck pocket, shown here:
Image

Here's another one showing the back of the neck heel. Note the taper towards the nut:
Image

Now the painful part - after routing the neck pocket, I find that the neck is off center by around 1/4" towards the G string at the nut. Doh! My neck pocket is correct on depth, but must have gotten cock-eyed. So much for measure 47 times, cut once.
Image

More pain and suffering. The neck got dropped (he shall remain nameless) in the shop, creating an evil gouge in the finish surface at the headless end of the neck. Near as I can determine, Steinberger necks were laid up by spraying black gelcoat into a mold and laying up graphite carbon fiber, which you can see exposed here. I'm hoping this is basically a gelcoat patch, as no structural damage is apparent:
Image

I entertained the idea of filing or chiseling the sides of the pocket until I had enough twisting room to get the neck straight, and then "bedding" the neck in mahogany dust and epoxy, but decided it was better to start fresh by gluing matching grain mahogany strips to the sides of the pocket so I can re-route. I made a couple of wedge-shaped rails (shoulda thought of this the first time) with the top faces and inside edge matching the seven degree bevel so the router can ride along them with a top bearing pattern bit to re-cut the pocket sides. I will end up cutting out about 98% of what I glued back in, but hopefully it will line up right. I'm scratching my head as to how to get the router guide rails parallel to the tapered neck heel sides. I thought maybe I could clamp the neck to the body with a continuous laser line from bride up to the nut (I have a laser level that can rotate to vertical or horizontal beam) to center it, and then set the rails in tight to the heel so they follow the heel taper, getting closer together on the nut side? Any any and all advice appreciated. You'll be sorry you let me into this forum, mark my words!
User avatar
Peter Wilcox
Posts: 1317
Joined: Sun Jan 08, 2012 1:31 am
Location: Northeastern California

Re: Hybrid Steinberger Bass Screwup

Post by Peter Wilcox »

Are the sides of the heel symmetrical to the neck's axis on each side? I know there's a taper, but is it the same on each side? If not, your neck pocket could be correct, and it's the neck that's off. Of course, there's still the top to bottom taper to deal with.

It's a picture, and pictures lie, but...
Attachments
hee1l.jpg
Maybe I can't fix it, but I can fix it so no one can fix it
John Sonksen
Posts: 356
Joined: Sun May 20, 2012 12:16 pm
Location: Portland, OR

Re: Hybrid Steinberger Bass Screwup

Post by John Sonksen »

if it was me I'd lay the neck down on a piece of 1/4" masonite or 1/2" birch ply and either trace the taper or run a straight edge down the length of the neck and transfer the outside edge lines that way. Then you can take that piece and line a straight edge up to your line and using a pattern bit, rout that line into what will become your template. You'll need to determine the width where the neck joins the body and how long the heel section is to form the end of your neck pocket, and it's just a matter of cutting the three sides for your template. It looks like the corners on the heel are pretty sharp so you'll have to do some hand work to square up the corners. As far as the 7 degree angle is concerned, that's really quite a challenge. It would be fairly easy to get the obtuse angled side, but on the acute side it seems like you'd need to rout a bit short in depth and clean it up with another tool, otherwise the opposite corner to the cutting side will dig into the bottom of the pocket. Additionally it would present an issue for trying to rout against your template, or the properly sized neck pocket. If it were me I'd just make a new neck out of wood, with a regular square heel.
Alexander Higgins
Posts: 145
Joined: Mon Jan 20, 2014 7:17 pm

Re: Hybrid Steinberger Bass Screwup

Post by Alexander Higgins »

The neck does taper symetrically with respect to centerline, so that's one less problem. They were made by the thousands in CNC cut molds, so they are pretty consistent. Using the Steinberger neck and tuners is the whole point of the project, so i'd really like to solve this. It's the thinnest bass neck I've ever seen, tapering to about 1.5"at the nut, very comfortable for small hands like mine. There are no dead spots in the fingerboard, and it's nearly impervious to changes in heat or humidity, so I'm not ready to scrap this just yet. I will have to chisel out the bottom of the wood patches at the bottom of the pattern bit travel. My current dilemma is due to my shortcomings in template making, so I think a jig that directly translates the neck taper onto the body is my best bet. Thanks for the input.
Alexander Higgins
Posts: 145
Joined: Mon Jan 20, 2014 7:17 pm

Re: Hybrid Steinberger Bass Screwup

Post by Alexander Higgins »

Eureka!
Actually proud of myself on this one. Based on forum members suggestions, I built a simple one-time router jig with beveled top and inside edge faces to guide a top-bearing pattern bit to recut the neck pocket. I glued in some matching mahogany strips to both long sides of the pocket.
Image
Image


I set the neck in place temporarily, and using my cheap Sears laser leveler set up for a vertical beam, aligned everything with centerline.
Image


It worked! I ended up shaving about 1/16" off the E string side of the pocket, removing nearly all of the glued-in shim, and left a tiny sliver of shim on the G string side, the glue lines are nearly invisible. Test fit the neck and re-checked with the laser, everything dead-nuts on center.
Image
Image

Thanks for advice on this one, resurrected a dormant project at last. Now on to final body shaping and sanding.
Alexander Higgins
Posts: 145
Joined: Mon Jan 20, 2014 7:17 pm

Re: Hybrid Steinberger Bass Screwup

Post by Alexander Higgins »

Another repair job:
I had a nasty router chip-out at one side of the bridge recess, so I cut back the edge to eliminate the chip, glued in a grain matched piece of mahogany, and re-routed the recess edge.
Image

The repair should be nearly invisible when the body is stained.
Image

Mockup with pickup rings, bridge, and neck. Body sanded down to 220 grit
Image

Back of body with belly relief carved. Much easier than I thought using a disc sander.
Image

I decided to grind down some spare neck bolts into points to transfer the neck hole locations to the neck pocket, been dreading this step, but it worked perfectly for 4 out of 5 of the bolt holes.
Image
I had previously re-set 3 of the neck bolt inserts that had loosened with epoxy. Despite using a template to set these inserts, the top left one must have gone in very slightly crooked, as the bolt passing through the neck pocket ends up very tight due to the tiny angle of the insert. Not sure if this is fixable yet, or really needs to be fixed
Image
Alexander Higgins
Posts: 145
Joined: Mon Jan 20, 2014 7:17 pm

Re: Hybrid Steinberger Bass Screwup

Post by Alexander Higgins »

Finally ready for finish, all the hardware holes drilled, channels for wiring drilled into control cavity, etc. All sanded down to 400 grit:
Image
Image

Had to step down the route inside the control cavity to get down to 1/4" thick wood for pots and switches to poke through:
Image

I'm going to finish with Watco danish oil by wetsanding the oil into the surface, have read lots of conflicting descriptions of the process as to drying time between coats, grit paper to use, etc. Any advice appreciated.
Alexander Higgins
Posts: 145
Joined: Mon Jan 20, 2014 7:17 pm

Re: Hybrid Steinberger Bass Screwup

Post by Alexander Higgins »

First coat of Watco Danish Oil "Dark Walnut" going onto the back. I've used the "Medium Walnut" before, but it looked a little "orange" on my sample piece. The endgrain is really soaking up the stain, so it's ending up darker than I expected, but will still look sweet. You can see how the oil has saturated right through 1/4" thick front wood at the electronics cavity. The first saturating coat complete, will let dry till next weekend, then start wet-sanding coats on with 400, 600, 800, and 1200 grit paper. I've read a lot of conflicting info on technique for this, drying time between coats, etc., but a rough consensus seems to be to wet-sand in circular motions with a flexible sanding block, let dry for 10 minutes, and then wipe off the "slurry" across the grain lightly so the pores stay filled with oil/sawdust mixture, repeat through all grades, and then wax. Any suggestions on this process highly appreciated. I'm hoping to end up with a satin sheen that will pop the grain a little.

Image
User avatar
Barry Daniels
Posts: 3190
Joined: Thu Jan 05, 2012 10:58 am
Location: The Woodlands, Texas

Re: Hybrid Steinberger Bass Screwup

Post by Barry Daniels »

Wet-sand only the first coat or two. After that the pores should be filled and you should then add topcoats without any wet-sanding.
MIMF Staff
Post Reply

Return to “String Instrument Repair: Practical and Political Issues”