Chris
Heating Pipe DIY Question
-
Christopher Perkins
- Posts: 35
- Joined: Mon Jan 21, 2013 8:28 pm
Heating Pipe DIY Question
I am going to be attempting the DIY bending Iron build shortly (the design that employs a barbeque lighter as the heating element, and a circular switch). Would it work the same way with a less expensive slider style switch (in place of the circular type)? Also...how do you protect the wiring from heat damage?
Chris
Chris
-
Bob Gramann

- Posts: 1101
- Joined: Fri Jan 06, 2012 11:08 am
- Location: Fredericksburg, VA
- Contact:
Re: Heating Pipe DIY Question
You want the light dimmer to have a higher watt rating than the heating element. I'm using a 600 watt dimmer with a 500 watt element. It has worked for several years with no problem. I mounted the dimmer in a metal double outlet box along with an outlet that I plug the element into. None of the wiring is exposed to any heat. No problem. I mounted the pipe (with the element inside) to a couple of bolts bolted into a block of wood (at enough distance that the heat doesn't burn the wood) that I grip in a bench vise when I bend. I'm traveling now so I can't provide you with a picture.
-
Bryan Bear

- Posts: 1376
- Joined: Fri Jan 06, 2012 1:05 pm
- Location: St. Louis, MO
Re: Heating Pipe DIY Question
What he said ^^^^^^
Just make sure the dimmer switch is rated higher that the element you intend to use. I wired up a outlet box that has a plug going into a hot tub timer switch (just in case I forget to turn it off) then a dimmer switch and finally an outlet. This is mounted on the underside of my bench top and plugged into the wall. I just clamp a pipe into my metal vise and plug the starter into the outlet box.
Just make sure the dimmer switch is rated higher that the element you intend to use. I wired up a outlet box that has a plug going into a hot tub timer switch (just in case I forget to turn it off) then a dimmer switch and finally an outlet. This is mounted on the underside of my bench top and plugged into the wall. I just clamp a pipe into my metal vise and plug the starter into the outlet box.
PMoMC
Take care of your feet and your feet will take care of you.
Take care of your feet and your feet will take care of you.
-
Gilbert Fredrickson
- Posts: 291
- Joined: Tue Feb 07, 2012 9:07 pm
Re: Heating Pipe DIY Question
A Harbor Freight router speed control works well. The 750w slide pot would work. The router control also works to slow bench grinder motors for sharpening tools.
-
Bob Hammond
- Posts: 638
- Joined: Sun Jul 22, 2012 4:13 pm
Re: Heating Pipe DIY Question
It's good to read about intrepid people who try hot pipe bending. I did that with my first, and I might go back to that method. Experts can produce very symmetrical sides, but sometimes asymmetry can be very charming.
>Always-ALWays-ALWAYS< put a timer cutoff switch in any circuit/device that produces high heat. THIS IS A FIRE DANGER. It's very easy to get fascinated or distracted while working, and then you might forget to turn the device off because >>the device doesn't move or make noise<<. A shop full of thin, dry, and crispy wood can go up very quickly, and it might not be just you who needs to evacuate the building quickly.
As a husband, dad, scientist, and medical school surgery professor who has seen some very sad things, please read and heed my advice to you about this.
-
Christopher Perkins
- Posts: 35
- Joined: Mon Jan 21, 2013 8:28 pm
Re: Heating Pipe DIY Question
Thanks a million for the advice, i will certainly heed this warning.
-
Alain Lambert
- Posts: 111
- Joined: Sat Jan 07, 2012 7:18 pm
- Location: Trois-Rivieres, Quebec
Re: Heating Pipe DIY Question
I installed the control of an electric pan on mine.
It is a thermostat. You set the temperature and it keep it there.
Just make sure ,the probe part (the long tube) is inside the bender. You have to open it to connect your element to the contacts inside.
You can find it at yard sale, flea market, etc for almost nothing.
My heater is a hot water tank heater. It is designed to work on 220V, but on 110V it is just OK for the purpose.
Just another idea!
- Attachments
-
-
Bob Gramann
- Posts: 1101
- Joined: Fri Jan 06, 2012 11:08 am
- Location: Fredericksburg, VA
- Contact:
Re: Heating Pipe DIY Question
I was traveling during the earlier part of this discussion. Here is my pipe and controller. Against advice, I do not have a timer on it. I'm pretty anal about unplugging everything when I finish a session.
- Attachments
-
-
Bob Hammond
- Posts: 638
- Joined: Sun Jul 22, 2012 4:13 pm
Re: Heating Pipe DIY Question
Bob, sure, I leaned heavy on the safety lecture about heat benders, and now I'm going to lean heavy on you too. Please don't take this too personally.
This is not about feeding my ego about I think about what's 'right or practical technique' or 'wise'. I didn't lecture only about what I've seen, but also based about what I did by ignorance -->once<. To this day, there are times when I'll get up in the middle of the night and go down to the basement shop and check. Even if the cat and dog are sleeping soundly, I still go down and check, and I never regret or worry about losing that sleep.
Ask Mario about fire safety; he'll tell you about it. You can do what you want in your place, but I think that when an easily avoidable hazard is pointed out and about how to avoid the hazard, then I think that it is extremely stupid to discount, or suggest in some way to ignore, advice based upon the evidence of direct personal experience. There is no useful defense for doing that. Certainly, I don't know you and I don't have anything against you, but I feel strongly about this matter.
Really, I'm a pretty nice and understanding guy, otherwise I wouldn't be here.
-
Bob Gramann
- Posts: 1101
- Joined: Fri Jan 06, 2012 11:08 am
- Location: Fredericksburg, VA
- Contact:
Re: Heating Pipe DIY Question
Yes, I understand the lecture. I'm not discounting it; I'm not ignoring it. That bender pipe is so hot that as soon as I am finished working, I unplug it and lay it on the concrete outside so that I don't inadvertently bump it and burn myself. (I did that once before I moved the shop out of my garage and I turned to talk to the UPS man.) I just looked on Amazon for a timer and didn't find anything that I liked--I don't trust the digital ones and the longest setting mechanical one I found went for 60 minutes--not long enough. What are you using?
The thing that scares me is the dust collector. A spark into that could smolder into the night. I haven't figured that one out yet. Got any ideas?
The thing that scares me is the dust collector. A spark into that could smolder into the night. I haven't figured that one out yet. Got any ideas?
-
Bob Hammond
- Posts: 638
- Joined: Sun Jul 22, 2012 4:13 pm
Re: Heating Pipe DIY Question
Bob, that's an excellent topic for discussion. We should find out how, and how often, that happens.
-
Bryan Bear
- Posts: 1376
- Joined: Fri Jan 06, 2012 1:05 pm
- Location: St. Louis, MO
Re: Heating Pipe DIY Question
Bob G., my hot tub timer switch is 60 min. I often use it longer than that. Fortuneately, it ticks while in use and clicks when it shuts off, reminding me to reach over and dial up some more time.
PMoMC
Take care of your feet and your feet will take care of you.
Take care of your feet and your feet will take care of you.
-
Jim McConkey

- Posts: 1066
- Joined: Thu Jan 05, 2012 4:00 pm
- Location: Way north of Baltimore, MD
Re: Heating Pipe DIY Question
Please take dust collectors to another discussion if you want to take it further, but I have heard of some running grounded bare copper wires through their dust collecting ducts to prevent the static buildup that can cause sparks.
MIMForum Staff - Way North of Baltimore
-
David King
- Posts: 2690
- Joined: Sat Jan 07, 2012 10:01 pm
- Location: Portland, OR
- Contact:
Re: Heating Pipe DIY Question
I just put one of these timers on my bathroom fan and am ordering a second one for the shops timed outlet that will get used for the soldering iron and the UV curing lamp. It's good to 1800W.
http://www.amazon.com/Woods-59007-Decor ... B002KS1DBU
http://www.amazon.com/Woods-59007-Decor ... B002KS1DBU
-
Christopher Perkins
- Posts: 35
- Joined: Mon Jan 21, 2013 8:28 pm
Re: Heating Pipe DIY Question
ok guys, i purchased all the items necessary for the diy bending pipe here: http://www.soundsalon.com/Make_a_Bending_Iron.html and I have run into a few problems. First problem, is upon unscrewing and removing the plastic handle to "reveal the wiring", I realized that all the interior wiring was covered in formed hardened epoxy or something like it and cannot be accessed. It is for this reason that I have decided to alter my design a bit and go with something closer to what Bob Grahmann listed earlier in this thread. Second problem, is upon bending the threaded rod to make the "feet", 2 of the 4 broke. Problem 3: once i snipped the threaded rod to size, the clipped end won't accept the bolts required for the plans shown. Any thoughts, ideas...suggestions?
-
Bob Gramann
- Posts: 1101
- Joined: Fri Jan 06, 2012 11:08 am
- Location: Fredericksburg, VA
- Contact:
Re: Heating Pipe DIY Question
When you cut a threaded rod, first you screw on a nut inside of where you're going to cut. After the cut, you turn the nut off over the cut end and it restores the threads as it goes by. I'll get construction directions for my pipe up later today.
-
Bob Gramann
- Posts: 1101
- Joined: Fri Jan 06, 2012 11:08 am
- Location: Fredericksburg, VA
- Contact:
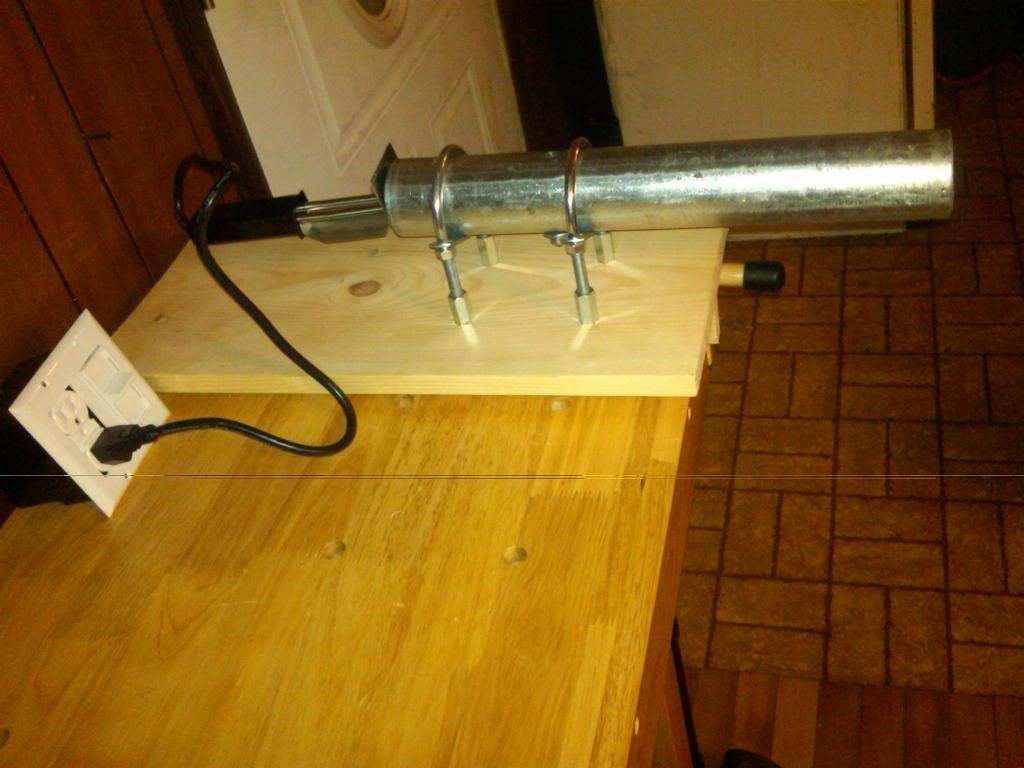
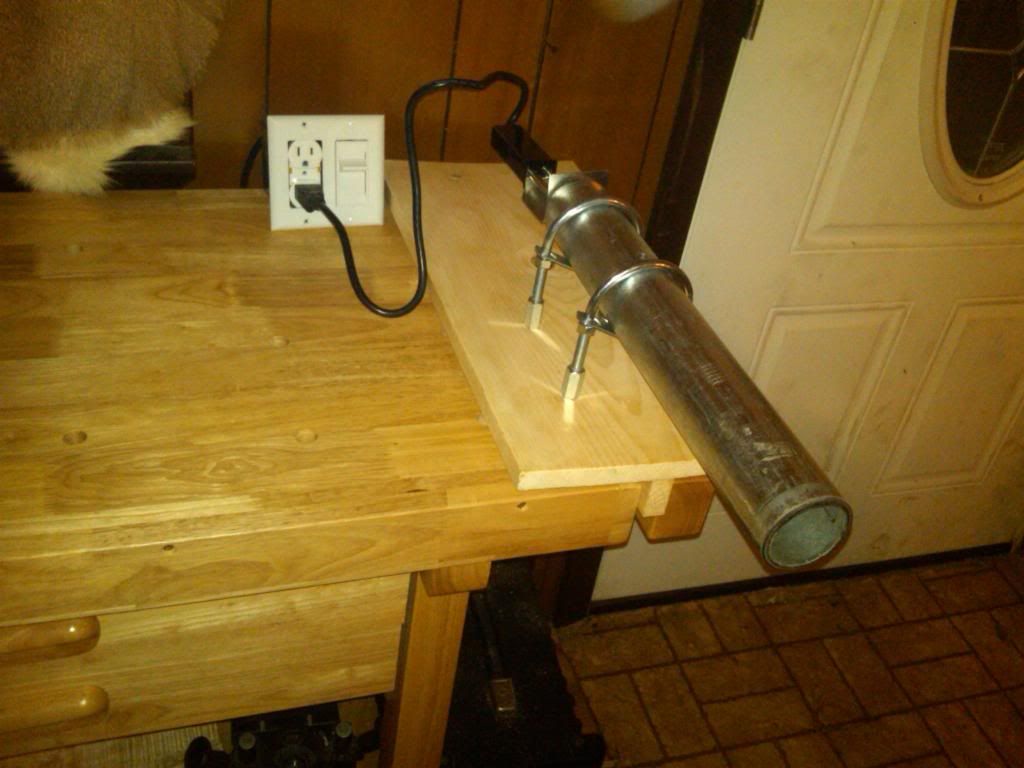
Re: Heating Pipe DIY Question
Here's the pipe part. It's pretty self-explanatory. The threaded rods are 7/16". The lower block gets clamped into a bench vise. My charcoal lighter didn't fit into the pipe. I plugged it in, let it get red hot, unplugged it, then bent it narrow enough to fit with a large pliers. It didn't break. (If it does, a new one is only $15 at Lowes).
Next, the control box.
I used a standard power tool cord rated for 12 amps. The advantage of this is that the wires are properly color coded. Black is hot, white is neutral, and green is ground. Note that there is a cable retainer where the cord comes into the box--you don't want to pull your connections loose by leaving the wire loose to move.
I hope that it goes without saying that all work is done with the power cord unplugged.
Strip about 5/8" of insulation from the end of each wire. Before you attach any of your wires, twist the stands tight so that there will be no escaping strands to make an unplanned electrical connection. All of your connections will need to be tight! Any looseness makes a high-resistance connection that can result in extra heat and even fire. With stranded wire, I usually wrap it around a screw post in the same direction that the screw turns when it is tightened.
The outlet has a hot side and a neutral side. Usually, it is labeled on the back, but if not, the hot usually is the gold screw and the neutral, the silver. The ground screw is green. Twist the green wire from the dimmer to the green wire from the power cord and install both under the green screw on the outlet. You can connect the neutral (white) wires to the appropriate connection on the outlet (there are two screws for the neutral--you can use either one in this application). The dimmer interrupts the current path from the power cord hot wire to the outlet. So, one of the black wires from the dimmer is twisted to the hot (black) wire from the power cord. The other black wire from the dimmer is connected to the hot side of the outlet.
The twisted connection is then covered with a screw on electrical connector (which is tightened until it won't turn anymore).
Your dimmer may have different attachments but the principle is the same--it interrupts the hot side.
Put all of the items in the box and test the box by plugging a lamp (with a filament bulb) into it. If it doesn't work, unplug the power cord and figure out what you messed up.
To add a timer, get the plug-in type (rated for at least 500 watts) and plug the power cor into that on the way to the wall.
I use some leather gloves with thick insulation when I bend on my pipe. I make sure that anyone in the room is very aware of it's location and I stay very aware. When I am finished with my session, I unplug it and set it outside on some concrete to cool. When I start, the pipe usually takes a few minutes to get hot. When I spritz it and the water instantly flashes off, I consider it hot enough for most woods. If your wood doesn't go plastic when you rock it on the pipe, you can spritz it and see if that helps, or you can turn the heat up. If it smokes, turn the heat down (and wait for it to cool a bit). After you practice a bit on some scrap wood (thinned to about .080"), you will get a feel for what you have to do. Good luck.
I hope that it goes without saying that all work is done with the power cord unplugged.
Strip about 5/8" of insulation from the end of each wire. Before you attach any of your wires, twist the stands tight so that there will be no escaping strands to make an unplanned electrical connection. All of your connections will need to be tight! Any looseness makes a high-resistance connection that can result in extra heat and even fire. With stranded wire, I usually wrap it around a screw post in the same direction that the screw turns when it is tightened.
The outlet has a hot side and a neutral side. Usually, it is labeled on the back, but if not, the hot usually is the gold screw and the neutral, the silver. The ground screw is green. Twist the green wire from the dimmer to the green wire from the power cord and install both under the green screw on the outlet. You can connect the neutral (white) wires to the appropriate connection on the outlet (there are two screws for the neutral--you can use either one in this application). The dimmer interrupts the current path from the power cord hot wire to the outlet. So, one of the black wires from the dimmer is twisted to the hot (black) wire from the power cord. The other black wire from the dimmer is connected to the hot side of the outlet.
Put all of the items in the box and test the box by plugging a lamp (with a filament bulb) into it. If it doesn't work, unplug the power cord and figure out what you messed up.
To add a timer, get the plug-in type (rated for at least 500 watts) and plug the power cor into that on the way to the wall.
I use some leather gloves with thick insulation when I bend on my pipe. I make sure that anyone in the room is very aware of it's location and I stay very aware. When I am finished with my session, I unplug it and set it outside on some concrete to cool. When I start, the pipe usually takes a few minutes to get hot. When I spritz it and the water instantly flashes off, I consider it hot enough for most woods. If your wood doesn't go plastic when you rock it on the pipe, you can spritz it and see if that helps, or you can turn the heat up. If it smokes, turn the heat down (and wait for it to cool a bit). After you practice a bit on some scrap wood (thinned to about .080"), you will get a feel for what you have to do. Good luck.
-
Christopher Perkins
- Posts: 35
- Joined: Mon Jan 21, 2013 8:28 pm
Re: Heating Pipe DIY Question
I can't thank you enough! This was HUGELY helpful and thanks to your help, HUGELY successful. Dimmer unit is now completed....now to tackle my pipe problems...A hole is now stripped. Grrrr. Maybe ill just go get some U bolts and be done with it. Thanks again
-
Bob Gramann
- Posts: 1101
- Joined: Fri Jan 06, 2012 11:08 am
- Location: Fredericksburg, VA
- Contact:
Re: Heating Pipe DIY Question
My pipe has a nut on the inside and a nut on the outside of the pipe on each piece of threaded rod. I made it so that it stands off from the wood because my first incarnation, where the pipe was bolted into a wooden cradle, scorched the wood into charcoal.
-
Christopher Perkins
- Posts: 35
- Joined: Mon Jan 21, 2013 8:28 pm
Re: Heating Pipe DIY Question
Thanks to all! My DIY Heating Pipe is now finished! Thanks again, Bob! I used U bolts with couplers to extend the distance from the wood base to the pipe. Tested it out. Works like a charm