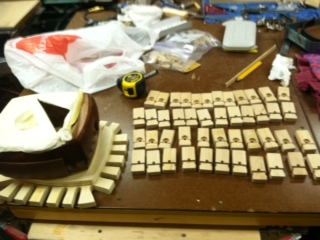
Steven Smith installs a new head on a Shamisen [Pictures] - created 08-05-2011
Smith, Steven - 08/05/2011.05:30:31
I was just given this shamisen last night to evaluate for repair; one of the skin heads needs to be replaced. The instrument is needed for a concert on Aug 31 and the player needs a little time to learn to play his part. That leaves about 10 or 15 days to get the repair completed.
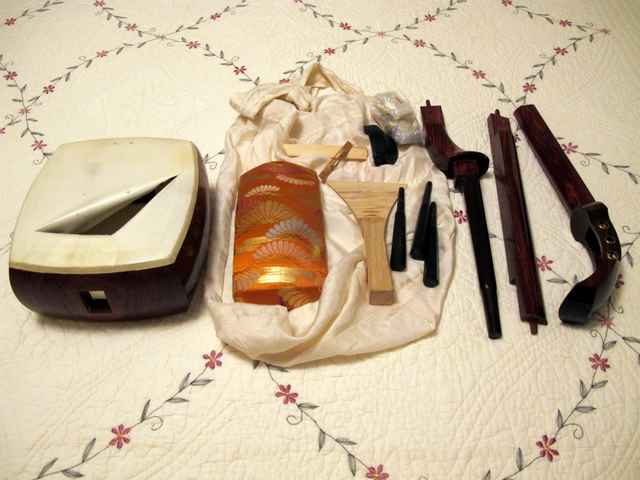
This shamisen is well made with body and neck of rosewood, and ebony tuning pegs. It disassembles for carry in the traditional manner and everything fits together nicely. The joinery appears to be machine made, possibly CNC. I believe the existing heads are the traditional cat skin (our cat said he is not volunteering, even if buttered
Thanks to YouTube I am familiar with the basic process of replacing the head: trim the skin, soak skin in water, put glue on the rim, and stretch the head over the rim using clamps and a stretching frame.
The glue that was used appears off white and is water soluble, at least a piece gets sticky if wet a bit. I was able to break off little pieces of the squeeze out much easier than would be possible with hide or fish glue.
I am considering using calf skin for the replacement as that seems to be easily available. Anyone have sources for other options? Recommendations?
I don't know what glue to use. Fish glue? Is there a glue made or rice?
Finally if anyone knows somebody experienced with these repairs that could do it quickly perhaps I could send it to them if the cost wasn't excessive.
Thanks folks, I appreciate any help I can get.
Here's a photo of shamisen as it goes into the 'gig' bag.
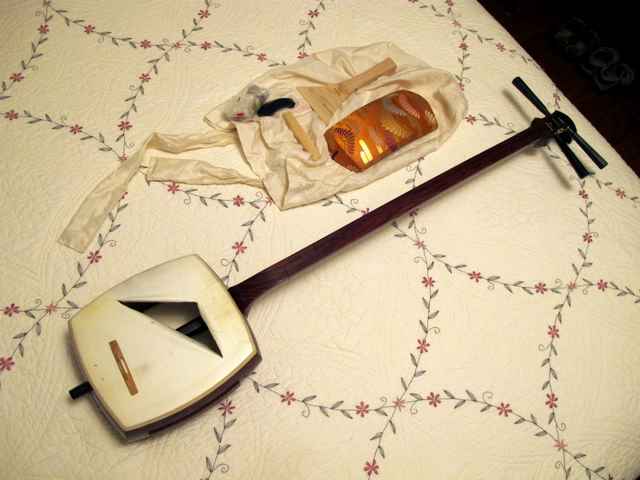
Assembled
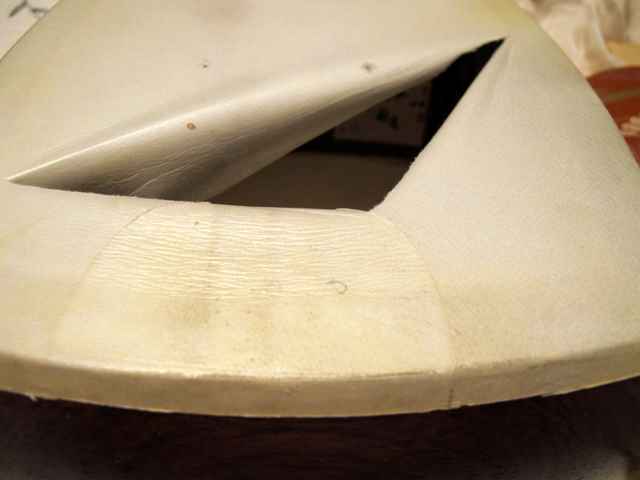
Closeup of the head. Not sure if that is a repair patch in the foreground or a patch put on for a wear point.
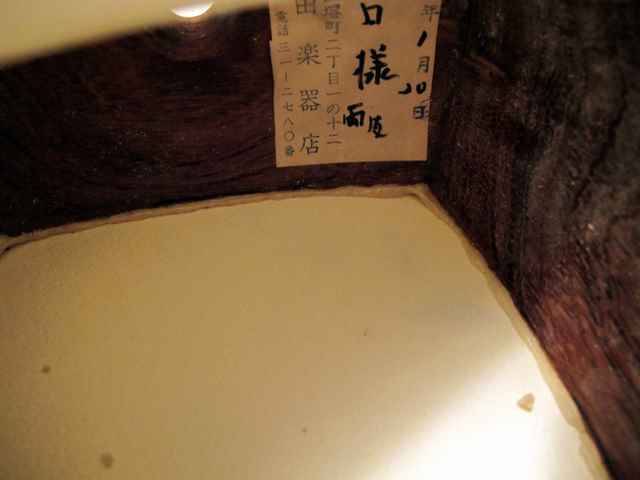
And last, an inside view.
In Sydney (where i live), there is a particular suburb where a Vietnamese community has developed over many years and they practice their culture with great diligence. Buskers can be seen on every corner playing Shamisens. It never ceases to amaze me how loud they are, and the wonderful tone produced. Anyway, I looked it up locally and this is what i came up with;
They use a dried hide "that looks like drawing paper" and is "moistened before stretching". Calf skin might be a bit thick. However, this link shows calf skin being used. http://www.youtube.com/watch?v=6IZC0bfaqKU
"They then scrape off the cuticle where the adhesive is to be applied."
Kneaded sticky rice powder is used to glue the hide to the body. Rice glue can be bought in an Oriental supermarket or you make it yourself.
It's used in Japanese paper crafts and the making of kanzashi (a Japanese craft which involves folding pieces of cloth into flower petals, arranging them and making them into ornate hair pieces).
The glue dries hard and almost transparent.
The Recipe
1 cup rice (preferably sticky rice like basmati or sushi rice)
3-4 cups water
{makes 2 cups of glue}
Steps
1. Combine all the ingredients in a saucepan and bring to the boil.
2 Lower the temperature and simmer for 45 minutes.
3 It now should look a bit like oatmeal. if it still looks rice, add more water and keep cooking.
4 When it looks like oatmeal, remove it from the heat and let it cool.
5 Put it through a sieve to remove the larger pieces, or put in a blender with more water if necessary.
6 Store in the refrigerator.
Hope this helps.
Barry - The YouTube video is the one I saw and that's about all I know about this process at the moment. Thanks very much for the rice glue recipe. I'll make some up tonight and test it.
Steven, You're welcome. I've never made the glue, so I'd be interested in your comments.
I'll post back. Life got in the way yesterday, I need to find some sticky rice. All we have in the cupboard is Minute Rice
No worries. Don't you hate it when your wife doesn't have the right stuff on hand?
Yeah, can't believe she doesn't keep my luthier supplies on hand, especially the ones I don't know I need yet
I got some information from another guy who is building a shamisen and he used Titebond on the head. I may try that, I'd rather use a glue I'm comfortable with. We'll see. I need to get the skin and test it.
Fair call. I was going to suggest something along those lines, but I thought you may be trying to do it the traditional way. Good luck.
This is a bit beyond my experience, but I wouldn't recommend the fish glue in this application. I use the stuff all the time, and I really like it, but it tends to get a bit gooey when it's not inside a joint. I've tried it for glue-saturated fabric patches, and it doesn't work very well for that. I do live in a relatively high humidity climate, so that probably accounts for my findings.
Incidentally, my wife says that she remembers her mom using sushi rice paste around the house.
Thanks Brad. I use fish glue a lot but didn't know if it would be suitable for this use. I've got several pieces of goatskin and calfskin on order so I will test them first. I still may mix up a batch of the rice glue (paste?) just to try it.
Just a followup - the shamisen is whole again. Gave it to the customer last night and strung it up. The thing is a little harder to play then I expected.
For the repair I made clamps and a work board similar to those seen on the youtube video referenced by Barry. I used a thin calfskin and TiteBond. Hardest part was building the clamps and workboard. Thanks for the help guys.
Steve, any pictures of the finished shamisen? I watched the videos and was so enamored of Kyle and his enthusiasm that I ordered a copy of his book, just because.
I also suggested he ought to check out MIMF!
Barry, thanks for posting the link and the rice glue recipe!
Neal - I just saw that this thread got resurrected. I'll see what I can do.
Steven, you might be interested in visiting the web site of Kyle Abbott who did the video. He is seriously passionate about the Shamisen. The book arrived yesterday, and it's pretty well done, nice detailed pictures, lots of info. Probably won't ever build an actual Shamisen, but I'm intrigued enough to consider building a Shami-ukulele based on the design.
An interesting website. I now know a lot more about the shamisen then I did a month ago
I found that a wet paper towel and a pallet knife were all that was needed to get the rice paste to loosen up enough to remove the skin.
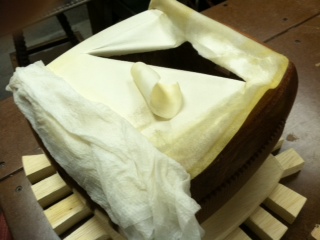
I used a thin calfskin, soaked in water and drained so it would stretch easy. The top of the shamisen box was coated with titebond original. The clamps use wedges to hold them shut, ropes are looped around the stretching frame and tightened. Small sticks are used to twist the ropes a turn witch further tightens the assembly. Finally more wedges are used between the stretching frame and the piece of wood the shamisen body is sitting on to make it even tighter. This is the traditional method of stretching the skin and it is surprising how tight it will get. I had to stop as a weak spot on the edge of the skin was starting to separate.

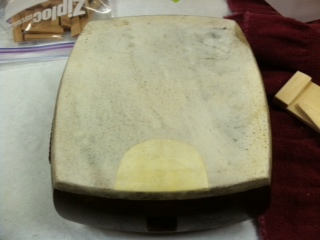
After the top was dry the overhanging edges were dampened and worked down onto the sides. Titebond was used here too. I made a little wooden tool out of spruce to work the hide. When it was finished I trimmed the hide with a razor blade and cleaned the glue residue off with a wet towel. Added the semicircular patch from the original. I suppose its a wear spot when the instrument is played. The dark patch on the upper right was to reinforce a weak area in the skin. I did not want it to self destruct before the performance! Fortunately everything held together and the thing even stayed in tune long enough to get through the part.
Steven, thanks for the follow-up and posting the pictures. I enjoyed this post and always enjoy posts about doing something different.
Wow, that is different! Cool.