Randy Roberts' 000 - 12 Cocobolo [Pictures] - created 04-10-2008
Roberts, Randy - 04/10/2008.11:57:40
May your life's music always come from your heart.
Boy are these some hard acts to follow, but I guess Ill join the parade so here goes.
After a small bunch of travel guitars and a couple reproductions of an 1840 kinda Size 1 Martin, I figured it was time to try my hand at a real grown-up guitar.
Variations from the usual are:
1. Very lightly radial X braced back
2. sound port
3. 3-ply solid linings (maple, Spanish cedar, Braz. Rosewood)
4. Fully adjustable / removable neck (modified from Mike Doolins design)
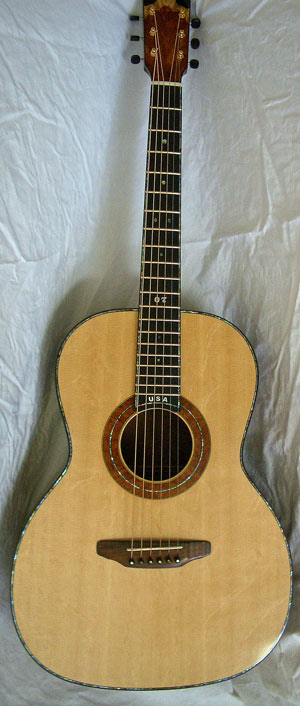
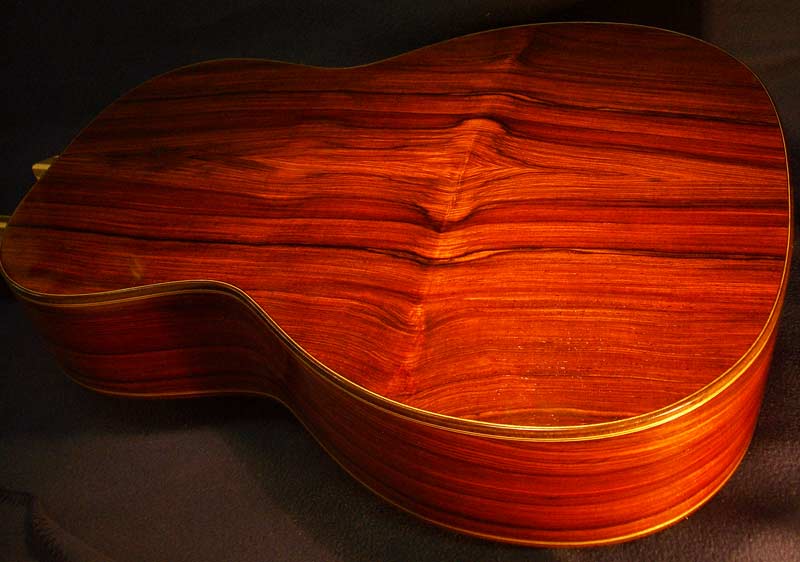
back/sides Cocobolo
top - Sitka Spruce
binding - Zircote
neck - walnut/pau amarillo/ maple laminate, CF reinforced, Hot Rod truss rod
bridge - Braz. Rosewood
fretboard - Gabon ebony
finish - French Polish
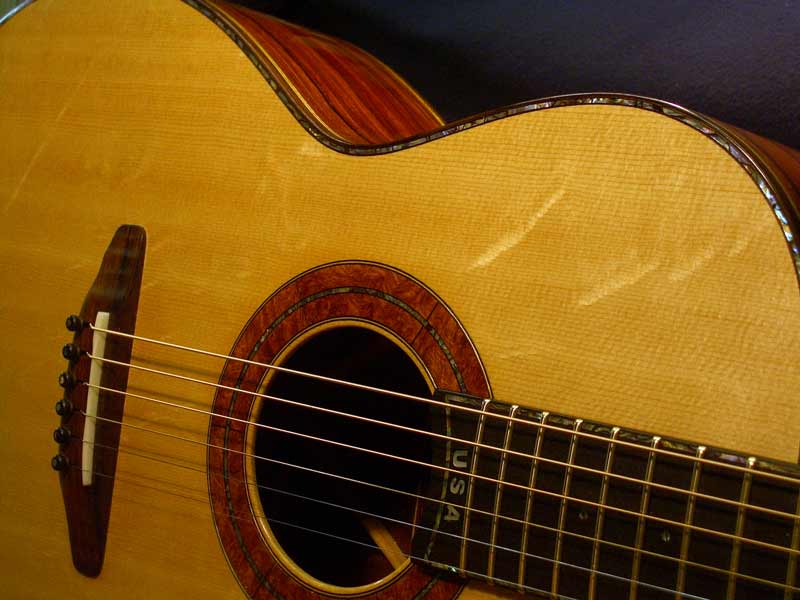
Back
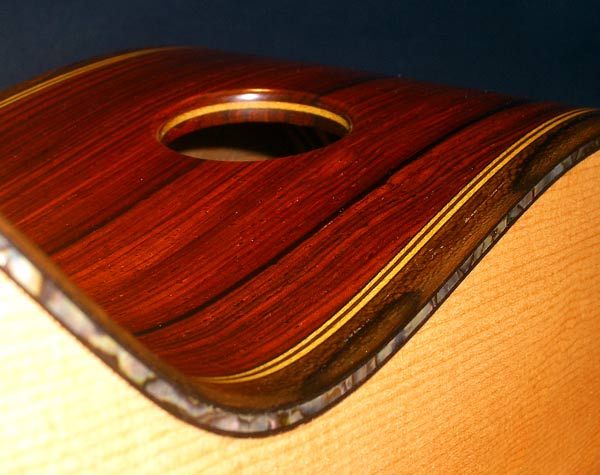
endgraft

soundport
rosette
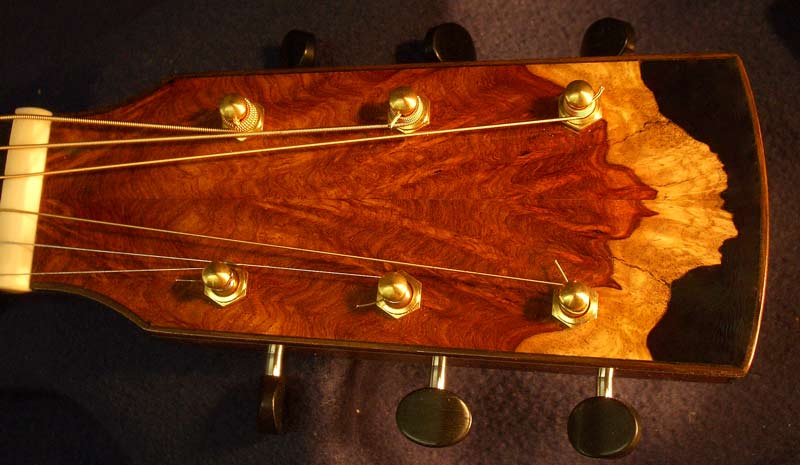
peghead - front
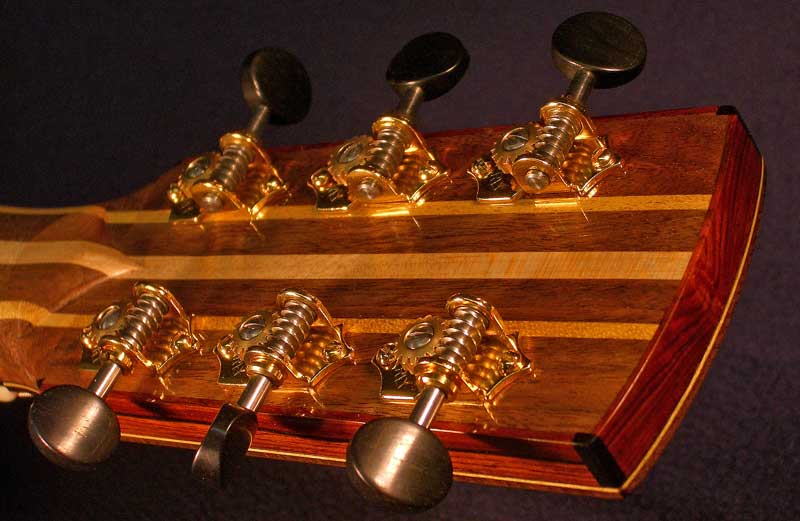
peghead back / volute
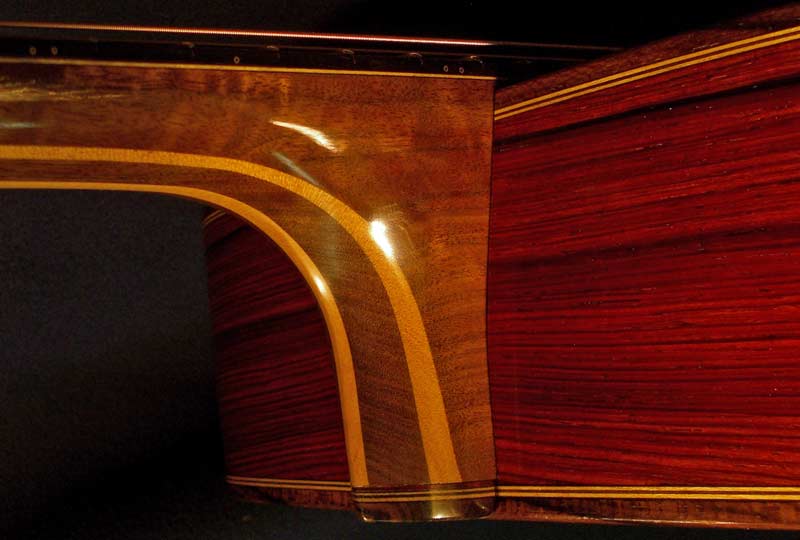
heel
Im really sold on the adjustable neck, even with the little bit of extra work it involves.
Being fully adjustable let the owner and I play around endlessly with different saddle heights, intonation changes for different types of strings, action heights, floating vs. attached fretboard extension, position of strings over the fretboard, etc.
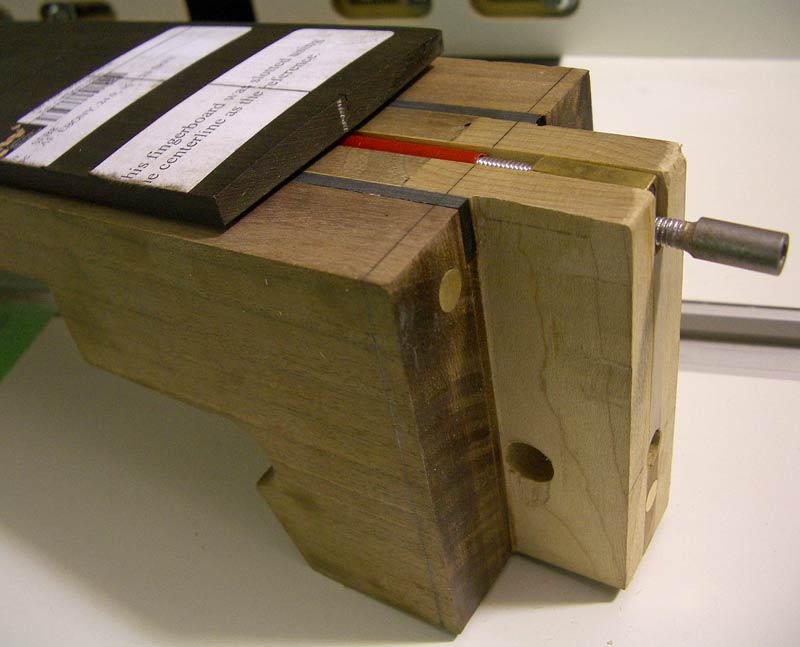
The neck comes off and back on again with no shift in the alignment, which also made French Polishing much easier.
You can play around with lots of options for as long as you want, and are free to easily change any of them down the road whenever you please.

Just beautiful. Is that red of the B/S the natural color or did you add a little something to the fp?
Yummy! And I *love* that stripe in the soundport!
Great Guitar!!
Excellent detail work, and nice overall design. I love it!
Super!! Now I have something to aspire to!!
Randy, how did you get those pictures of that size that meet the size requirements of the site? I.e., what reduction program or whatever it took?? Great pics.
Wow, nice!
Bill
The lighting, overhead flourescent and 2 of the cheap 500 watt halogen work lights, seemed to really agree with the colors of the wood.
Ernest:
I've been fed up with the lousy thumbnails I got from the cheapo software I've used before. I went out yesterday and bought Adobe Photoshop Elements 6. It's a stripped down version of Photoshop, but seems to have really good editing features. When you go to save the picture [File/Save forWeb] there's a window that pops up that lets you specify size (800x 600 pixels) and a little button that lets you specify file size(50 k) and it automatically optimizes the picture for that file size. Makes it super simple.
I think it was Bill McCrone that suggested that in the regular Photoshop he uses, and I bought the Elements 6 in hopes that it was in there also and it is.
It sure looks like a keeper to me. That Coco is beautiful. Fine looking craftsmanship.
Of all the very nice elements going on in this guitar (and who doesn't love a 000?), I especially live the headstock.
I really, really, like the headstock.
I do have to confess that I've never developed an affection for stripey necks, but I am willing to overlook my prejudice for it in this guitar!
Wow, so much candy for the eye! I'll second the little details like the port stripe. Funny nobody mentioned the headstock, though (wink)! Is that REALLY one piece of wood, or did you do some fancy grafting?
Any shots of the guts?
Very nice work, Randy.
Jason
Is that what you mean?
What guts do you want
That looks fine, Randy.
The adjustable neck is cool, but I would wonder why you went with only one bolt. Is the bolt captured inside the guitar or is it free? It looks like the neck will flop around when there are no strings on.
Mark,
I've done the 2 bolt adjustable and it convinced me it was redundant and just weakened the tenon (2 holes instead of 1).
The captive bolt has a wavy lock washer behind the head of the bolt that keeps the bolt head pressed firmly up against the neck side of the neckblock. No wobble at all. The 3 adjustment pivots control the lay of the neck in 3 dimensions. The captive bolt does not do any of the allignment with how I'm currently doing this, it just pulls the neck up snug to the neckblock. Nothing else.
I did have an unintentional "science experiment" with this. While playing with moving the neck closer and farther from the body (playing with the intonation), the sound went from pretty deep and rich to suddenly sounding like a 12 string banjo. Thought I had totally ruined the guitar somehow. Ended up that, as I brought the neck closer to the body, the tip of the captive bolt bottomed out in the hole for it in the neck and kept the adjustment set screws from contacting the brass inserts they rest against.
Sure gave me a real appreciation of how much of the sound of the guitar is coming from the neck through the neck block.
And this is why I am dying to make a coco guitar. Beautiful! Now to win the loto so I can afford a coco set!
Just had another look, and noticed the ebony corners on the headstock. Lovely! A very fine instrument!
Great detail Randy and yummy wood. Good bear-claw as well.
Fantastic build! Your attention to the small details is something to aspire to.
Wow. Really nice. I love the woods and the purfling running through the heel cap.
Hello Randy,
Very nice piece of work. Glad you reach the same kind of conclusion on adjustable necks as I did. One bolt is quite sufficient to provide all kinds of rigidity you want.
Wow, simply beautiful. You do some amazing work. I'm curious what affect the sound port has. Better projection?
Kull,
Think little "monitor" speaker for the player
Bravo Randy. Now the rest of us will have to post our pics with heads hung just a tad lower!
The coco is scrumptious!
The bound headstock with the burl just blows me away too.
You might have mentioned earlier. Is the red stripe in the purfling coco as well, or did you use something else there?
Henry,
Hi Randy,
Can you share us your knowledge of how did you do the purfling on the heel cap? did you bend the purfling on the corner of the heel?
Also - how did you do the stripe on the sound port.
Those "little" fine things, makes a guitar so unique.
Thanks
Yair
What everyone else already said. It's just downright pretty. Re: the sound port--how did you do it? Perhaps a layer of spruce and then another layer of cocobolo?
Yair,
I'm not, and had to glue up a stack from left over scraps. With the adjustable neck joint, I leave gluing on the heelcap until the very last, when I'm pretty sure of where the heel is going to lay in relation to the tilt of the neck. Then I can glue it on with very little space between the cap and the body. (you still want some space)
Patrick,
The sound port stripe was done by using a patch of the Pau Amarillo used for the purfling and also a patch of the Cocobolo. both pieces were bent, just like the sides, at the location on the bending form that the sound port would subsequently be. these bent patches were then glued onto the inside of the side, before the top and back were attached. Once the body was finished, I stuck it under the drill press and used a 1" Forstner drill bit.
That was probably the most difficult thing to do on the whole guitar - to actually get myself to ram a 1" bit into the side of a perfectly ok guitar. I had not done that before.
A real beauty! Excellent detail work.
Must be artifact from the lighting or something, the purfling is black/yellow/black/yellow/black
The side purfling in the picture of the sound port must have a brown in the center, which the reddish from the coco is accentuating?
Randy, just a couple of questions about the adjustable neck.
Is there a 3rd adjustment bolt at the bottom... can't see one in the pictures.
How did you go about cutting the recess in the body for the heel?
henry:
Dave:
Yes there is a third adjustment screw below the bolt. The recess for the heel was cut with a dremel.
See the tutorial about One Bolt Adjustable Neck Joint in this section and I think that will make this more clear
I had the opportunity to see this guitar in person last night. The pictures show some of it's beauty, but every detail is perfect. It really is nice, plays well, and sounds nice.
I handled it for about half an hour and (finally) glanced at the neck joint. It is invisible on this instrument. Of course, the detail and finish distract you from looking at anything else specific.
It is one of the nicest guitars I have ever seen or handled.
Wow! I'd like to see and play that great piece too. Alas I am far away. Considering Steve's remark about the invisibility of the neck joint, this is in perfect agreement with what Coco Chanel said in her definition of luxury "le luxe est ce qui ne se voit pas". The other school exists too, Stauffer (and the hundreth of followers who copied his solution) thought that if a bolt exists.. it should be seen. Interesting debates among recent architects around this point, since the Bauhaus and the famous "less is more".. I do not want to open a debate about this, the more I get old the more I stay on the side of that kind of philosophical discussion.
Randy you really served well the cause of the adjustable neck designs. Thanks. We shall overco.. o.. ome.
Steve,
That's very kind of you. Plain brown bag, Knothole in large Oak tree behind third park bench, after 3:00 am, unmarked bills. Have I got it right?
I think the red envelope would be more appropriate in this case, since you've taught us something of value.
Being an "electric" guy, I don't often poke around the "acoustic" section and I missed this one altogether.
Randy, this is a beautiful guitar. There are so many wonderful design elements. It's a stunning piece of work.