Pinless bridge pros and cons? [Pictures] - created 11-05-2009
kuun, murray - 11/05/2009.08:15:54
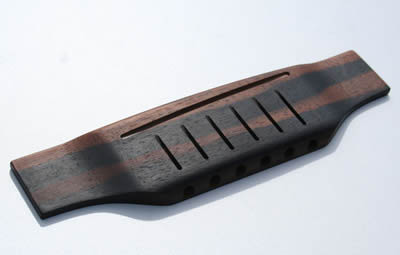
I'm making my first steel string guitar and starting to consider what type of bridge to make. I only know the normal pin-type bridge but, although I have only seen photo's, I rather like the look of a pinless bridge.
What are the pro's and con's of the pinless compared to the conventional type? And, is one type more likely to better sounding than the other?
Where can I find more info/plans on exactly how to make a pinless bridge?
You might want to take a look at Mike Doolin's website and see if his bridges are what you're after.
I definitely like the aesthetic of pinless bridges but, in general, what can be the pitfalls of these pinless types? And how difficult are the to make without CNC?
A pinned bridge is a system that works with the bridgeplate to completely lock everything together. The string ball sits tight on the bridgeplate, and a well fitted pin locks it there. This creates a mechanically anchored string, putting less strain on the bridge glue joint, and can allow a smaller bridge footprint. A pinless bridge relies 100% on its glue joint.
Another negative to pinless bridges is that you're likely to develop scratches in the guitar top behind the bridge when changing strings, and for sure when a string breaks and the ball goes shooting out of the bridge, you end up with a little skid mark.
Doolin's design gets around both of these issues to a certain degree, though.
You might want to check out the Lowden Guitars website.
It has some pictures on their process.
My pinless design (I doubt I'm the first to use that exact design, but I don't know the originator to cite a name) isn't much harder than a pinned bridge.
The only difference from making a normal bridge is setting up a little ramp with a 1/16" cutter to cut the string slots in the top and making a drilling jig to drill the holes in the back.
The Doolin style requires a jig to drill some angled holes, but it's also quite quick to make.
Either way, the 'pinless' parts of both designs take very little time to do compared to the 'carving a bridge' part once you've got a jig made.
Murray,
I use the pinless system 'a la Lowden. I glue them on with fresh hide glue, in the go bar deck for 12 hours then wait a total of 36hrs before stringing. I use freshly planed (hook turned razor blade) gluing surfaces and have no problems with them pulling off.
Mario makes an excellent point about tops getting scratched up; plus I like the idea of being able to remove the string from the bridge while leaving it on the tuner (probably because I spend way too much time tinkering and experimenting).
My vote goes to the Jeffrey Elliot design as demonstrated on Mike Doolin's site. As soon as I have the time I'll be re-tooling to make those instead...
Art, could you tell me more about gluing the bridge with go bars please? The cam clamps that I have are too deep for the way I've designed this particlular soundhole. I don't want to have to import 3 clamps for this one job. I had considered gluing on the bridge before I fit the back but that is risky with regards to exact saddle position.
I am not Art, but I place a small support under the bridge area, then use the go bar deck to hold the bridge down. (Hot hide glue.) Remove the support later through the sound hole.
Murray,
Pretty much what Steve said. I use two very small turnbuckles and a caul under the bridgeplate. My necks use a modified Doolin joint so I attach and roughly align the neck, locate the bridge then remove the neck and proceed. I use locator pins to keep it in place while putting on the go bars.
I'm currently out of town, but if you want, I can post some pics in a week or so.
Hi Murray,
I position the clamp and lower jaw extender thru the soundhole so the extender bears against the upper and lower braces and then position the other extender on the bridge and fingerboard, with the clamp in the middle. Tightening the clamp puts pressure on the bridge. I generally use 3 clamps with extenders for a bridge. It is not the most elegant solution, but it works.
Hi Murray,
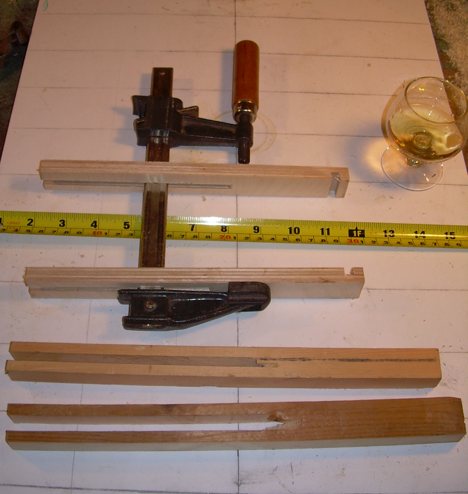
and here is a mock up of the extenders in use. The little dado in the end just happened to already be in the scrap I used, but isn't necessary. The upper extender reaches from the bridge to the fretboard (or to a caul placed to keep from dinging the soundboard). The lower extender rests against the braces above and below the soundhole. I usually place three clamps with extenders through the soundhole for clamping the bridge. The jaw extenders can be used in other clamping situations also.

The way that the bridge is not directly supported by the lower extender bothers the engineer in me.
I had the same reaction as Barry.
Of course with the appropriate bridge pad caul, then you could keep it all symmetric.
Those are neat Clay and I'm sure one could find other uses for these extenders. I'd use a caul at the end to support the bottom of the bridge though.
I suppose one could crank down on the clamp and distort the top if one had a mind to, but with normal clamping pressure and a little common sense it works fine. With non scalloped bracing the lower extender can be placed on the part of the X brace that is under the bridge.
I'm sure the design could be improved by adding a piece to the jaw of the lower extender that would allow it to clear the bracing and rest on the bridge plate.This would only take a few more minutes to fabricate. But they do seem to work O.K. as is.