
Our members post many pictures of their own gorgeous and amazing guitar rosettes [Pictures] - created 02-12-2008
Bieber, Alain - 02/12/2008.12:57:41
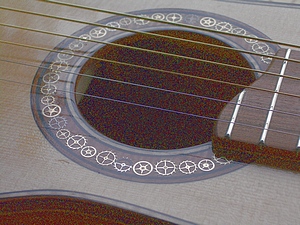
I am sometimes tempted by different styles for classical rosettes. I give an example of what I have done recently, just to start discussion if somebody interested. The rosette is made as a simple ring of tagua nut with a thin BWB purfling. The purpose is to have a look less typical of a country or a period. Any other idea?
It is a classical size guitar in Rio rosewood with a koa binding. Model closely related to Bouchet. Head with simple inexpensive black Rubners.

Hi Alain,
I've thought it daunting but intriguing to design my own rosette from logs. The pre-sized wood is readily available. Years ago I seem to recall there was a link here for an program that let you view your design as you worked it out. But that link was broken last time I tried it. Anyone know of a similar program? I've tooled around with microsoft paint since it is free. Zooming in to 8x lets you build 'logs' of any color combination but copying and pasting repeats of the design is the only way to visualize what it will look like.
Of course there is graph paper.
Hi Alain, did you read Bogdanovich' book on making guitars? I really like his style of doing rosettes. Take a look and tell me what you think. Enrico
Thanks,
Bill, by "log" do you mean bigger pieces of wood but same technique as traditional?
Hi Alain, I like the fact that you have done something different. I'm bored with (most) classical rosettes. It is one of the areas that one could use a bit of artistic licence on a classical guitar.
I'm not sure that mine should call this a rosette or not - someone called it a necklace:-) It is also "art deco" as opposed to "classical" - in keeping with overall theme of this guitar.
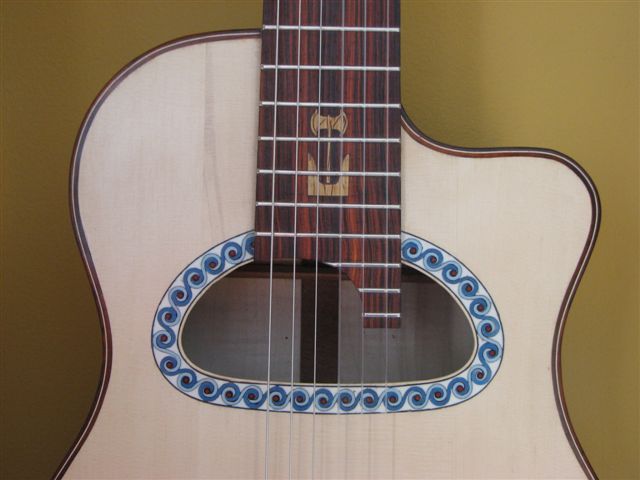
This is my #2 nylon string top, German spruce with the "rosette" inlay in wild olive. The binding is also wild olive with a thin b/w/b violin-type purfling. #3 is the same except I'm using a WRC top.
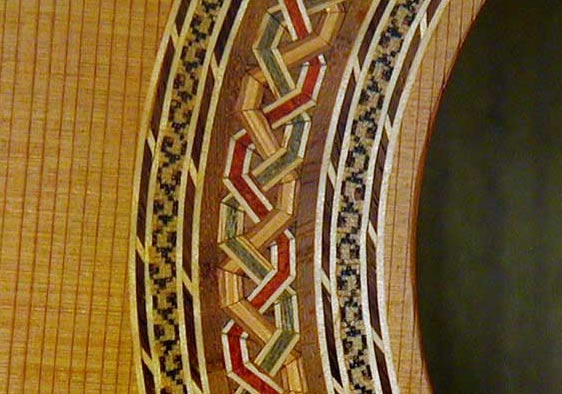
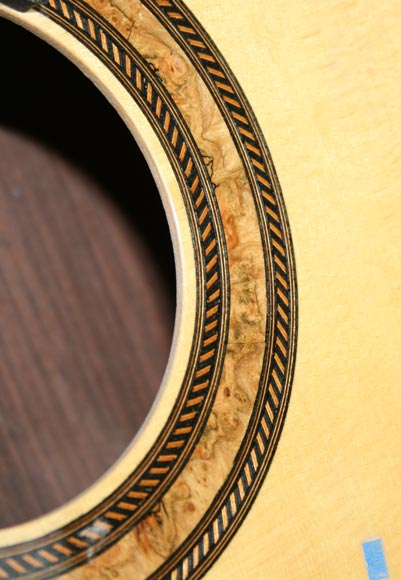
I like working with natural hardwood tiles, rings, and herringbone. I often do them off the cuff. I've routed a few out and started over, no problem if the soundhole is not cut out. Finding which natural hardwoods work best has been a journey.If I do involve mosaic, I keep it simple and use side grain. Here is my most recent, which involves bloodwood, holly, satinwood, and koa.
Here is one of my carved diamond rosette. It disappeared at a distance because of its lack of contrast.
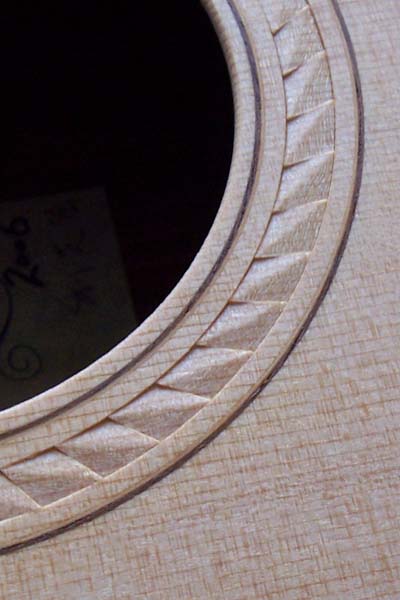
Now that one's cool! Clean, subtle, and interesting.
I like it too.
Have you considered using a little colored shellac? It would fill the deeper areas more, perhaps giving a very subtle shading.
If I had your skills, I would steal that idea.
Chih-Wei,
Your free to steal the idea, it's at least 400 years old. Nicely executed though.
Hi Alain, by log I just meant the regular colored rosette sticks about 1 mm square that suppliers like LMI carry for the traditional method. A unique personal design could be very interesting with all the colors that are available these days. I was wondering if the creative design of these has been computerized beyond graph paper.
Bill,
I have seen nice spalted (?) maple ones at Milburn guitars. Another idea.
Alain, It's not nearly as difficult as you thought. Denser soundboard materials such as sitka or douglas fir are much easier to carve than the lighter cedar. This was just my sencond(my last also) attempt.
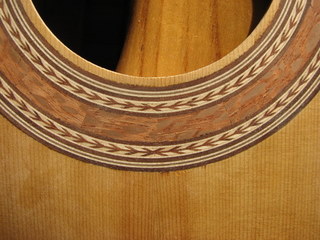
Steve, This pic was took while it's in the white. I think it is probably better to use darker and wider rings.
I've replaced the top of a cheap guitar and carved double-spiral pattern as a rosette on it. It's so ugly that it makes people laugh.
Gentlemen, Chih-Wei Liu's photo reminds me that at one time I was thinking of a "rosette" where the pattern was cut right trough the top. That is, a simple pattern cut around the soundhole, not as intricate as those found on the "soundhole covers" of some old lutes. In my case, possibly a similar art deco design that I have used, except that there is no inlay material.
I realize that one would have to account for the additional airhole space and that the area would have to be reinforced (maybe with some resinated fabric. Has anyone seen this done?
Ovation?
Isn't that why they call them rosettes?
Edit: check out some of these lute roses.
http://www.lutesandguitars.co.uk/
Here's one that I've got on the current build. Center tiles are the same as the body wood. I wanted to try something a little more traditional this time, last two were anything but...
Douglas,
Bill
I think lute makers frequently call their soundholes "roses".I wonder what country used the word "rosette" first for guitars ring shaped decoration. Not French (rosace), not Spanish (adorno de boca), maybe English, German? Italian? or others??
yes the central part would be the rose, but in the dictionary the suffix -ette apparently comes from middle English around 1790 derived from the French, meaning a smaller something, dinette, majorette, etc. So a rosette would be a small rose. A rose is not only a flower but also has many other meanings, such as the central spout of a watering can, a design coming from a common center, a circular architectural element, a decoration surrounding a doorknob, etc.
Murray's idea sounds like those wooden covers that fit in sound holes.... Google "lutehole"
Those look cool. Alan would be all day calculating the change in Helmholtz after one of those is installed!
Bill,
For lutes and baroque guitars, it is a fact that the carved wood or parchment cover called the "rose" changes the sound (slightly). Maybe somebody knows for modern guitars. A few of them have lute-like roses. I never experimented with that..
I would not shout inside a lute, the thing might explode.
From what I can tell, a carved or parchement rose doesn't change the pitch of the air resonance much, it just adds a lot of drag that cuts down on the Q value and power.
I've been making rosettes of mostly side grain pieces for several years. I've made up jigs to produce a braid pattern, and mostly play around with colors and backgrounds.
One thing I did find out was that, although the side grain stuff is actually trickier to get right than the usual end-grain-with-sticks rosettes, the players aren't nearly as impressed. They like the idea that there are 10,000 little tiny pieces in the rosette, so I've been incorporating some of the end-grain stuff of late.
This is one I did a couple of years ago in a cedar top. The braid is bloodwood/maple, blue mahu/satinwood, and 'burning bush'/cherry in a side grain walnut field. The little curlyques are maple, mahu and cherry sticks, .35mm square. The diagonal 'ladder' is maple and Indian rosewood.
Alan Carruth / Luthier
Here's a simpler, but very effective, rosette made by one of my students. I think the 'folded ribbon' on this one was walnut/mahogany, in an ebony background. With the side grain reflectivity and the small difference in color between the two woods it looks quite three dimensional, and it's easy to make with simple plane jigs or on a miniature table saw.
Alan Carruth / Luthier

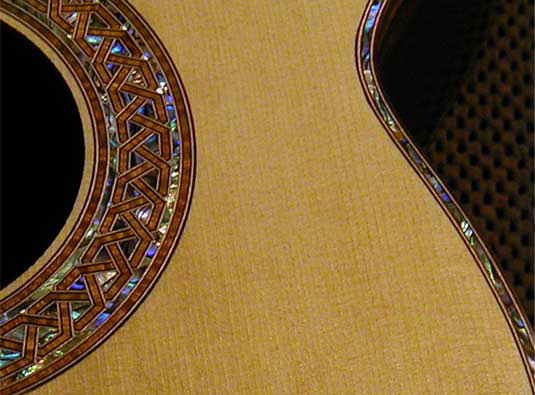
This wouldn't look appropriate on a classical, but I can't resist. This is a larger braid, in koa with B/W edges, and a background of paua shell. It takes a few days to get all the little pieces of shell cut and in, but the effect is really cool.
Alan Carruth / Luthier
WOW! Al, that is beautiful.
I'm slinking away, shaking my head......
YoW!
That last one is amazing!
They all are...
Congratulations Alan. You say it took for you a few days to make that? It will take a few weeks for me to understand how you did that? Wonderful.
All very nice!!
Alan, I've always been impressed by your rosettes!
I shake my head in wonder at the opinion of players who are more impressed by the sheer number of mosaic pieces in a rosette than the artistry. Its actually pretty easy to make the tiles with lots of end grain pieces compared to something like what you're offering.
Gorgious doesn't come close to describing the rosettes posted above. I hope this doesn't land me in the virtual dog house, but I think the program Bill Leirer was referring to can be found at:
http://gicl.cs.drexel.edu/people/sevy/luthierie/software/software.html
Links to Jon's site are fine, just remember that your anti-virus program should ALWAYS be up-to-date before you download or install any compressed or executable file.
Thats it!! Thanks I thought that link was dead for some reason.
Alan, those rosette's are beautiful. Did you achieve the side grain by using glued up veneers rather than logs? I guess Hauser was known for his side grain rosette's so you are in good company.
Bill Leirer asked:
"Did you achieve the side grain by using glued up veneers rather than logs?"
I made logs out of glued up veneers.... ;o)
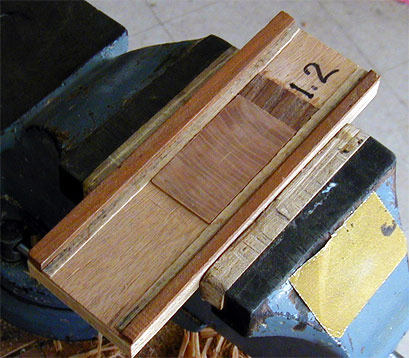
Back in '96 (iirc) I did a 'plate tuning' workshop in Palo Alto, under the aegis of the Northern California Associated Luthiers. I had been wanting to make that braid for a long time, and couldn't figure out a good way to make the parts quickly and repeatably, but that weekend Brian Burns showed me a way, without realizing it. He used a plane jig to thin bone saddles, and I adapted the setup to making braid parts.
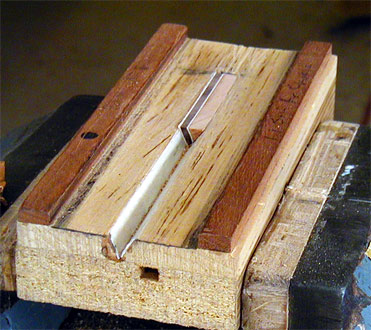
Take a piece of wood and glue a couple of little rails on it, just far enough apart that your plane can run between them. After a few strokes the plane will stop cutting, as it will be riding on the sides of the sole outside of the mouth. If there is a pocket in the wooden base you can put something in it, and when the plane stops cutting the part will be very accurately sized. By making a series of these jigs you can cut parts of the sizes and shapes you need. You can, of course, shape parts, glue them together, and then re-shape the resulting assembly. The trick, if there is one, is figuring out a good sequence for making the parts you need. After that it's a matter of making accurate drawings and assembling the proper jigs.
The three-part braid I use requires 15 or 16 jigs for making the pieces. I end up with four logs for each repeat of the pattern; two roughly triangular ones that have the inside and outside lines, plus part of the background, and the two diagonals that join them. I like to make three of each log, so that if there's any inaccuracy in one it can be compensated for (one hopes) by countervailing inaccuracies in the others. The logs are sliced up in little purpose-built miter boxes, and I put the parts in a small box that has been divided into twelve compartments.
I like to assemble the rosette in the top. I glue in the veneer rings, and then the cross banded background that is on either side of the actual braid. I use a HDPE ring as a place holder for the braid itself, just the way you use no-stick strips for shell edging. Once the rings are dry I glue in the braid parts using HHG. This allows for a little working time to get things in tightly, and does not require clamping.
It's amazing to me how precise this whole thing can be, using only hand tools and wooden jigs. The first time I inlaid one of the 1/2" wide braids (like the one with the paua background) I found I was acummulating some errors. I ended up having to trim some of the parts to make them fit. On later reflection I realized that my plexi 'place holder' had made a little too narrow, and I put a single layer of cellophane tape around the outside edge of it. That was perfect. It took me a little while to figure out why I made that mistake: I had forgotten to allow for the width of the glue lines, which are about .002" (.05mm) each. It wouldn't matter, of course, if these were the usual trapezoidal logs, but in this case, where things overlap, it makes a difference.
One of my students, BTW, liked the idea, and used the same technique to make a 'Greek key' pattern, which took 20 jigs. I'm thinking of making another dozen jigs which will allow me to turn the braid into an interlacement that returns on itself.
The little maple leaf inlays I used on my 'Autumn' guitar were made the same way, but are much smaller; about 3.5mm square, with 20 pieces per tile. The smallest element in a tile is .7mm square, and has the side grain running diagonally across it. That's about as small as I think I can make them using this method. I think I made 17 logs to get the 1000 or so leaves for that guitar, and it took 90 hours. That was nuts....
Alan Carruth / Luthier
Here is another simple side grain classical rosette I made with Al Carruth's plane jig method. Its walnut, mahogany, and cedro for the "cubes" in an endgrain bloodwood field with curly koa in the outer bands. The reflective side grain gives it a real 3D appearance.

Nice work Scott. Are you going to show us more?
Alan, the plane jig you're describing (riding between rails, with a trough scraped out) is like a mini surface planer, right? How do you hold the pieces in there? With a teeny-tiny bench dog? (Would that be called a Miniature Bench Chihua... ah forget it...)
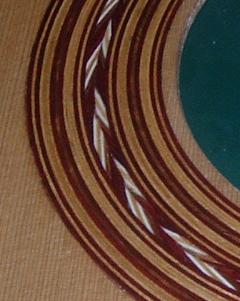
Alain, I finally took this picture of the zebra wood simple rosette I made for the second tenor uke I made. Not fancy, but with a face plate of zebra wood and the bridge of ZW, it worked out real well, but simple.
I've made segemented rosettes like that too and I find it makes a whole lot of difference in the look when you have the grain direction running toward the center as you do here. It looks good!
Ernest,
Very nice Alain.
Here is a rosette on a early romantic guitar. I purchased the guitar on Ebay. The original was from about 1850, and probably of German origin.

Alan
That is incredibly beautiful. I can't imagine how you got the uniformity to the pearl portions.
Alain and Steve,
Very nice work, both. Is that pearl set in "mastic" like the old guys did, and where do you come up with "Mastic" if that's what it is? In the old instruments I've seen the mastic drys out, cracks and the pearl is eventually lost. Not good. I'm sure you guys already know that, but I'm just wondering how you did that.
Also not appropriate for classical, but there's also the option of the "odd" approach.
this was for a stressed out writer who used playing as his escape from stress, so I used mostly escapement gears from old watches. He liked the visual pun.
I realize some believe I could have made the Ries replica(!). NO, NO, fellows.. my Maestro and friend Thomas did that, and I just bought the object. Easy.
I do not think that he uses the old "mastic" recipe but I will ask him. The shell little pieces are made one by one....(sigh).
This guitar is the most advanced example of Viennese sophistication I know of. Even more refined shape than a Stauffer or a C.F. Martin. Those guys represented, my taste of course, the apex of guitar building. Something like the Cremona school for violins. You can build different objects but not better ones.
Randy, this watch gears inclusion is a really nice idea, why not on a classical. I might steal that.. with your permission of course.
I like Randy's guitar also.
Ernest--This is the original guitar, and the pearl is set in mastic. None of the pearl was missing, but the mastic had shrunk back. I simply used shellac and "pore filled" the area. It filled fairly well. The pearl is quite eye catching, so you don't notice the small cracks in the mastic.
When I do a similar pearl in black background, I line the edges with black fiber, place the pearl in position, and use a little cyanoacrylate to hold them in the spot I want, and then flood the field with epoxy with a little black pigment in the epoxy. You have to fight bubbles, and I always seem to have a few spots that need filled. I still need to figure how to deal with this better.
The black fiber gives a sharp edge. If you just fill with black epoxy, it sometimes moves into the endgrain and gives an irregular outline. If you use epoxy with black stain, the stain leaches into the wood some.
Steve Senesy wrote:
"If you use epoxy with black stain, the stain leaches into the wood some. "
I had epoxy leach dye out of some black dyed wood into a lovely white top once when doing a 'dot and diamond' rosette. A real drag.
I'll be making some rosettes in the next week or so, and will try to get some good pics of the jigs. My camera is only a 1.3 megapixel job, so it's tough to get good shots of small stuff!
Alan Carruth / Luthier
I've posted this one before, with the completion of the guitar, but it seems appropriate to show it in this discussion.
Its all cast epoxy. First, I made up a master of the scroll pattern, then pressed it into fresh clay, about 60 times, then poured in pigmented epoxy. When the epoxy cured, I pried off the excess clay, then placed the pieces into water to dissolve the remainder off of the epoxy pieces. I chose the best pieces, fit them into the rosette channel, pinned them in place, and secured them with CA glue, the flooded the spaces with pigmented epoxy. I plan on revisiting this motif.
Alan,
kary
How do you tint your epoxy? Dyes?
That rose with the watch-gears is cool!
The rose and neck of my guitar of last year:
Ankh signs and scarabs. Inspired by the Egypt-o-mania of the '20-'30.
Jamie, regular resin colouring agents...available wherever fine composite materials are sold.
Forget the rosette, Jan that is a great headstock!
Alain, I think anything on this forum kind of assumes the right to steal away. Make the trough deeper than the gears. Set them in place, spot glue with CA. Flood the rest of the trough with CA, small amounts at a time until it well covers the gears. This will give you a glass like surface in the end if you sand it through the entire range of grits with Micro Mesh, and protects the metal from being exposed so it doesn't oxidize with time. Also did one with a cheap quality gold necklace.
Another option to an epoxy mastic is to use ebony sawdust. Pack it in well and then flood the sawdust with CA using relatively small amounts of CA at a time. It results in a solid ebony looking backround.
Remember to coat the trough with shellac first so the Ca doesn't wick into the pores of the top and stain the top itself. And make the ebony dust with a file rather than sandpaper so you don't have random white spects of grit in with the ebony dust. You also want to have a coat of shellac on the top's surface first so ebony dust doesn't get into the top wood. Use a scraper to level the "mastic" portion and it minimizes black dust getting elsewhere like it can with sanding.
Randy,
What magnificent rosettes everyone!
Chih-Wei. Where are yours? You should show them again.
Remember to coat the trough with shellac first so the Ca doesn't wick into the pores of the top and stain the top itself...
And I will add to Randy's warning you should not go whole hog with the shellac on the first pass like I did. I used it too wet and had the shellac soak through and stain. Go lightly on the first pass young men and women!
Randy,
On your gears guitar, if I understand right you routed out a fairly wide trough that you placed the gears in? The gears are not inlaid in the sense that you routed out a cavity for each gear the same shape as the gear?
If so, what "surrounds" the gears. Are they floating in a pool of clear CA, like being caught in amber?
Randolph:
The CA will look all bumpy and cracked, but the new thin CA you add just wicks into any irregularities of the hardened CA, and once the whole mess is higher than the surrounding wood surface, it scrapes/ sands down to glass smooth.
I've also used this method for any paua or pearl purfling I've done. It lets you polish the actual surface of the pearl to a mirror finish before you place it in the trough, and as long as the pearl's surface is a little lower than the surrounding wood, you don't end up scratching the pearl surface when you finsh sand the top. The CA above the pearl sands more the same as the surrounding wood than the pearl could and so you avoid a "bump" where harder pearl might stick up above the surrounding wood after sanding. It also gives a little bit of a three dimensional effect because the pearl surface is lower than the surrounding wood. The CA above the pearl kind of looks invisible because your eye is drawn to the pearl not the clear above it.
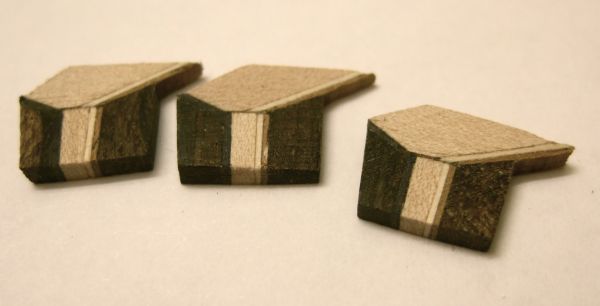
I like using the side grain also. Here is a maple and ziricote endless martini rosette.

I reallly like that Ken!
Very neat, Ken! There are so many possibilities with side grain rosettes that I think you could spend years on them.
Alan Carruth / Luthier
OK, so I got some pics of the plane jigs. Maybe they should go under tools? I'll post them here, and let Deb figure it out.
Here's a simple one for making a piece of wood a uniform thickness; in this case, 1.2mm. I'm using it to take down an end grain piece of cherry for the cross banded background of a rosette.
Alan Carruth / Luthier
Here's the first jig used in the process of making the outer, roughly triangular, log for the braid. It just takes one side off to the proper angle.
Alan Carruth / Luthier
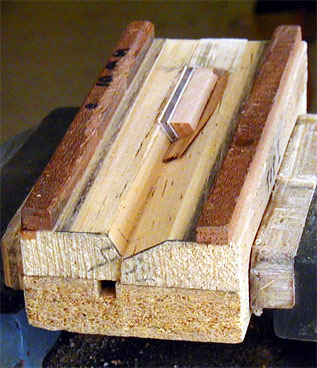
Here's the next one, to take the other side off. Two of these get glued together, and then planed down further inother jigs to finish the outer log. The inner log is similar, but with different sizes and angles so that they wil fit together to make a circle. There are also two more or less parallelogram arms that join the triangles together, and each of those takes two jigs.
Alan Carruth / Luthier
Wow, these rosettes are all remarkable and show a wide spectrum of approaches from minimal to very detailed. The next time I think that there are too many constraints for a little creativity, I will return to the article. I think it is interesting that the article starts with Alain's very elegant and minimal use of tagua nut and progesses to include implementations like Alan's eye popping technical tour de force. I think the creativity displayed here is an argument for multi-soundholed instruments!
Well, I thought I'd add 2 to the the list, although I don't think the level of creativity matches what has already been posted. I will try harder. (Yes, yoda, there is no try...)
This first one is in the current instrument I am finishing up. I have about 2-3 more days of French polish, so despite the poor quality of the photo, I don't want to handle the instrument much right now to get a better photo. Anyhow, the customer is originally from Colima, Mexico and wanted a pre-Columbian theme from her part of the world. So we have some Aztec animal symbols and coloration based on a lot of pottery I looked at. The woods are ebony and amboyna burl.
EDIT: I looked at this article a while ago when Alan's braid+shell was at the end. My apologies if any of the creators of the excellent rosettes following Alan's work saw my statement that the article ended with Alan's photo. My mind still suffers Windows from being programmer years many ago. :)

The second is something I believe I have posted before and is an example of a continuous pattern spalted interior. This kind of rosette seems to have moved from "alternate classical" to almost standard, at least here in the northwest.
The poor instrument containing this rosette is a current research project, so the rosette is in a poor state, hence the partial shot.
The spalted area consists of 4 sections of spalted material joined in spots that are chosen to hide the joint. The top joint is pretty easy to pick out, but the other two are a little more difficult. In real life, the joints do not catch the eye.
Oh, I have noticed that although I stabilized the spalted material with CA glue, the colors have muted over the years and the color borders are less definitive. I think the instrument is about 6 years old. I like the current coloration, but it is not as sharp as when I first created it.
Tom-Nice work. I love the Aztec touch.
Tom and Ken, those are great rosettes!
Ken, did you make up a log(s) like Alan does, or did you piece it together in place (in situ). I'm just amazed at the quality of work. Beautiful.
Wow... I'd like another .....endless....martini ......please.
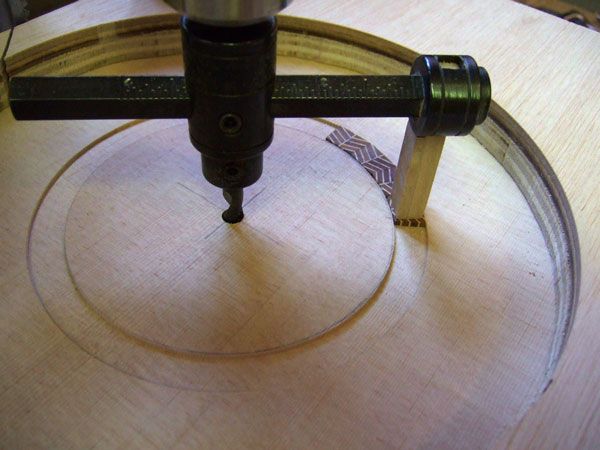
Henry, I make up the logs first like Alan, but now I'll be using his jigs to make them more accurate. I slice them on my bandsaw and build them in the top. I use a flycutter to clean up the inside and outside arcs. Then I install the purfling lines and soundhole binding.
Very nice, Tom, both of them in their own way.
Thanks, Alan, for sharing those jigs.
Thanks for the kind words, folks.
Jan, did you make the anhks using the Spanish method or some other way? I have been wracking my brain for ways to deal with concave lines and wonder if you are doing something I am not familiar with.
Ken, your endless martini looks spot on, both in visual appeal and the technical spacing. Do you have a feel for the amount of error in tile size that your method requires?
Thanks, Tom. Since these are steelstring rosettes they are only 3/8 inch wide and I don't have too much trouble with the amount of error that wider rosettes might have. But I still have to fit each one a little it seems. I also number them as they are sliced so that they might have smaller irregularities. I can have some slop on the inside and outside arcs since those get trimmed anyway. Unlike Alan's, each tile is only one piece and that might make it easier. I don't see how Alan gets all his different pieces to fit so well.
Thanks, Ken. Your tiles are similar to what Alan appears to be making. I never considered a polygon tile before this thread appeared. It opens up a lot of possibilities. Now if I could just remember which drawer I put that bottle of skill juice in...
I spent the last week-end in Roma. In Sta Maria de Trastevere the pavement was an inspiration for rosettes. An example on the photo. The whole church is paved like that, at least a dozen different designs.
Those guys are something.
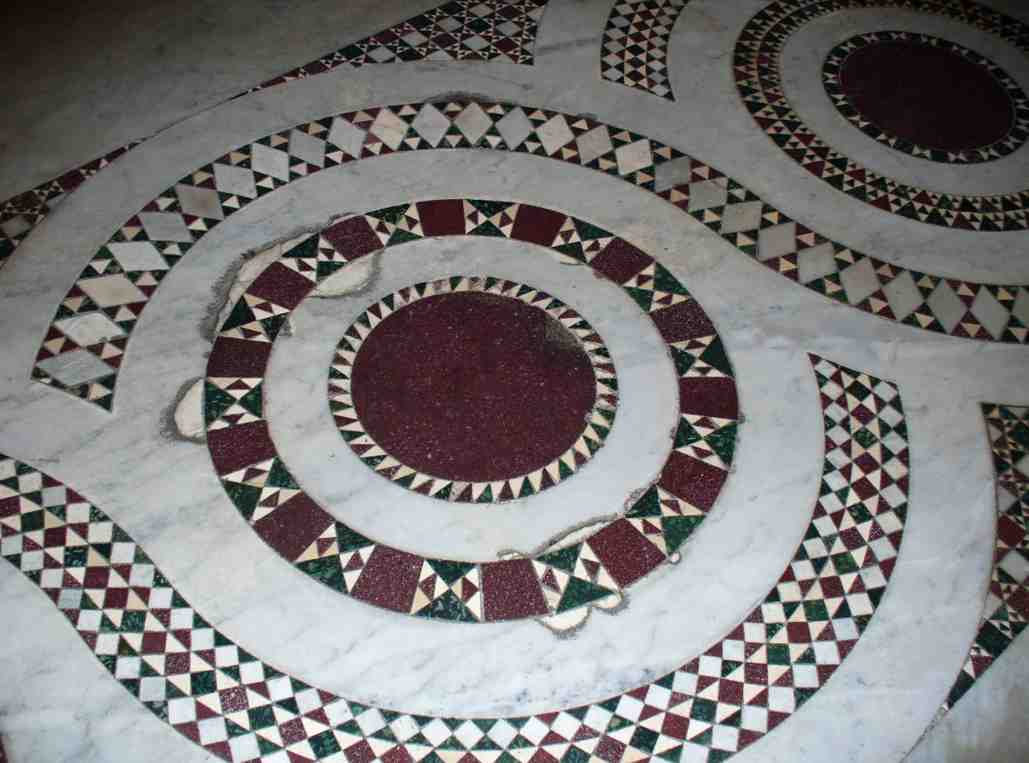
Well...stone is SO much easier to work than wood! Especially without power tools...
If we were voting on "best discussions", this would be top of my list for a long time.
Ditto what Steve said. My last classical was my first with my own rosette. Rather simple, but it sure felt good designing and executing my own creation.
BTW, very nice article in a GAL from about a year ago by Greg Byers on this topic.
Another nod to Eugene Clark in an AL article explaining his rosette making process: from rosette aesthetics, to dimensioning and dying the strips, to assembling the "log"...
I'm attempting my first rosette now, and it's taking as much time as all the other preceding steps. Of course, I had to do it all the hard way (from raw shell), but some of ideas in this thread about jigging up the process has already sped up a couple steps.
Any thread over 80 posts is usually worth your time. Cool stuff, folks!
Just want to say that I am totally impressed with the amount of creativity and hiiiiigh class workmanship that you all have showed here. Impressed and inspired!!!
I'm not sure if I posted this a while back but I haven't gotten my head around Alan's Jigs (but Scott sure has) and wanted to do a braid, so I figured out a way to do it by lanimating veneers to produce a side grain 'macaroni-like' pattern that interlocks into a braid. Here is my first attempt inlaid in a redwood top. Got somemore tweaking to go. As always, thanks to Alan for the inspiration - his rosettes are truly remarkable!
This i sthe best thread i evasaw!
Yea I know, I've been wanting to get in on it too, but I only make the regular old non innovative classical rosettes. Talk about feeling inadequate.
I'd still like to see some of yours.
John, that's still awesome! I've been wanting to try something like that for years! I even have drawings, really.
I suppose Deb will close this exchange someday. I did not expect such a flow when I started this thread. First of all, thanks a lot to all of you. Now, I have more ideas than possibilities to realize them.
It seems that many of us are really trying to insert a bit of identity in a rather standardized object. I mean the classical guitar. This has always been the case I guess. Just limited for professionals by costs considerations. I recall Romanillos says (somewhere, cannot recall) that he was speechless when one of his student asked him "Why do you care so much for rosettes? I can't get that." I think I recall he just uttered .."But..why not?"
Last question of mine, in (acute) summary: What is for you the most appealing " historical master example" for a rosette 1/ in the classical Spanish technique? 2/ in other techniques?
Deb, If you think it can be of interest,and necessary, could you open a new thread?
The central motif that seems to be so often repeated is the basic cross or 'plus sign' and all the variations of that. It has a certain simple appeal. I think Torres incorporated that one and then those that copied from him incorporated variation into their work. Hauser used it and that made it popular for builders wanting to make 'the guitar of the epoch'