Methods for making rosettes from plain or highly figured/spalted woods; construction techniques and the use of multiple fitted or bookmatched pieces, or one solid piece [Pictures] - created 02-02-2004
Bui, Tu - 02/02/2004.22:01:14
Hello everyone,
I would like to make a rosette for a classical guitar out of spalted maple. Please advise.
Thanks
Tu
I've done it, but it's tough to do. I just routed the "ring", and then sliced it off on the bandsaw. Took an 8' long board to yield one rosette.....
I also route the ring and slice off thin rosettes(not yet with spalted but other materials). I use the same laminate trimmer setup that cuts my rossette channels and sound holes. Once you get a nice tall (1/2") ring carved out, you can make enough rosette slices for several guitars. Consider bending and gluing some darker woods around the inside and outside of the ring before slicing. Sort of like a binding or purfling. It creates some good contrast to set the lighter maple apart from the top wood. The attached wood also strengthens the rosette slices so that I don't bust em apart before I get them inlaid. Send in a pic when you're done.
I've made one from a 3/4 x 3/4 strip a friend gave me. The ring was made from keystone shaped sliced off with a bandsaw. The point being, you don't need a lot of spalted wood to make one if you can get a pattern in a small piece.
I am curious as to why you first route the ring, then cut it on the band saw.
What is the advantage? Do you mean that you are cutting keystones then assembling them into a circle?
I have made wooden rosette rings in the past by first thinning the stock to the desired height on a drum sander then cutting the rosettes with a circle cutter.
I do it with a dremel on a trammel, just like I cut the channel in the spruce top.
Stacking keystone shapes together is a cool idea. I bet it makes for some interesting symmetrical patterns especially if you can book match the pieces in a few different directions. Save those scraps, you never know...
A taller ring will yield more than one rosette slice. I got three rosettes for a little more effort than making one. I also had a thick hunk of interesting wood to work with so what the heck. The other reason I do it this way is that I don't yet have a thickness sander to work with to start with thin pieces. It's just easier for me to sand one side flat before I make a cut. I just scrape the other side flush after it's glued into the channel.
Has anyone used a lam trimmer or dremmel to cut non-circular rosettes and sound holes (ellipses, ovals, stars)? I've seen em but don't know how it's done. Templates, jigs, ancient family secrets?
"Do you mean that you are cutting keystones then assembling them into a circle?"
Yes, I book matched and edge glued them with CA. I think you could just glue them in the rosette channel, too. My advantage is that I don't have a big chunk of spalted wood to work with and the piece looked like it would make and interesting pattern. There are many ways to skin a cat. :o)
I glued up wedge shaped walnut and then routed this rosette. Didn't have to make angles perfect, as the gap is hidden by the fretboard, but they gotta be close.

I just put a solid ebony rosette in a classical top. I used an Ebony peghead veneer & cut four (across the grain) sections that were then trimmed to fit together as "tiles". (I used my homemade "micro-adjustable" circle cutting router jig to cut the inside & outside radii of the tiles.) The "V" effect at the joints is pretty cool, even if it is subtle. With spalted or highly figured wood this would look VERY cool! To cut the ends of the tiles for a good fit, I routed a circular channel in a piece of MDF, just a hair wider than the rosette channel. Then I scribed a line across the circle through the exact centre. Then used a razor saw to cut the scribed line down below the bottom of the channel & hey presto... you've got a jig to cut the ends of the tiles for a perfect fit. You can make as many or a few tiles as you want... the angle is always the same. The only reason I made tiles was I didn't have a piece of Ebony big enough for a one piece rosette. To make a one piece, I stick the wood to a scrap with carpet tape & use the circle cutter to zing out a ring... Fast & easy, but take care when you pry the ring up & remove the two sided tape... those little guys are fragile.
Take a look at the wood rosette designs on some production Taylors (steel strings), I think their 5 series. You save lot's of wood that way. They are sort of an elongated parallelograms (spelling?) not really interlocked but.. lol just look at the pictures. I think Dejonge also does a nice rosette, but I think he cuts them from a 1/2 sized block, and make them symetrical. check the web for a picture, there are quiet a few.
I have several ideas actually. If the paterns are symetrical enough, you maybe able to put purfling in between to get a bigger effect.
Either way, cutting a full out rosette from a piece is quite wasteful, try cutting 1/4's from a thicker block and fit them together, if you are doing classical you dont' even need that much, remember that you dont need your special wood for the area covered by the fingerboard.
If you're doing spalted maple, as is the case here, then you don't want to "fit together" a bunch of smaller pieces. The spalting is very random, and needs to be in one piece to look right.
And the reason for routing thick stock, then slicing, is because of both the need for one continuous ring, and because if you first thinned it, then tried routing it(I tried....), I promise it will disintegrate. Spalting heavy enough to be nice in a rosette means the piece will be weak, almost rotten.
For those of you who cut the tiles. Do you generally align the grain in the wood to point toward the center of the sound hole, or do other orientations?
I was thinking you might be able to construct some interesting visual effects simply by monkeying with the orientation of the grain.
That's for you to decide, whatever you want it to look like!
I use spalted maple pieces to help establish a more regular pattern. I've found that I can cut out pieces that fit together quickly by using a sheet of clear acetate sheet that I scribe the inner and outer arcs of the spalted maple circle that I want to make, then drill a quarter inch hole at the center. I pin this to my workboard with a 1/4" steel dowel, then locate my sheet of spalted maple veneer such that the design elements I want to use are within the two arcs.
To mark the section for cutting, I pierce each arc line with an exacto blade and rotate teh acetate sheet over the veneer. I then cut the arc of maple out with a jeweler's saw.
As Mario states, you have to be careful with this stuff. I've found that thin CA glue or thin epoxy (System 3 bar top) helps stabilize and make it more uniform for cutting. Be careful with the CA! A broad area of coverage produces a very caustic white smoke. I've used stuff that was like styrofoam and had no problems after reinforcing it.
I use two ways to disguise edges between the pieces. One is to follow a dark line in the spalting, then do the same cut on the neighboring piece. You have to have dark lines to pull this off.
For less definitive color borders, I cut a super clean scarf joint for each piece, glue them together, add the rosette to the top, surface the top, then start working on the seams. To disguise a seam (this works best on wood with a lot of coloration going on) gouge out a small indentation over it with a large radius (shallow curve) relieve carving chisel. Find an area on a piece of scrap that pretty much follows the patterns around the seam. Using the same angle and same tool, gouge out a flake of wood. Glue this flake over the seam with CA glue, let dry, and sand flat. You can continue this until the seam is to your liking. I leave this step until I am ready to finish the guitar.
I use a template to make the scarf joint with. I route a channel in UHMW plastic for the maple pieces to sit in after they are radiused. I cut through the channel with an angled cut using a very fine tooth thin bladed back saw. To make the cut, drop a piece in, align it with respect to where you want the cut to go and cut. Then put the neighbor in on the other side of the cut and make that cut. Oh, I also build the maple circle in this channel, gluing with CA. The plastic provides enough flexibility that you can work the completed circle out. I use a 1/16 inch brass rod pounded flat to work underneath the circle to assist lifting. You have to be a little careful.
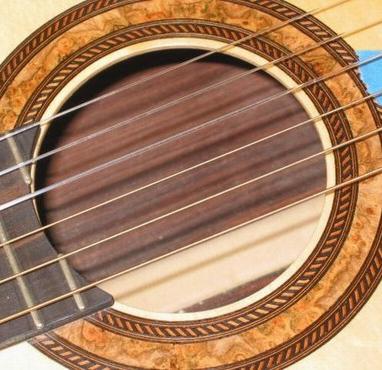
Here is a pic of the definitive line matching, showing the kind of material this works well with. I could have done better, but the rosette seems to hold up to inspection pretty well. This is an 8 piece center section. You will be able to pick out the seams, some of them easily. You will probably also pick out one in the upper right that is not a seam even though it looks like one! These are the kind of lines that make matching easy.

One more quick one to show the kind of material that works well for the second technique I described. Of course after double posting, this may be my last post ever! There are 7 pieces in this rosette.
I bow towards the south... Well done! I would have never thought of using the ink black lines to join two seperate pieces. Perfectly disguised!
!!
Tom, good stuff. Does that acetate sheet have to be stiff enough not to distort when it is being spun around the steel dowel?
Your rosettes have a deceptively simple beauty, like all good art!
Thanks Mario. I wish they were perfect. Be careful with that bowing though. Just yesterday, I was bowing to the north after visiting your website and seeing what a wonderful business you've created up there. We might accidentally bump heads with all this bowing! If you ever get tired of the view and want to trade my widowless basement for it, just say the word :).
Thanks, Henry. The acetate is the thickest I could get at the art supply store. Its a little thicker than a business card. Thicker is probably better, but it does not take much. The sheet holds the blade pretty well, and you don't want a lot of it sticking through. The 1/4 inch rod that the sheet rotates around can take a bit of an outward pressure as you scribe the arc in the wood. If the setup wobbles, the hole in the workboard needs to be bigger. The scribed line can be filled with chalk dust for better visibility. Something I picked up from Larry Robinson's inlay book.
If you ever get tired of the view and want to trade my widowless
Tired of the view? Umm, no, I don't think that'll happen soon
Thanks for the good words! Mind if I use your idea and run with it?
Here's and idea that's worked well, if you would like to completely build a complex rosette prior to installing it into the top. It lets you take all the time you want, play around with arrangement and alter design, replace broken pieces, etc.,
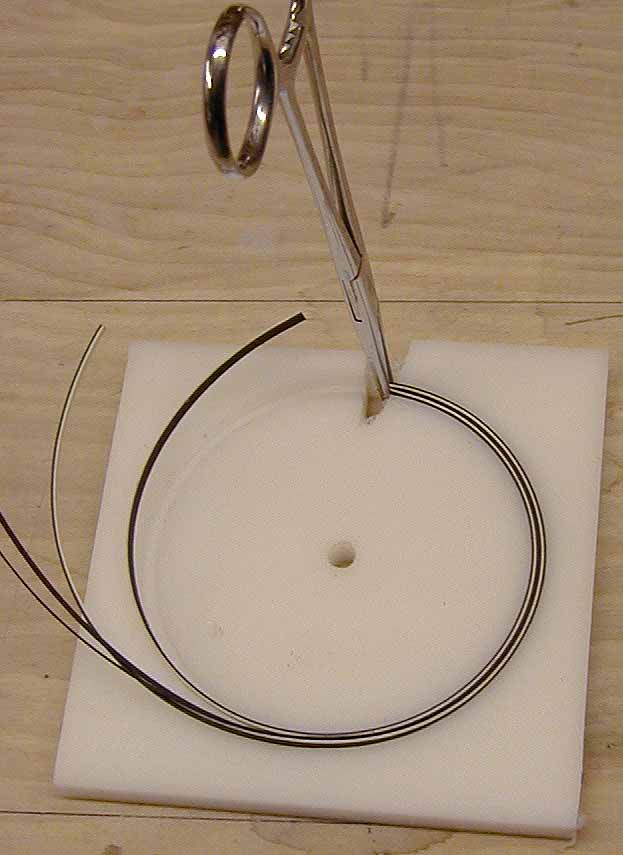
When you cut the rossette's channel in the top, cut the same channel in a piece of polyethylene (the white kitchen cutting boards) at the same time. Then use the cutting board's channel as a mold to assemble your rosette. Once you have assembled it, just flood the whole channel with CA. The CA won't bond to the cutting board material, and the entire rosette will easily lift out of the channel by sliding a screwdriver or other wedge under it. (A wedge cut out of the mold facilitates both assembly of the rosette, and lifting it out of the mold.)
CAUTION: ALWAYS go buy your own polyethylene. DO NOT, UNDER ANY CIRCUMSTANCES reach for the one that's always sitting there on the kitchen counter if you know whats good for you.
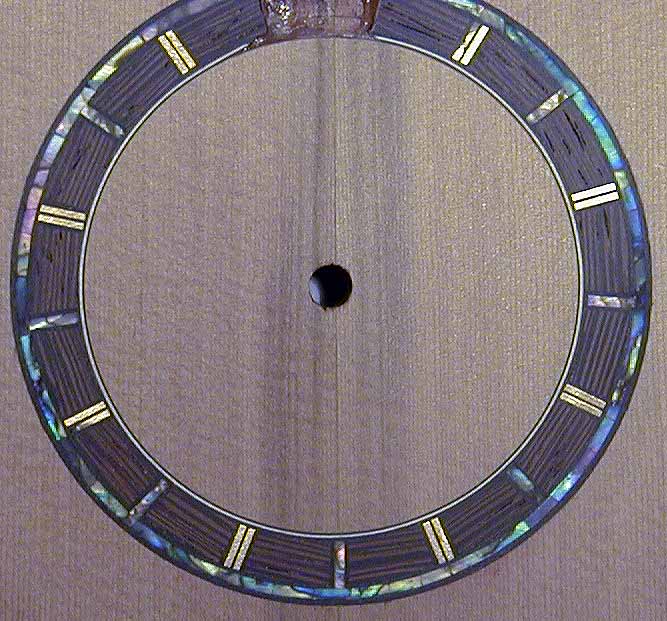
Here's an example of a more complex rosette made with the polyethylene mold method. It made the assembly of a lot of very small pieces easy. The entire rosette was then lifted and set into the top with a perfect fit, as both the top channel and the mold channels were cut at the same time.
Tom, in your last picture, is the herringbone that lines the rosette hand made or a commercial product? I ask because I may be interested in incorporating something similar in my rosettes.
Man, I love this place! I've been struggling with some particulary stubborn Padauk lately. Randy, the "mold" idea will work wonderfully for this. I'm going out right now and make one. (Not with my wife's cutting board though) Thanks. Paul
Paul, if you are going to use padauk or really ny wood that has color that can leach out into the spruce, be careful about that! The first time I put shellac over padauk binding it bled all over the maple and spruce I was working with. If you spray some sealer on it first you'll probably be fine, and test some scrap to see this bleeding effect.
I have used corian for the rosette mold, but the cutting board looks like a good choice of materials.
Mark, I found that out the hard way. Now I've just been wiping the strips with a 2lb cut, let it dry and hit it again. No color comes off the second time so it must be sealing it well. Thanks for the heads up. Paul
Mario - I don't think there is anything more beautiful than winter sun playing across large expanses of snow. It never fails to lift my spirits. Please feel free to run with any ideas I post here.
Randy, hey, that looks like my template! I tried using the back side of the cutting board, but still got caught! I like the use of the scissor clamps. I'll have to get a pair. I've just been letting my ends splay, which bugs me. Oh well, gave me a chance to add some purfling to the doghouse. If I am experimenting with designs, I use three channels - one for the inner ring, e.g. herringbone, one for the central ring, e.g. spalted maple, and one for the outer ring. This allows me to assemble the whole thing and see if the entire design works before committing to it. It has saved me a couple of times when the design elements that looked okay individually competed like crazy when stuck together. Plaid and polkadots just don't go together in a rosette! Both of the rosettes I show here were built this way.
Randy, is that black palm in the center of your very beautiful rosette? I really like your use of different materials.
Roger, the herringbone was made by hand. I can't tell from your question if you have made your own, but it's not too bad to make and you should try it if you havn't already done so. I believe there are some articles in the library that show some techniques, and now that Randy has posted the channel idea, you have the perfect place to try it out.
Steve, the polyethelene helps with removal due to its flexibility and only moderate bonding power with CA glue. How does the corian work for you?
Corian works fine. The materials pop out with just a little pushing. I have used the PVA and hide glue, but not the CA or epoxy. Epoxy and CA would presumably stick to the Corian.
Ok, I'll be the first to admit that I'm easily amused. But Randy's idea for the rosette mold is about the best idea I've seen for a long time. I've really struggled with wood rosettes and this made it slicker than snot on a doorknob. I had some UHMW plastic (ultra high molecular weight) that I used for things like saw fences. Very slick and NOTHING sticks to it. Worked like a charm.It's nice to be able to really bear down and push the pieces in without having to worry about denting the top. Hey, sometimes the simple ideas are the good ones. Hat's off to you Randy! Paul
Randy, how do you shape all of your individual pieces to fit them into the mold?
I take a different approach. I draw the pattern out on a piece of cardboard, then tack the pieces onto the cardboard, face down, using CA glue. At this point the wood pieces are just shaped like trapezoids. Then I take a router and rout the inside and outside edges, turning it into a circle. Rout a cavity in the soundboard, glue in the rosette (with the cardboard still on it), then scrape of the cardboard. As long as the rosette stands just slightly proud of the soundboard it works like a charm.
Of course my method is no good for more complex rosettes, or where you want to have the purflings attached to the rosette before inlaying it. I like to put the purflings in last, as I can get a perfect fit by routing the cavity just a hair short, then compressing the purfling a bit so it slides in - the glue re-expands the purfling, filling any gaps and inperfections.
But, I do it this way mainly because I don't see an easy way to make each of my rosette pieces perfectly arced before gluing into a rosette.
Tom:
There is only one honorable thing for me to do. I hereby relenquish the title of "Snot on a Doorknob" to you. Now I know how those Miss America's feel.
The wood's name is on the tip of my tongue but I can't come up with it. There have been several posts on using it for sides and backs here, when it hits my brain cell I'll post it. Thanks though, i've been eyeing a piece of black palm every time i'v ebeen to the store, and couldn't find an excuse to buy it till now.
Roger:
for that one I cut rough chunks so their edges butted up to make a circle, gluing them to balsa wood (sands off fast later), and then cut the inner and outer rings all at once with the Dremel circle cutter like you do.
Some of the things i've found nice about the channel mold method are:
Cuts down on dinging up the guitar top while i screw around.
Once glued, it holds the rosette well for things like routering another channel for border strips or MOP, etc.
Thin strips like .010 maple don't break as much when you push them in, its so slick.
You can do your pore filling (like I forgot) and most sanding while it's in the mold, and avoid the problems of the spruce/ cedar top sanding away faster than the hard woods in the rosette (definitely a problem with some metals). If you sand down to the mold surface, you know you are going to be close to flush with the top when inserted because both channels are the same depth.
using the CA, the rosette doesn't seem to have any of the wood swelling problems when glued in the top. The CA seems to seal the wood well and keep the moisture from the Titebond from soaking in. I would think it would lessen the bleeding problems some woods can have as well.