Jeff Chumley's Fourth Guitar - Flying V for my son [Pictures] - created 07-06-2008
Chumley, Jeff - 07/06/2008.08:34:04
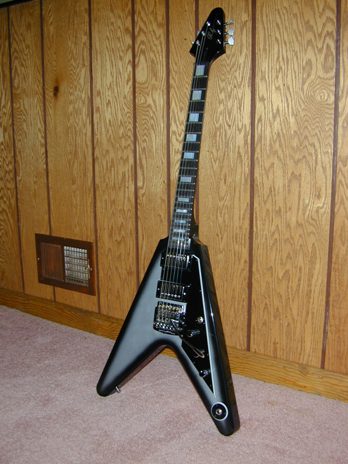
I wouldn't have chosen a flying v myself. I would rather be more original but my heavy metal son really wanted one so here it is. He also chose the paint scheme which caused me some headaches having never worked with metallic paint or an opaque burst. Turned out pretty well but the next one will be better.
It is all mahogany with a 24 fret ebony fingerboard. Pickups are Duncan Distortions. Kahler Trem. Sperzel locking tuners. The electronics are simple with no coil taps or phase options. I am having a bit of a grounding issue (posted in the electronics section) But I'm sure I will resolve it soon. I haven't covered the tension rod opening on the peghead. My son likes it that way. Go figure.
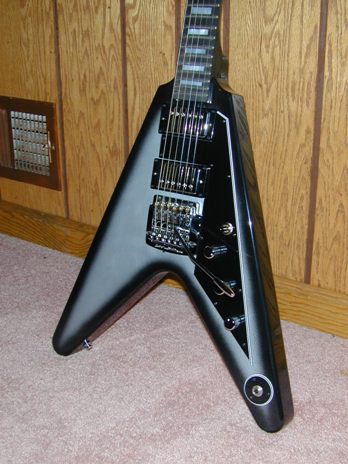
I hadn't made a pick guard before so that was fun. Using a BWBWB blank and an mdf template, after routing it looked like a herd of tiny zebras exploded in my shop. I'm still finding little black and white striped flakes.
I'm having trouble with the trem going out of tune but since I widened the string slots a bit and put some graphite in the slots it is much better.
I'm real happy with the way it plays. Very clear sound and easy to play. My son gives it a big thumbs up.
Now, my other son wants an explorer. Where is that other hunk of mahogany...
Jeff
Front
Body
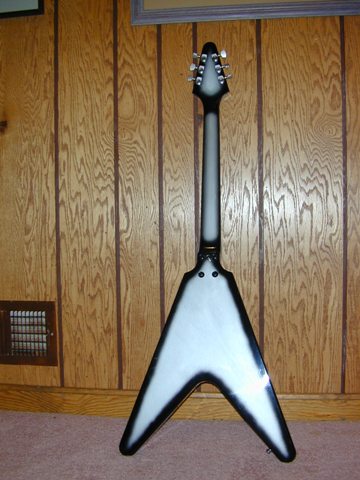
back
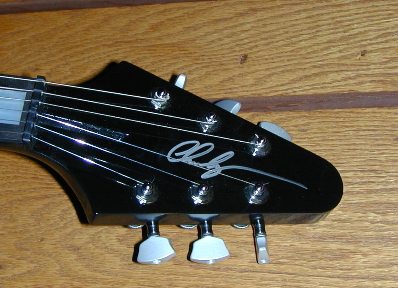
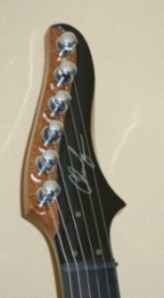
Peghead
Wow! Very Impressive. I like that you even got the silver burst on the neck and back of the peghead. I'm sure he'll be the envy of all his buddies. Nice job.
Very cool! I love the finish.
Great job, Jeff! I love the finish as well, and how the metallic color works well with the tuning knobs and the inlayed MOP fret markers. Is that headstock logo inlayed MOP also, or painted on? And nice job on the burst; I like how it's just on the periphery to act as an outline, most noticeably on the back.
Tanks Andy, Kieth and Justin
On the buddies, I just dropped him off at a band rehearsal so I'll soon find out. They will all be 9th graders in the fall and I think they are great. Listen here if you want:
http://home.comcast.net/~jchumley/Aftershock/aftershock.htm
On the finish design. I wish I could take credit but I pretty much copied the Gibson silverburst as closely as possible. I airbrushed the burst freehand. I had noticed the Gibsons look hand done. The lines are not perfectly straight. So when anyone notices mine aren't perfect, well, I meant to do that!
The signature on the peghead is silver sharpie. I think it looks great. I have used it on all my guitars. I wait until I have a perfectly smooth clearcoat sanded to 600 grit and I sign it. Then put on one or two more clear coats and sand and polish. I Don't know if it will hold up over time but so far so good for three years. Here is my usual peghead (which my picky son wouldn't let me use. Had to be like the real thing).
Jeff
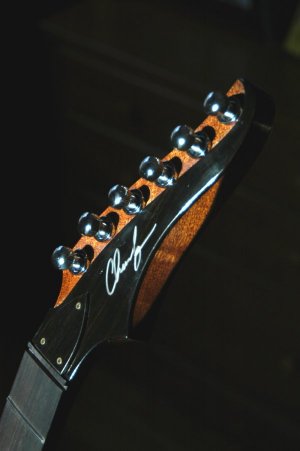
I like that head! What kind of tuners are those?
Steinbergers. I don't recommend them. They look cool but I put them on a guitar that I built for someone else and I ended up replaceing three of them because they either wouldn't hold or they would bind when tuning. I think the concept and design are good but the manufacturing tolerance just wasn't up to it.
I replaced them with Gotohs.
Looks good. Every collection needs at least 1 v.... and every large collection needs at least one double neck- Wait til one of your sons thinks up that idea! AHHHAHA.
I like your origional headstock. Good lines. Can we see another pic from another angle?
Here is another angle on the headstock. I don't really have a good shot of it.
heres another. It shows the angled cut better.

Jeff--You do nice work. I like your son's guitar, and the peghead you are showing is a great design.
Thanks Steve.
I hadn't built one for over a year but this one has me charged up again. I'm not much of a guitar player. I play old time banjo mostly but guitars really grab me.
Jeff
Nice V. You might want to add a string lock to keep it in tune when he uses the Kahler. Kahler makes two versions, the one with the cam locks is pretty nice.
Thanks Charlie. I actually have the Kahler string lock without the cams. It came with the trem. I'm looking at locking nuts just to be a neater install but I think I might go ahead and use the string lock. I heard from one knowledgeable source that the cam lock version doesn't work that well. I also tried last night and the fine tuners have plenty of range to go to drop d without having to loosen the nut lock.
Jeff
Is the tailpiece floating? Can you pull up and down on it? If so, doesn't the whole guitar go sharp when you do drop D? Mine always do.
Yes. It is the same as yours (on your rehabbed red guitar). Mine is the mass produced version but the design is the same and yes, when you reduce the tension on one string, especially the low E, all the others go sharp but thats life. He can always keep his Epi SG in one tuning an the V in the other and swap guitars if he can't get the hang of quick tuning. I don't think it will be a problem. He has a really good ear and tunes quicker than I do.
Very K.K.Downing... I love it. Very 80's. He needs some studded leathers now.
Jeff,
way to go Dad!
-Keith
Thanks Kieth,
I bought the MIMF plans too. I didn't use them much. Just to get the overall size of the body right. My first guitar was my own design. It looks cool but it is so ergonomically bad that it hangs on the wall and collects dust.
And now for the comedy bits.
I did at least two stupid things on this one. My son wanted a 24 fret neck and when I changed the design I wasn't careful enough and the end of the Kahler just overhung the radius at the base of the V. Dang. I couldn't just back the neck out an inch because I had already drilled it and there wouldn't be enough wood to support it anyway so I ended up routing out and inlaying a 3/4" x 3" piece of Mahogany into the back so it started about an inch from the base of the V and extended an inch or so from the body under the heel. patched the top and recut the neck pocket an inch further back. I was glad it was going to be an opaque finish! That added time and effort but you can't see it in the finished product.
The other stupid thing was worse. I fretted the neck after finishing and put dents on both sides in the transition area from neck to heel. I had the cradle a little too close to the heel. I haven't tried to fix it yet. I will try to steam them out (poke a few needle holes into the wood) but I want the finish to completely cure first.
In future, I think I will fret first and then finish.
I will try to steam them out (poke a few needle holes into the wood)
The needles shouldn't be necessary. Just a damp cloth and something small like the tip of a soldering iron.
What a nice Flying V, Jeff! I'm building the same, and it is also my fourth guitar. But I built my last guitar (Flying V too) 25 years ago when I was very young and unexperienced and it also, like your previous one didn't turn out quite well. So, after finding this site among many others (which I think is the best), I'm in the process of doing it all over again to great excitement of my son! So far I've made the neck and now I'm doing the body. How big is your neck pocket and did you bolt it on, because I can't see it properly on the picture? Will the screws hold Mahogany (although mine is all Sapele)? When I finish it some day I'll post the pictures here too!
Zakk
Thanks Zakk,
It is bolt on. You can see two of the screws on the back picture. The other two are black on black and don't show well.
Here is how I do the neck pocket. It is a bit hard to describe. I worked it out for myself and I am sure there are better ways but...
First, I shape the neck almost ready to finish. Down to about 220 or 320 grit paper. Make sure the sides of the neck at the heel are perpendicular to the bottom of the heel.
Then I clamp the neck to the top of the body in the correct position. I usually have the body at a similar point of completion but you could fit the neck to a body blank and shape the body later.
I then take strips of wood about 1 1/2" wide and a foot or more long tapered at the same angle I want the neck to be and use double sided tape to tape them to the top snugged up against the sides of the neck. Then take a block of wood that fits between the two strips and is slighlty shorter and tape it down snugged up against the end of the neck. Then pick up the neck and it leaves you with a routing template taped to the guitar. It is tapered so the bottom of the pocket will be at the correct angle.
Several issues:
1. I find that a piece of regular typing paper pinched between the sides of the neck and the two strips gives you just the right amount of play so that the finished neck and body will fit just right. Try it on test pieces to get the right number of paper sheets. I find that after the cut is made, if I can put the neck in and pull it back about 5/16" from the end without applying any real force it will be about right.
2. The little block against the neck has to be lower than the side rails so it won't interfere with the router. Also, its edge that contacts the neck should be angled the same number of degrees as the neck pocket. For me that is usually 1 1/2 or 2 degrees for the guitars I build. Depends on the type of bridge and how hich the fingerboard will be over the body.
3. Make sure you use really strong tape. I usually use the stuff Stewmac sells. This time I got some from an office supply place and it was really thin but if I layered it three or four times it was good.
I like this approach. A single pocket template wouldn't work as well because the necks are not all exactly the same. The neck on this flying v is wider than my other necks and since they are all hand made they vary a bit anyway. I have used it on all four of my guitars and they all have excellent neck to pocket fit. Just be real careful and make sure the tape bond is strong. The strips should be hard to pull off.
As for the strength. I use wood screws to attach the necks. One maple and three mahogany so far and no failures yet.
Jeff
Trem Intonation update:
I installed the string lock that came with the Kahler last night and now the intonation is much better. After playing a tune with much bombing and bending there is only a need to tweak one or two strings (usually the third). moderate whammying has no ill effect.
If I build another with a trem I am going to go with a string path that goes absolutely straight from nut to tuner and with only the bare minimum required break angle.
The 3rd is usually a problem. Try soldering the ball ends, as was suggested, and work on the nut a bit.
On my guitar rebuild, I went from 3x3 to 6 inline tuners, with straight string pull, with locking tuners. It stays in tune even when divebombing.
Yep. I noticed when I took off the strings to install the lock, the third string was still binding in the slot and then I forgot to widen it before restringing. Didn't want to admit it but you got me. I can't solder the ball ends on the strings that I have because they are color coded and seem to be either painted or have a plastic coating. I will have to get some new strings to try soldering.
edit: I may have misunderstood the soldering. I just looked up D'Addario trem strings and they seem to be talking about soldering the twist. I was thinking that you meant soldering the string and "ball".
Just the twist, that usually helps a little.
Jeff, thank you very much for your tips about making the neck pocket. I'm just about to do it soon and I'll certainly incorporate the way you 've suggested. I've read something similar about it before but your method is more hands-on approach. Much obliged!
Zakk
The retro vibe mixed with that elegant headstock really works well. Tasty stuff, Jeff.
Thanks Ellie.
Zakk. Make sure you try it out on scrap first! It can take several tests to get the correct thickness of paper shim and to make sure the tape is strong enough to hold the template. You don't want the template parts to move!
Jeff
I'm not a big fan of the V design but yours does look well executed. I do love your normal headstock though. Any shots of that design with standard tuners. I've also used the Steinbergers and found the quality to be questionable (and installation a hassle). I had to replace the first set I used.
Thanks Scott,
I don't have any pics with the mini tuners on it and I don't have one around here right now to photograph. Even though it is "My signature headstock", I've only built two with it so far. I'm starting two more now that I will post here in a few months. the straight through tuners do look better on it. But it still looks good with regular tuners.
Jeff