Jeff Brooks's neck reset of an old Stella Harmony 12-string [Pictures, Drawings] - created 01-04-2010
Brooks, Jeff - 01/04/2010.16:35:15
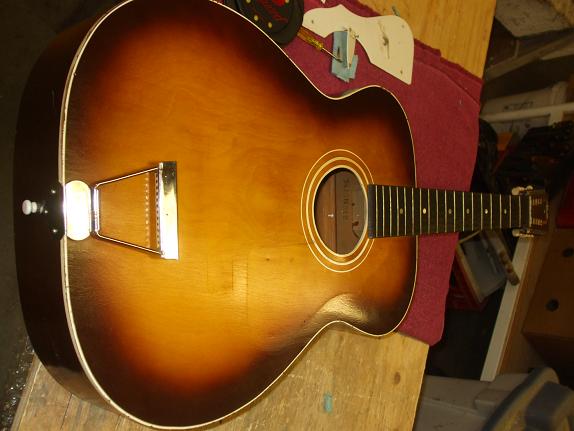
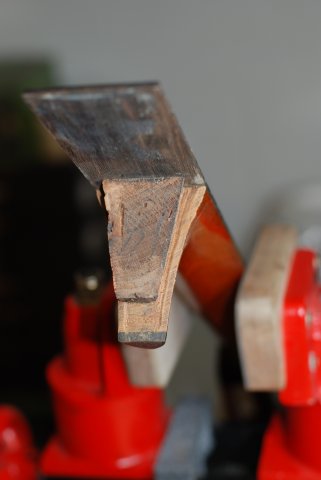
Hi, newbie here. I have this old guitar (about 1957?) and am wondering if it is worth attempting. The strings are too high from the fretboard and it is obvious that the body has been excessively humid at one point to where the string tension has warped the soundboard area,the damage occurring when it dried out, I suppose. Do y'all think it might be possible to jig it down and lightly steam the inner body then gently attempt to reshape it with clamps and braces? Or do you pull the neck first and then do a reset after attempting body repairs? I have an excellent skill set and decent tools but am not a luthier, not afraid to try though. I hope the image is decent but could e-mail additionals if interested. Any help appreciated, JB
I've repaired loads of old Harmonys and Stellas, including quite a few of these 12 strings. They are solid birch bodies, and while not a great guitar, they have charm all of their own, and are a good opportunity to learn some techniques without worrying about destroying a valuable instrument.
The 12s almost inevitably need a neck reset, and the original neck body angle was pretty inadequate in the first place, resulting in a very shallow break angle over the bridge, so re-setting the neck is a good opportunity to set things properly to rights so you can use a taller bridge to improve the break angle.
So, pull the neck first before dealing with the warped top, as it will allow you to properly get to grips with levelling out this part of the guitar. Be careful when free-ing up the end of the fretboard, as the tops are prone to splitting in this area - yours looks like it already has, so work carefully. That spilt will need cleating after it's all been levelled out.
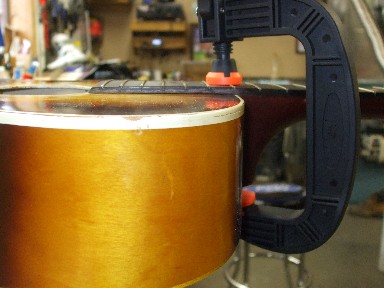
Check to see if the braces are tight to the top, or if they've been loosened by all that movement. If they are loose they'll need re-gluing, obviously. I deal with these warped tops by a bit of moisture applied to the inside using wadded-up damp kitchen paper, then clamping the top thru' the soundhole to get it all flat. You don't need to use any steam. I have a nice piece of really rigid phenolic board which I use to lay on the top and clamp to. Let it dry out for a few days before unclamping. You may need to repeat the process if it doesn't work first time, but reglueing loose braces and introducing some reinforcement around the soundhole may also help get the worst of the warp out. I then reinforce the area round the soundhole, with either some thin birch (salvaged from other old Stellas) and / or additional spruce braces, depending on how bad the warping is. You may also need to use some internal 'jacks' or wedged struts to help with the true-ing up process.
Once that's all done, you can re-set the neck: as I say, I like to give a pretty decent angle to ensure a good break over the bridge - this helps to stop the strings popping out of the notches in the saddle (an infuriating problem with these guitars if not sorted properly), and I feel it does no harm in terms of exerting a little extra downforce on the top to 'drive' it a bit more and give more volume. Do check the trussrod before you re-install the neck - these usually have an adjustable trussrod and I like to make sure it's all working before re-setting the neck. I've never had problems with these 12 string necks warping, as they are pretty robust, but it's always best to have a working trussrod.
This is quite a lot of work, but if you take your time and work methodically it should turn out OK. You needn't fear about wrecking a valuable guitar with these Harmony Stellas, but properly sorted, it should be a serviceable and robust companion for many years to come.
I've always thought it looked like something Sears would sell, however, by the wear evident on the fingerboard, it has been played a lot. I have physically had my hand inside the body and it appears that all structure is in place and solid, that's why I thought the humid thing might be it. I also have a "See Snake", which for discussion purposes, is like what they use in a colonoscopy only made for mechanics purposes. Everything looks good inside! So, just how might I tackle a top replacement? I think I understand the neck removal and reset process/procedure, and I suppose if I go there I'm in for a penny and in for a pound, so why not?. My good guitar has a one piece Sitka spruce top. By homework, would you suggest trying to fab a piece of that onto this?
I too, opt for repairing rather than replacing the top. I've had good results with warming the top (not so hot as to damage the finish!) with maybe a bit of dampening of the inside of the top. Then, clamp up straight to dry and cool and repair-replace bracing. Some extra re-enforcement bracing around the soundhole can help too.
Thanks folks for the good advice. The only reason I mentioned e-mail was to provide a better view of the problem by sending multiple photos with greater detail. I have no problem keeping the discussion in the public forum, I agree, it is best for everybody in regards to learning. As I said I am not a luthier so I will ask some things that may seem elementary to y'all. Mark, I am wondering about your comment about doing the top replacement later if the repair attempt doesn't work out. Would it not be a lot easier to replace the top when the neck has been removed for reset? The current top doesn't seem too bad to my eye and, as stated above, seems to have all the bracing intact. Again, maybe I'm not looking close enough or perhaps don't know what I'm looking for. I would probably prefer the original top but I would also think that now would be the time. John, can you explain cleating around the cracked area? Also, am I missing something? I don't see any indication of a truss rod at all. John and Amy, I also thought that it might be prudent to add some additional bracing around the sound hole but also thought this might affect the sound quality. Again, I'm fairly ignorant in regards to this art so any advice would be appreciated. Thanks again, JB
Jeff
Cleats are just little patches of wood glued across the crack on the inside to help stop it opening up again, I make them around 1/2 x 1/4 x 1/8 inch (really rough dimensions), I think if it as stitching up the joint , so 2 or 3 here will probably do.
If it's got a truss rod it will have the usual white plastic cover on the headstock where the adjuster nut is, if not, no adjustable rod, but it may have fixed steel reinforcement like most 6 string Stellas. If the neck is reasonably straight with no adjustable rod, I wouldn't worry, these necks are pretty chunky and robust.
You'll find "ladder" braces running across the top -I often put a pair of small braces either side of the soundhole running between these transverse braces to help stop the top warping, and also to assist with the straightening process by the process of glueing them in. It's not going to do a great deal to harm the sound.
It's your call as to whether you decide to pull and reset the neck - it's a load more work as a first-timer. As I say, it will allow you to improve the break over the bridge (which may actually help improve the sound a little), but you will have the additional task of determining the correct amount of angle and learning how to steam out and re-fit the dovetail neck joint. It's a great learning opportunity if you are up for the challenge, and there is plenty of info out on the web as to how to do it.
You don't need to buy special tools: I made my neck pulling jig from scrap plywood and all-thread rod, and my steamer rig is a little stove-top kettle, plastic hose and brass tubing bought from the local model makers supplies..so it probably cost me no more than $10 in all, and is still going strong after dozens and dozens of neck resets.
To replace then top you'll need to remove the neck, then you have the choice as to whether to rebuild it with a trapeze tailpiece as per the original (I'm assuming that's what it it) or as a pin-bridge: both need quite different bracing patterns, so you are getting involved in another set of decisions and skills to learn.
Keep coming back with questions..that's what's the forum is for.
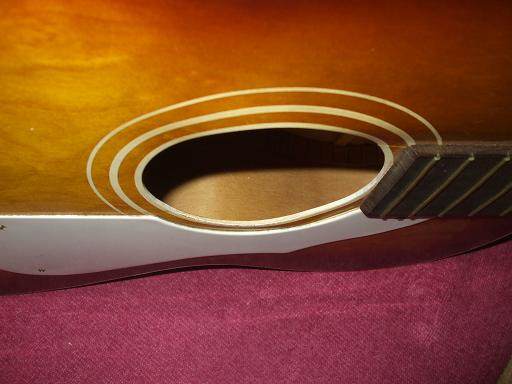
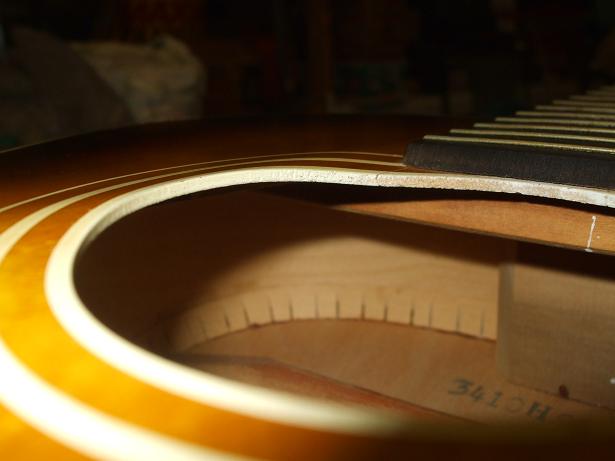
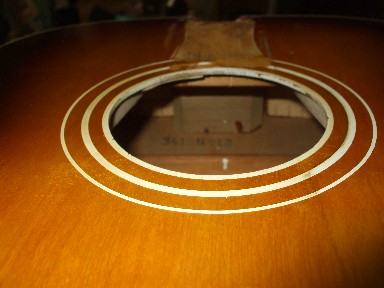
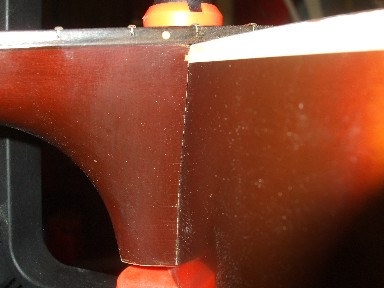
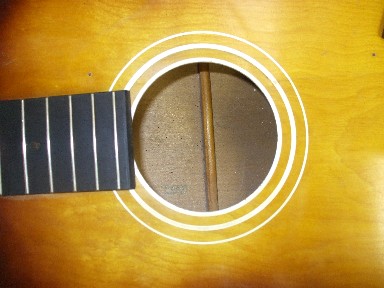
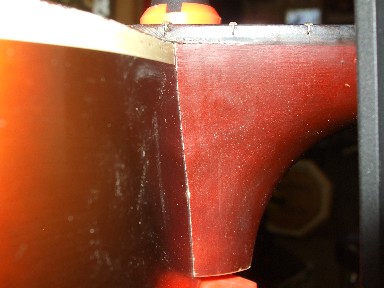
Thank you all for the input, I appreciate it and it has given me a lot to think about. I have included another picture for perusal. I have gone over this unit a little more thoroughly based on your comments and have found the following: 1) it appears that an attempt at straightening it has been done before as there is a thin strip glued under the top around both sides of the sound hole at about 10 and 2 o'clock not quite 45 degrees, about 3/4 inches inset from the opening 2) it appears to be a 1966, this # F-66-WN is inside 3) it feels as if the visible crack extends along the bottom of the fingerboard about 3 inches towards the head, under the neck 4) the neck appears to the eye to be straight, i.e., not twisted but appears to have a very slight arch in it, concave if looking at it from the side 5) all bracing appears to be solid, put my fingers on all and attempted to move them. Micheal, thanks for that insight into the cleats, I agree about the stress relief thing with the cleats. To all, the guitar came from British Columbia where it is known to be "moist" most of the time and given Thomas' comments about the tuning to D it would be easy to see how if tuned up tight, leaning against a wall in such an an environment for who knows how long, the exact damage visible would occur. It is not my main objective to sell this rig rather a learning experience and the satisfaction that may be gained by finally tuning it up and hearing it sound good, it is just about impossible to get it that way as it is. I have looked at a page that gives a very good explanation of how to remove and reset the neck, on Martins specifically. I think I would like to stick with trying to straighten up the existing top but am unsure how successful that may be, and maybe as Thomas suggests, may not be entirely crucial given a neck reset. So I have a few more questions for the experts and as I don't know how much space the forum gives you in one posting I will start another which will also allow another photo.
OK, so the neck reset at http://www.guitarrepairshop.com/repairneck.html outlines it pretty good. I can handle all of that but am wondering where to drill and insert the steam needle. I would guess on one side or the other of fret 13. I appreciate your remarks John about the fabricated steamer, my job requires me to improvise repairs and tools sometimes, we call it "McGivored". I'm thinking that once the top gets flattened out that the area where the fingerboard extension lands on the top that that area under it should somehow be braced, re-enforced. Could you not brace from say the center of that area to close to the base of the inside dove tail mount? Maybe this would really alter or deaden the sound? Let's start there and see where we go?
Thanks again, Jeff
Those thin reinforcements either side of the soundhole are more than likely original - I'd take them out to allow some better reinforcement to be installed (they are probably warped anyway, and may get in the way of putting in some decent reinforcement). All you need to do to reinforce the top is simply put a pair of braces either side of the soundhole, fitting between the existing cross braces. You can fit these in at right angles to the ladder bracing, or splay them to make sure they 'catch' the worst of the warped areas - go for whatever option will do the best job structurally, don't worry about keeping it square to the other braces. Don't worry about the area between the soundhole and the neckblock, the fretboard end will keep all that pretty well level and together, just cleat it internally.
By the way guys, these guitar bodies are not poplar, they are birch. I've restored and sold several of these for pretty handsome amounts, but the old 1930s Oscar Schmidt spruce top Stellas (Leadbelly & Barbeque Bob style) are a totally different kettle of fish and go for thousands...don't forget tho', they are a totally different and unrelated (except by name) instrument.
Was the guitar playable before you started looking at it? Just trying to see if you need to go to the hassle of resetting the neck. Putting a straightedge down the fretboard and see how much clearance over the top you get at the bridge position should tell us whether a reset is on the cards.
If you do go with streaming the neck out, pull fret 13 and drill through the slot..or (here's my preferred solution), uses a Dremel from inside the guitar, drill the centre of the neckblock until you feel it go into the dovetail cavity and insert your steam needle that way. It's more fiddly to drill and put the needle in, but saves that hassle of pulling and replacing the fret. These fretboards are very brittle and chip out like billy-o when you try pulling the fret (and I bet this one will be bad if it's dried out a lot)...so on balance it's worth a modicum of cussing and swearing to get the needle in thru' the heelblock than even more of it when you tear out the fretboard along with the 13th fret.
John, this sounds like an excellent plan of attack. The guitar, in my humble opinion, was not playable. Where the fretboard meets the body the strings would have been 1/4 to 3/8 inches off the board. The strings tended to bend very easily. Very hard to tune and keep tuned but this may be more the machine heads as they need work too, I'm sure. I wanted to ask you, when you say "I deal with these warped tops by a bit of moisture applied to the inside using wadded-up damp kitchen paper", what is your definition of a bit of moisture? Again, excuse my ignorance, but I would think that one would have to get the material quite damp to bend/straighten it or to remove the existing inner strips around the sound hole. See next post.
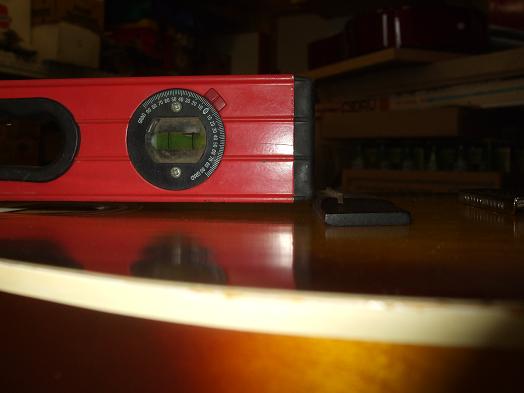
I hope I'm doing this right. It is probably hard to see from this photo but there is a "dip" in the fretboard beginning at 3 ending at 15. I recall another discussion about dealing with this were the truss rod is loosened, the board is heated and the neck is jigged and straightened with jacks. What do you think about this? See next.
A closer view of the same issue. See next.
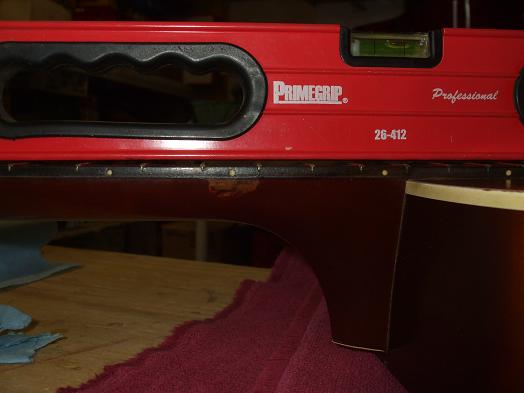
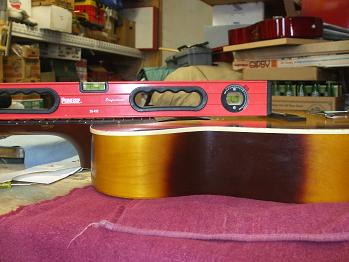
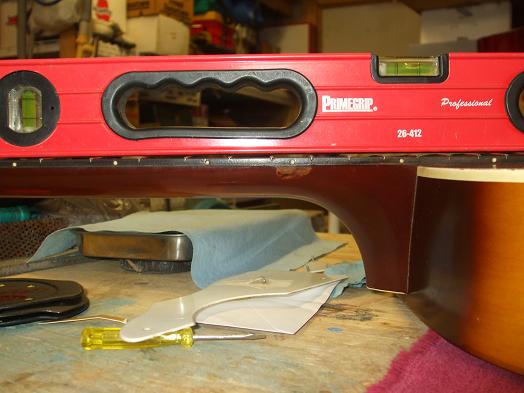
And finally, where the straight edge meets the bridge. The level is laying flat on the board. Does this help clarify the neck reset question??
Thanks again, Jeff
If that were mine I'd have the neck out and re-set no questions....no height to play with at the bridge at all, and as I said earlier, the saddle on these bridges was really too low to start with in my view. Absolutely typical of a Harmony Stella 12 - the 6 strings show just the same problems, but with the 12s the playablity is compromised much more. You could always leave it and learn to play bottleneck slide...great sound on a 12 string! I use an old Yamaha 12 in the same way - It sounds great and I cant be bothered to take the neck out.
I put a fair bid of moisture inside, paper kitchen towels folded over about 4 times, soaked in water and left for a few hours. I don't want the water to go right through the top timber and lift the finish, but it needs to get pretty damp. Take out the towels, clamp up and leave for a few days to dry thoroughly.
To take out the old patches you'll need to dampen them and insert a hot palette knife to loosen the glue..a bit of heat and a bit of moisture should do the trick. Work slowly, be careful that you are working the glue joint and that the knife doesn't cut into the top itself - that birch is quite soft and it's very easy to cut right into it and out thru' the face!
It's a lot of work for an old cheap guitar..but that's not stopped me doing dozens of them!
John's approach makes sense to me, based on my experience with these. I've done two in the past year. And if you steam the neck through the 13th fret, my notes show me that the Harmony 12-string pocket is hit by tilting the drill just slightly toward the dovetail..drilling straight down at the 13th won't hit it.
"the area where the fingerboard extension lands on the top that that area under it should somehow be braced, re-enforced." You just need to make little spruce braces and glue them in where you're removing the flat ones, if you want to go that route, which makes sense since there's already a wrinkle. You shouldn't need braces under the tongue part of the top. Re-read what John said above..
This is a worthwhile guitar to fix and keep original. They play really nicely when set up properly, and have a nice, full sound. And, yes, they are killer slide guitars ala Blind Willie!
Just to clarify for accuracy's sake on this public board, the body of this guitar is all 'solid birch', no poplar on the top.
Also, re: value, I've sold several of these for ~$500 as has Neil Harpe at stellaguitars.com. Granted, I'm paying less that $500, but I'm also putting some decent repair work into them, too. And, yes, you can find them on ebay for 2-300, but retail market value over the past few years, in excellent, playable condition can yield ~$500 give or take.
Keep us posted..Tom
Well John, yeah it's an old cheap guitar but I think you, in particular, have convinced me to give this a go. By estimation it is 44 years old and I like seeing old things come back to life. I appreciate what you say in your postings. I specifically appreciate your advice on drilling the neck block midpoint to steam out dovetail joint and totally agree about the fragile fret board.
OK, so here is my plan with a few questions.
First, remove neck (gently). My understanding of this is to heat shield the top of the body around fret board, heat, but not cook the applicable section of board and gently work the glued joint loose with a thin knife. I would presume that if one were going to drill the 13 fret they would do it before the above but utilizing the center of the neck joint inside method then one would drill, start steaming then jig it up to push loose the dovetail. That last part is a little tricky. I have an idea of how I would do it based on some of the pages Ive seen and some of what I inherently know, i.e. , its sturdy in certain planes and fragile in others but not overly strong, therefore the clamp forces must be distributed over a broad area. If somebody can contribute on this it would be appreciated.
Questions on this:
What about that "dip" in the neck as mentioned? Do I leave it alone or do I attempt straightening it? And if so, before or during removal or will it straighten with neck reset? My thought on this is, C) neck reset but have seen pages where they jig the neck, heat the board and bend er back a bit. I t seems like a fairly large dip to me but, again, I dont know exactly what can be done with a reset.
Second dampen, heat and remove strips around sound hole. Dampen, heat, clamp as required to straighten top of body.
Third prep crack(s), fab and install cleats.
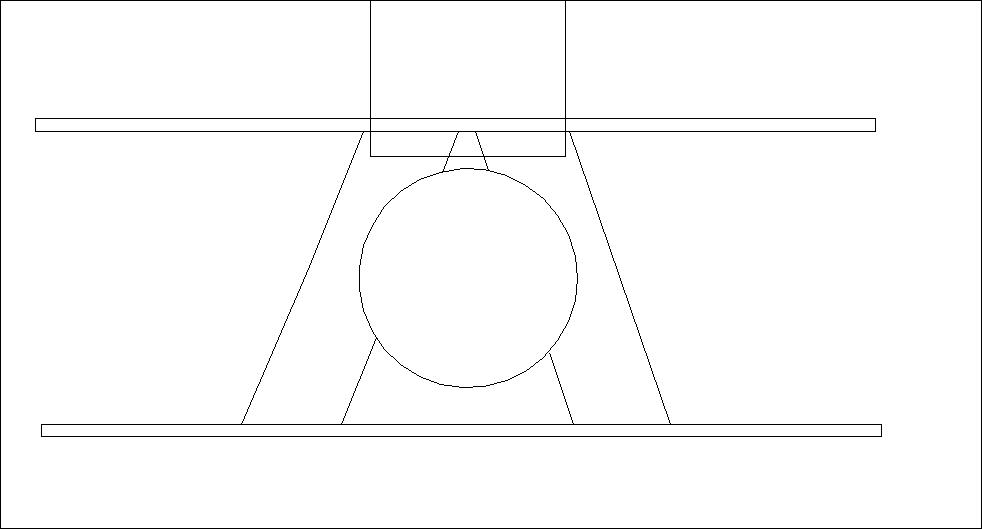
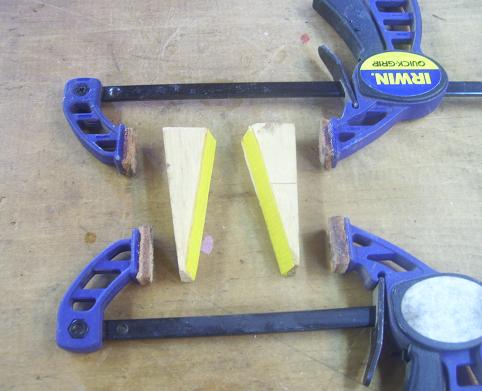
Forth, determine bracing for sound hole, fab and install same. Please see drawings. The first represents bracing similar to the ladder placed perpendicular to same. The second shows strips (birch, spruce?) cut to fit to reinforce both the hole and the cracked area ahead of the board.
Questions on this:
Right, wrong? I would think that each has its merits but would think that A) might be stronger? If so, spruce material? What glue?
Option B. I appreciate all of your inputs. Will probably have a few more questions along the way and hope I can post a successful refurb when complete.
Thanks JB
Sorry, forgot to send drawing.
Jeff
I'll see if I can take photo of my neck pulling jig for you.
Basically you're thinking in the right direction.
What I usually do with the fretboard extension where it runs over the body is to make a thin wedge to fit between the fretboard and top so the board runs dead straight all the way thru'. I do it as part of the 'dry fitting' before glueing the neck in, so I can fit it tidily, stain and lacquer it to match.
I tend to go with your option A for bracing around the soundhole as there's a lot more strength to resist any future warping problem, using spruce braces and Titebond, but might also incorporate some additional thin 'plate' reinforcement around the soundhole to help prevent splitting at the soundhole.
As regards the straightness of the neck itself, without seeing it it's difficult to say. I've done a couple of these where the fretboard was so bad or falling off, that I installed a simple fixed steel bar reinforcement in the neck and managed to clamp it all back straight. You need a little relief (a very slight bow)in the neck to help the playability and prevent buzzes: how much have you got at present?
Good luck! Apologies in advance for encouraging you to have go at all this!
Heating the neck and straightening it in a jig (as it cools) can work, depending on the thickness of the neck. Basically you are softening the glue under the fingerboard and then re gluing it with a straighter neck! Some of those old Stella's had baseball bats for necks though and this method does not work so well. I've had success with pulling the fingerboard and installing an epoxy graphite rod in mandocellos and mandobasses as well as in guitars.
A baseball bat for a neck is a good analogy. In relative terms the relief, or "dip" in the neck is not huge when looking at it with a straight edge before the board hits the body. Looks like less than 1/8" at largest. Today I will see if I can provide a better picture of same, get some measurements and post. To clarify, when doing this neck reset one is raising the elevation of the entire neck structure relative to the top and thus bridge, right? If so then I suspect that any "dip" as previously cited could be greatly reduced to a point were a slight relief could be managed. If not too much trouble, what do you call "slight relief"?
Regarding the sound hole, I am thinking that maybe a mix of both reinforcement methods might be appropriate based on John's comments. First, straighten the top, allow to dry. Second, glue in some "plate strips" around the sound hole clamp and dry then glue in and clamp two brace pieces in a configuration to best support the sound hole.
Again, thanks for the support.
Jeff
Looking at the neck with a shorter straight edge it appears that there is not such a "dip" in the board. I hope this picture is a better indicator. I have successfully dislodged the board from the guitar top and and currently working on building the jig and steamer to remove the neck.
Jeff
I'm no great expert on neck relief, but it's typically to aim for in the order of a couple of hundreths of an inch, (taken midway between 1st and 12th frets) but hopefully some others will chip in here. It's may be possible to take the worst of it out by levelling the frets with a file or stone and re-profiling them.
I like a maximum of about .010" relief at the 5th fret.
Update. I have successfully removed the neck from the body. Thank you John for the advice about steaming through the mount block inside the body, worked great. Also received advice from a local luthier to use a pressure cooker, hot plate (Coleman stove) and clear vinyl tube as to monitor and control any water in the tube. Put an open ended tee in midway along the tube with a short piece of tube to allow draining water off and also to throttle steam volume, worked great! Worth note hear for any other novices - I used a turkey injector needle for my steam point. I have cleaned up the dovetail and joint, have cleated up the cracks and am currently straightening the flat top. This appears to be going easier than I thought it might and it seems it will be unnecessary to remove the flat bracing inside the sound hole area. If it holds up when I remove the clamps then I think i will just install the spruce braces on both sides of the sound hole as close as possible to reinforce the area. My luthier friend (Wayne at From Hank to Hendricks in Peterborough Ontario) advises me that I should aim to see a straight edge laid flat on the frets land on the raised hump on the bridge just below the string block (if that makes sense). I get what he is saying and based on that it would appear to me that the neck needs to be shimmed upward about 3/32" or so. The actual angle of the neck to the body seems OK but I'm not an expert. Given that, I would think one would make a flat shim to be installed under the fretboard extension and would have to make and install shimming in the dovetail to accommodate a good tight re-fit. Does this sound typical? I'm I on the right track? Any suggestions?
Well done on getting the neck out!!
With a neck re-set, the whole idea is to put a bit of back-angle on the neck to compensate for the fact that the body has 'folded' slightly. On these Harmony 12's I always put a fair bit of extra angle to give more height on the bridge, as I feel that there was never enough break angle over the bridge in the first place. This inevitably means making a new bridge or at least putting in a taller saddle. Your luthier friend's advice about clearance at the bridge is generally speaking sound, and is based on re-sets on conventional pin bridges. You can take more liberties with a floating bridge, and as I say, I've found that extra bit of height at the bridge can really help the overall playablility and get rid of the annoying tendency of the strings to "ping" sideways on the saddle.
To adjust the neck angle means that the neck heel will need a bit of careful cutting and the dovetail joint will need veneer shimming to get the desired angle. The fretboard extension may then need a tapered shim to take up the gap between fretboard and top.
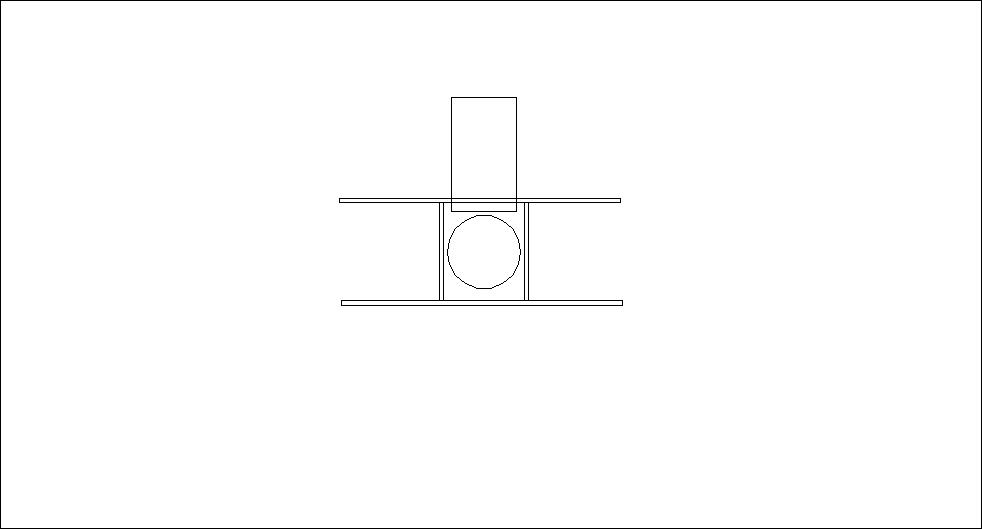
Thanks again John. Luthier Wayne did mention angling the neck. He said he usually makes a slight cut with the coping saw the width of the blade on the inside of the neck heel for a reference point then shaves a taper with a very sharp chisel. This is where my skills might be at their limit. Please refer to the drawing. The dashed line is what I assume he means here. Are you talking the same thing or are you saying just around the heel base area? I would assume one would have to taper the entire length to get a proper fit but again I don't have the experience to know. Please clarify when you can and advise if there is an "easy" way to do this. Because that wood is drier than the Sahara and thus hard and brittle I would think this would be very challenging. Wayne said I was a brave man for attempting this and I said maybe just foolish, I don't know.
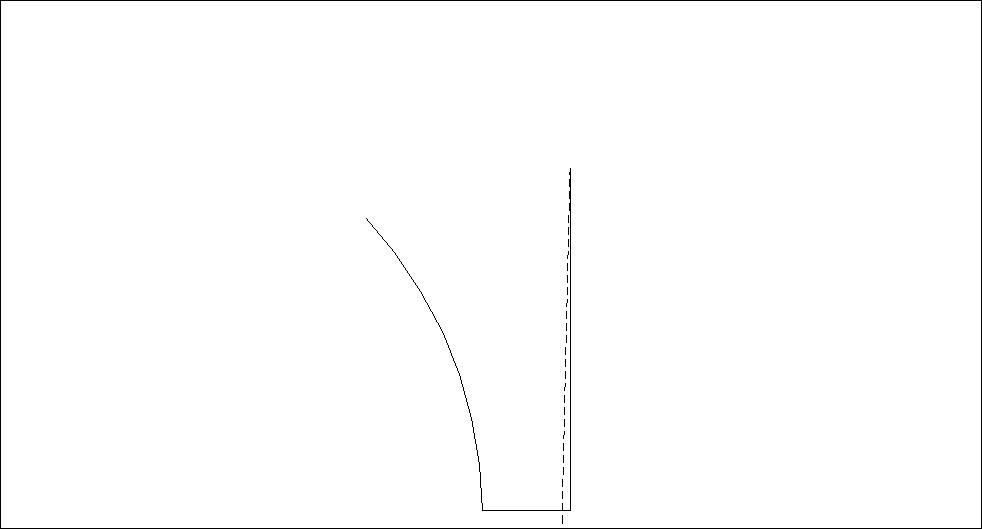
Jeff, this is standard neck-set procedure, the easiest mistake to make on your first one is to take too much off the heel. Slow and easy does it and keep checking the fit and the angle. Once your angle is where you like it (and you need to compensate for string pressure) then comes the ticklish job of fitting perfect shims to the dovetail so that it fits perfectly also.
Jeff-
You need a very sharp chisel to do this stuff, so that is the first step.
Then, 'flossing' with sandpaper can fine tune the fit. I usually put clear packing tape or 'Scotch' tape on the back of the strips of sandpaper- something about 100-120 grit works for me-to make them more slippery and also a bit more tear-resistant.
When you get 'very close' on the dovetail fit you can use paper shims with a bit of glue, when veneer would be too thick.
Jef, that's exactly what we are talking about. I don't use a saw as it would take off too much material, just some really sharp chisels, and I do what John says, cut the heel so that you are only having to mate up the outer face with the sides of the guitar. I also use sandpaper with a tape backing - the neck is offered up to the body and snugged down with strips of sandpaper between the heel and body (I use them on either side of the dovetail to keep everything symmetrical during the procedure) and then the sandpaper is pulled through so it abrades the heel to conform with the sides of the body. You just need to work slow and methodical - Amy is right here, don't take too much off in one go.
Thank you all for the above. I would like you all to know that the crack repair, the "flattening" of the top and brace installation has all gone extremely well, thanks to all of your guidance. I wouldn't say it's like new but much, much better. I'll post a picture when I get a chance. So to be clear I am shooting to achieve something like what is illustrated in the drawing, right? The undercutting thing makes perfect sense and I'm pretty sure I get the Flossing thing. Amy, when you say "(and you need to compensate for string pressure)", how do you gauge that?? As there are 12 strings I'm assuming that pressure could be significant. And by the way, I thought about this but have forgot to ask - should I back off the truss rod before neck reset is attempted?
The neck adjustment should be straight, while you are doing the set. I tend to go by feel and experience when judging string pressure, the flex of the neck, the "umph" of the body at the bridge- I know there is probably a mathematical way of doing it but I just use my gut. Undercutting the heel (do you understand what he means when he says that??) and doing the sandpaper pulls are all good techniques. I usually take a piece of 120 sandpaper and cut it into strips, about 5/8 by 4 inches. While pulling them to fit the heel, I do, say, three pulls on each side, blowing off the dust between pulls and using a fresh piece on each side. This gives you even fitting and keeps the neck in a nice centered alignment. I think I learned this from Bryan Gallup at one of the Northwoods seminars and have used it ever since. Clear as mud??
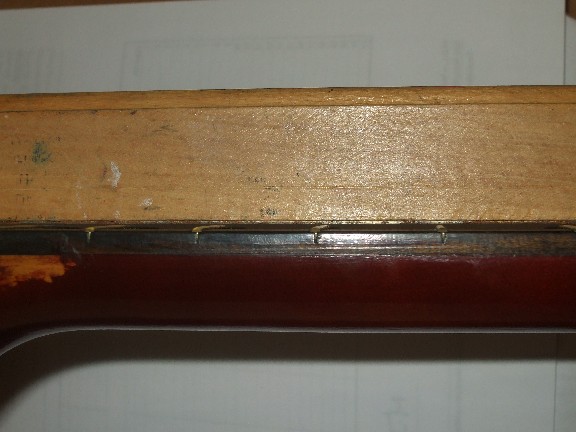
Not a very clean example of undercutting, but this should give you the idea-it doesn't have to be much. This is on a straight tenon (Hofner 'classical' converted to bolt-on).
I think its a good picture of the undercut. Yeah, I understand, from the picture it looks like a curved edge chisel maybe a hollowing chisel is used to relieve the material behind the fitting edge, if that makes sense. My question is - we are talking about refitting this as illustrated in my drawing? The drawing is a little exaggerated to illustrate the point. The above picture looks like the undercut goes the whole length of the tenon and if I'm seeing it right, the whole fitting edge has had the flossing applied. In my case do I not want to induce more of an angle towards the bottom of the dovetail or heel if that is the correct term? My thinking is that I would undercut pretty much opposite of what I can see in the picture above. Please advise as I am getting confused.
Jeff-
The undercutting is entirely separate from any shaving you do to change the neck angle- it's just to make sure that the contact point between the heel and the end of the guitar body is along the edge of the heel. Otherwise, something 'hidden' can be preventing a good tight-looking fit at the body- it can be frustrating to track down.
The undercut goes around the perimeter of the heel- be careful working at the 'narrow end' of the heel. If you are adding on a heel cap later it can hide any problems at the end of the heel, but usually in a repair you have the cap still attached...
I usually use a straight chisel for this; I probably grabbed the gouge because it was handy and really sharp, or because the wood was trying to split on me. It was a while ago.
Here's another look at the 'trough' that chiseled out so there's less material to remove from the heel as you shave it to get your angle.
Tom
That part of the heel only needs to make contact at the edge, but for a good neckset, that contact has to be dead-nuts perfect. Once it is perfect, the fitting of the dovetail starts. First, make sure the surfaces are clean and perfectly flat. For the actual structural support, the dovetail has to be fit ever so perfect, using shims. Jeff taught me to use index cards cut into various shim sizes to judge what needed to go in, the shims are glued to the dovetail with little angled wedge cauls, then the dovetail carefully re-fit. I used to use carbon paper to check the areas to shave down, now I use the blue carpenters chalk, I moisten the mortise cheeks a bit and brush on the chalk, then work the tenon in carefully and firmly, remove it and check for chalk!! Once you get close to a perfect fit, be really careful each time you remove it, sometimes you have to firmly "tap" it with the heel of your palm, sometimes, you need to put it back in the removal jig, the fit gets that firm. You want the dovetail to fit in just so with no wiggling and just a firm clamp pressure, no Hulk Hogan strong man stuff! OOOHHH!!! Don't forget to constantly check your side to side, the alignment to the bridge! Nothing as awful as gluing that bad puppy in and having it off to the side! I'm getting ready to pull a Martin neck, I'll try to get pictures start to finish. Sometimes I just get into the zen of it and forget to pick up the camera!! But on a final note, don't rush. Start to finish, for me, a Martin neckset that goes perfectly, no glitches is five to seven hours of bench time.
The kit directions from the dovetail 000 kit at the stewmac give some drawings and step by step. They give some math for figuring out how much to take off too, but I think most people just do a little and constantly check until it is right.
Here: start on page 24: http://www.stewmac.com/freeinfo/i-5297/i-5297.pdf
Hi Jeff, just take it nice and slow. I feel a bit guilty about getting you deep into this repair job, as I was one of the ones to encourage you to have ago at it!
Even though I've done dozens of neck resets, I still find re-fitting the heel can be a slow and frustrating job, so don't be put off if it takes a little time to get the hang of it. Assuming you've got the dovetail and pocket nice and clean (you need to get rid of all that old glue and any shims), you may find the joint pretty sloppy, especially as you start trimming and fitting the heel, but this can be corrected by shimming the joint.
Just one thought before you fix the neck angle, how high was the original bridge and saddle? I highly recommend increasing this significantly - although I haven't got one to hand to measure, in the past I've made new bridges with about an extra 1/8" height, plus a taller saddle, thus raising the top of the saddle by a good 1/4" above the original. This is something you wouldn't do on a typical pin-bridge guitar, but these 12 string floating bridge Stellas really benefit from it in my experience. My 6 string Stella has 9/16" height in at the saddle, and although it has a different sort of bridge to the 12 string, the principle is the same, and it is indicative of how high you can go with it.
Sorry to harp on about this, but there's nothing more frustrating than doing a re-set only to find the angle isn't quite right on completion!
Thanks Bill, good stuff, saved for future reference as I'm already well into it. Thomas, thanks for the latest photo, it has given me a good idea of what I'm trying to achieve here. Amy, as stated to John below I've started the work and am getting what y'all have been saying about how to do this. From my experience so far I can certainly see this job taking 5 to 7 hours! Can you explain though what you mean by "little angled wedge cauls"? Sorry, but I'm fairly ignorant in regards to some of the terms you folks use. John Wormald, just remember, I asked for it!! Don't feel guilty. I started on the reset work on Saturday and have got it somewhat close. I have used your suggestions regarding the neck angle to gain more break over the bridge and the dry fit indicates that I would indeed have a good 1/4" height change as opposed to the original. It has to be at least that to correct the original string height off the fretboard problem this baby had (in my humble opinion). It may wind up being a little taller than that based on what you say about the increased break to improve playability and the tolerance of these guitars of same. The shaping of the new neck heel has gone relatively easy but, as you state above, the dovetail is now quite sloppy. I believe I have the dovetail and pocket good and clean. Just playing around with a few shims there has demonstrated to me that this will probably be the most challenging part of this exercise, mostly because of all the blind trial and error involved. I have a couple more questions for you or however wants to chime in here. Regarding the floating bridge, can one fabricate a shim for the bottom of the original to raise it's height or do you suggest fabbing a new one and if so, why, if it's not too much trouble? The fretboard extension will definitely require a shim under it. I have a piece of 3/32" basswood on hand that would just require a taper made to fit. Is this material acceptable for that job? And John, as you seem to have a lot of Stella wisdom, the tuning machines on this unit seem quite loose to me, maybe that's the way they are. Looked at these http://www.stewmac.com/shop/Tuners/Guitar,_slotted_peghead_tuners/Golden_Age_Restoration_Tuners_for_12-string.html - what do you think??
I don't have a neck out right now, but here are the wedges I use to glue the shims to the dovetail. I have different sizes for different dovetails.The yellow tape is to prevent them from sticking with any glue that mushes out!
Thanks for the clarification Amy, I get it now. I'm going to post a few photos of where I stand as of now, maybe you would care to comment on the heel refit, i.e., is this "dead nuts" enough? This first one is after all the work done to the top to repair cracks, straighten top and bracing installed.
This is obviously the dovetail with undercutting and mating almost complete.
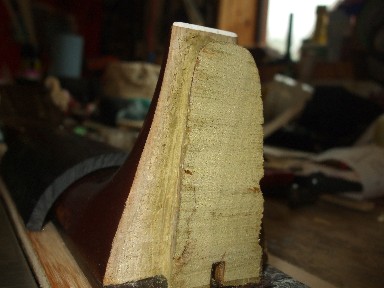
Heel mated to body top side.
Heel mated to body bottom side.
Neck dry fitted to body (no shims yet. At this point if you lay a straight edge on the frets it clears the top of the string saddle by about 1/8" (see posting #20 in relation to where I started). Do y'all think a shim under the fret board extension is needed? If I push down a bit on the extension the fretting curves down (away) from straight edge and is slightly curved away even if not pushed.
Finally, the extension now extends slightly over the sound hole. I'm thinking it will be necessary to trim this off a bit?
Re: posting #53 - if forgot to add photo.
Jeff - I'd leave the end for the fret board untrimmed, and I like to shim the fretboard extension so it doesn't fall away. The material for the shim isn't critical, but I trim it neatly and stain & finish it to match the fretboard edges.
You could glue a shim under the bridge, but it might end up being a bit thick overall. I've done both options- glued a thin packer under the bridge and stained it all to match with a taller bone saddle, and I've also made a complete new bridge from a scrap of rosewood. Your call really, and how much extra height that you need.
I've not used the StewMac tuners, but do check the string spacing. I've just looked at a Stella 12 string neck that I've got, and the string spacing matches the Stewmac spec. I've not had too much trouble with the original Harmony tuners, it's when they are stiff that they give trouble. I usually take them apart, clean and lube them (don't loose any bits, it difficult getting matching parts!!).
Looks like you are coping with all this pretty well -keep up the good work!
It looks like you've moved the 14th fret closer to the bridge by an eighth of an inch or so. Be aware that this will affect your intonation and should be offset by moving your bridge back an equal distance, which is not a problem since its a floating bridge.
By the way, the fit of the heel cheeks looks fine. Nice job.
Thanks for your advice and encouragement. Am working on shimming in the dovetail and as expected this is a large exercise of patience. I walked away from it last night. Hopefully by the time this coming weekend passes I will be able to post a victory.
Visualize the cavity and be one with the dovetail Oh Grasshopper........
Oh Master, you must be real good if you can do this job in a day! Just like playing these, practice improves the art eh?
Jeff, I do a neckset in four or five days, those hours are actual work time. When I steam the neck out, I clean off any moist glop, then set the guitar up on the shelf so that the steamed area dries. Next day I fit the heel and glue on the dovetail shims. Day three, (with all going well) final fit, drop dead perfect and I make and glue the fingerboard extension shim. Day four (or late day three) I glue the neck in, a five minute job if everything is perfectly fit and ready to rock. Day five, check out everything, make a saddle, dress the frets, tiny touch up where needed, and string 'er up!! This process can be shortened by doing steps morning and evening but I teach evenings and when I get home I don't even want to look at repair work!!
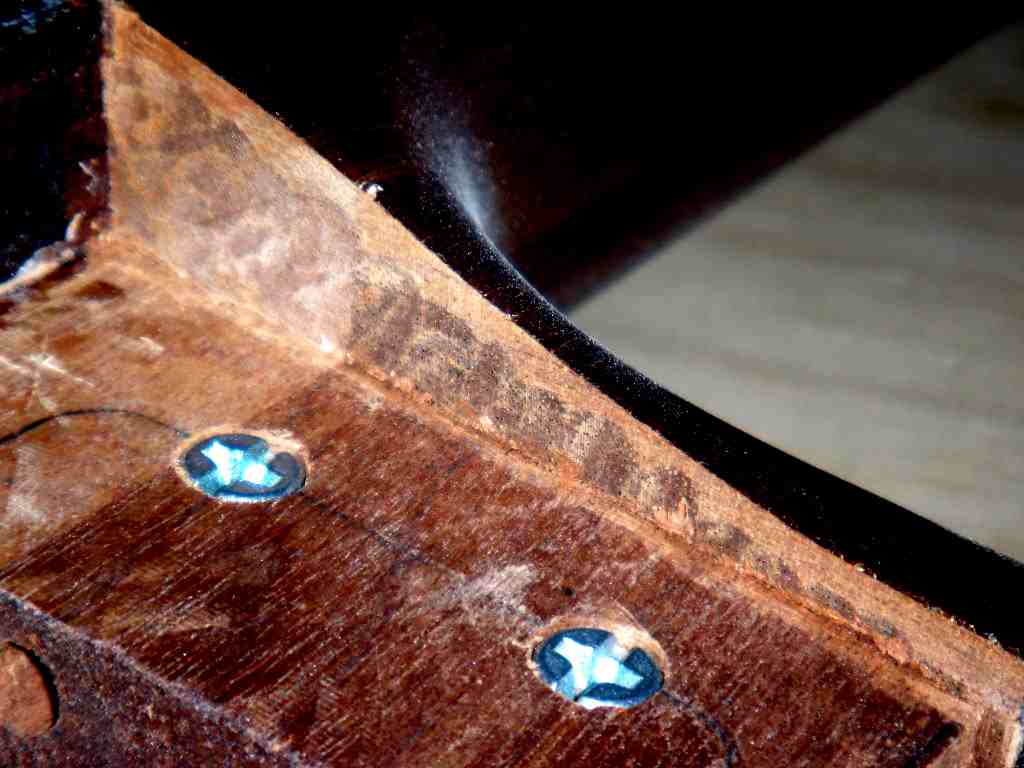
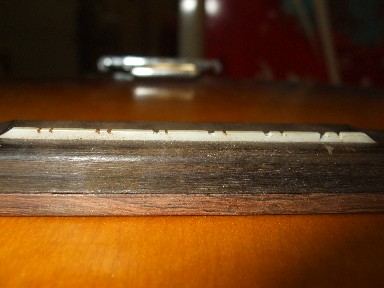
I have a hard time getting inspired at the end of a long day, however, I have been at one with the dovetail and believe the neck is ready to be reset this fine Saturday morning. The extension shim is fab'd and glued on, I can hand seat the neck into the mortise to a point just slightly above the body and it seats nice and tight with only slight clamp pressure. I will try and post the results later today or tomorrow. I have attached a couple of photos of the bridge and saddle and I think it is obvious that a new saddle is in order as the bottom E strings have been in contact with the bridge. I have a piece bone on hand to fabricate same but am wondering what is the best approach to remove the old one? Again, totally novice here so any advice would be appreciated.
This photo illustrates the bridge height with a shim (not glued on yet). On dry fit the straight edge just barely clears the saddle and it doesn't appear gaudy or to large (in my humble opinion). Total height is about 1/2 to 9/16" to top of saddle. Still have a little sanding to do on said shim so final height will be a little less. It has also been suggested to me that a strip of 600 grit or so sandpaper be affixed to the bottom to keep the bridge from sliding around. I'm not sure if the original bridge material is ebony or what. It doesn't seem black enough to be ebony and the shim material is Brazilian obtained from my Luthier friend Wayne. Comments?

Those saddles are nasty to get out, I've done a few, and they have never come out clean. I've resorted to 'nibbling' at them with pliers to get chunks out, then having to clean up the slot with a really tiny chisel and a scalpel, or cleaning up and milling a deeper slot on the drill press and a jig.
The bridges are some sort of stained hardwood, maybe maple but I wouldn't swear to it. When gluing on a shim, I stain the whole thing black (leather dye works fine). The bridge will stay in place just fine, don"t stick anything to the bottom. You might need to put some sandpaper on the top of the guitar in order to gently sand the bridge to conform to the shape of the top.
In general it's looking like you've got about the right amount of extra height (well in my view, that's how I treat these Stella 12s). If you are replacing the saddle, I'd make it a tad taller, so you can then thin down the bridge shim a bit so it's not as bulky, and if it were mine, I'd also sand down the wings to reduce the chunkiness, then stain the whole thing black.
The easiest way for me to get those saddles out is to cut along its length and break it out. Take a small backsaw or X-acto razor saw and cut a slot along the whole length of the saddle. Then take end nippers or something and squeeze the two halves together, they will break out leaving bits and pieces in the slot to clean out.
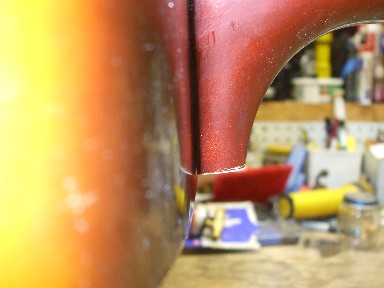
Well folks, for better or worse the neck has been reset. I am reasonably happy with it although the heel bottom has a slight gap. The dry fit looked good but when it got glued in and dried this is what I see. Thanks guys for the advice on the saddle removal. Cutting a slot along the length makes sense but that will be a delicate job as it is only about 5/64" wide. I have roughly fabricated the new saddle blank. John - the old saddle is about 11/64" tall (as best as I can estimate with the vernier) and the blank I have made is 19/64" right now (1/8" taller). Is this about what you suggest? Because it is bone it should be a little tougher/harder than the plastic and thus give a cleaner tone? Am I shooting for looks or function here?
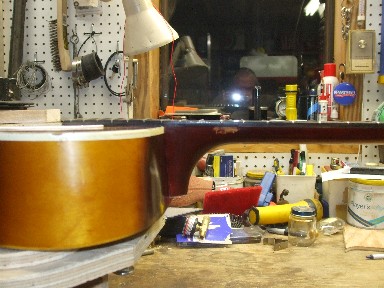
A wider view.
Well done with getting the neck back in...I've had exactly the same problem with a tiny gap like that. It can be very frustrating after everything looks good and tight to see that at the end of the day. I just fill the gap with some tinted filler to improve the cosmetics and try not to get too wound up about it, especially if I'm certain the dovetail and the rest of the joint is solid and tight.
It sounds like the saddle will be fine like that -remember that you are dealing with a floating bridge not a conventional pin bridge, so a tall saddle isn't really an issue. With a pin bridge, an overly-tall saddle has a tendancy to be leverered forward to rotate in the slot and can split the bridge, but no real danger of that with this type of floating bridge. You should definitely be shooting for function rather than looks, but after a few of these you'll "get your eye in" and know what works well and how to get it to look right too. You will probably find that you still have to notch the top of the saddle to stop the strings sliding sideways and keep the correct spacing, but believe me, if you hadn't got that extra height to give a little extra pressure on the saddle, you'd would still be getting strings popping out sideways under even moderate strumming and picking.
Good Job Jeff! I used to have that little gap at the heel, and it got me all frustrated but now I take extra care fitting, it is just our natural human tendancy to tilt the sanding block a bit as we hit the narrower, easier end. And when you do sandpaper "pulls" you have to be really careful to pull dead-nuts straight out and not fall to the temptation of an upward motion......