Interior caul for gluing acoustic guitar bridge? [Picture] - created 05-17-2008
Ryan, Michael - 05/17/2008.01:00:05
Never waste the challenge of a big mistake
Hello,
I am about to glue on my first acoustic steel string bridge on an OM guitar I have been working on forever.
I guess I am supposed to glue it on using a caul inside.
Does the caul need to be shaped to fit the top. I know I have shaped the bridge to fit the radius of the top and it seems logical to shape the caul too. Also, any suggestions on gluing especially clamping. I have 4 of the shopfox aluminum long read clamps from Grizzly. I have read all the stuff in the library and am still not sure.
Thanks for your patience.
I usually put my bridges on in the gobar deck. I put a single support in side the guitar. I have little sticks, about 1/8" x 1", tape some cork over the ends, and slip one in that fits.
Other choices--Use a vacuum system of clamping, use the long reach C clamps, slip a small screw and nut in the pin holes, and remove this later. Lots of choices and variations.
The usual advice is to make the caul while the guitar is open so it fits pretty well over the ends of the braces, that way you don't crush the braces or indent the bridge plate. If your box is already sealed you need to offer some kind of protection in there if you are using clamps or use one of the other methods. Possibly using your plans to fabricate something that will pass through the soundhole, or maybe something flexible like wax paper and friendly plastic backed by a thin piece of wood?
I have little sticks, about 1/8" x 1",
Don't you have that dimension wrong, Steve?
1/8" thick, 1" wide, 2-3-4 inch long. Multipe sizes, adjusted with the belt sander as I need them.
I use osage for my bridge plates. They don't dent easily.
I pad with the cork to allow some ajustment space, and avoid denting the marriage stripe, or the back of the guitar.
I had to solve this problem when I made my classical years ago. I made a set of cam clamps
with notched lower jaws that fit nicely over and around the brace under the bridge. The upper and lower jaws are cork-faced. Your situation will be a little different because your bracing plan is different, but you might be able to do something similar.
Thanks for the clarification Steve.
I've tried "friendly plastic" for bridge clamping cauls and found that it warps as it cools when I make something that big.
I've made half a drawer full of those things that I've made for re-gluing bridges on guitars in my repair business. (I keep them because they often fit other guitars, and now when I get a guitar in with a loose bridge to re-glue, I check the cauls I already have and usually find one that fits. I've noted the guitars they fit on the cauls with sharpie.) The following assumes your construction is "standard" with "normal" bracing and bridge plate.
I start by balling up a wad of aluminum foil, putting it through the sound hole and forming it in place under the bridge, pressing it around the braces and the bridge plate. I then use that for a pattern to make a wooden caul, notching for the braces and adding patches of wood to the corners where the caul is clamped against the top of the guitar and not the bridge plate. The notches for the braces can be filled with friendly plastic to fit the braces closely, but I seldom do that.
As for the top radius, You say you shaped the bridge to fit, what about the bridge plate? I shape the glue surface of my bridge plates for the top radius and that means they are flat on the clamping surface inside the guitar so I don't have to shape the center part of the caul. I sand the little wood patches on the corners into the radius dish, but leave the center flat. If you glued a flat bridge plate in, you could shape the caul to fit the radius and then glue on the corner patches.
Oh, and I use three cork-padded cauls on the top of the bridge, a deep reach C-clamp and two cam clamps.
Thanks,
Really, My bridge area has very little dome to it for some reason. I did shape the bridge under surface but it took very little scraping, certainly not the 1/16" the dvd talks about.
Anyone used the technique of positioning the bridge, tape marking the position, drilling the 2 outer holes, plugging with bridge pins to make the bridge not move, cutting the bridge pins flush for clamping, then clamping thru the sound hole.
The gobar deck technique sounds interesting but it seems the struts are awfully thin.
I don't know what the "friendly plastic" is.
Also, how wide and how long do you make the caul if it fits over the x-brace?
Here's how I do it. This is going to sound complicated but it's not. It's just very detailed, in an attempt to provide all the information needed. Your goal is to have the inner caul fit the top and bridge plate exactly, because failure to get a good fit can place enough pressure on the top at the wings to break it, or not enough clamping pressure in the middle of the bridge.
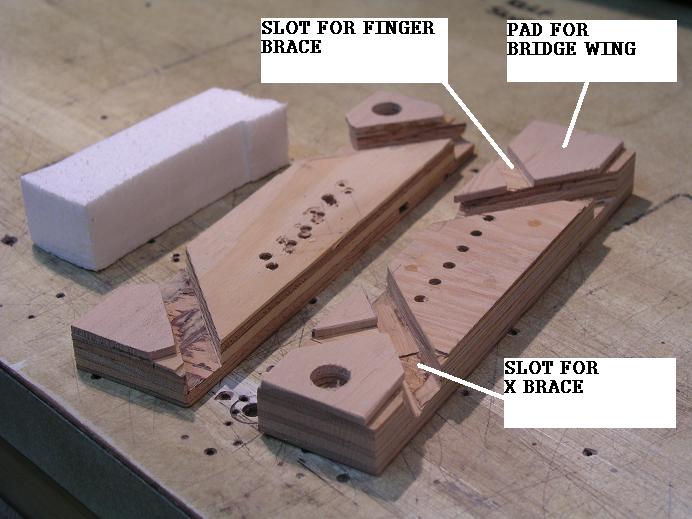
The caul will be about 1-1/2" to 2" wide (depends on your bridgeplate.. it can be a little wider but not narrower than the bridge plate) and as long as your bridge. If you built your braces and installed your bridgeplate exactly to the plan, you should be able to lay out your caul based on your plan. I use a piece of 1/2" plywood although solid stock will do nicely. When it's done and lying on your bench it should look like this:
2" x 6"? x 1/2 plywood (or whatever) with a pair of grooves on a V arrangement for your X braces. These should be maybe 1/4" to 5/16" deep depending on the height of your braces minus the bridgeplate thickness. The grooves should be about 3/32" wider than your braces to allow a little slop.
You may have to cut another pair of grooves at right angles to the first, going "outboard" from the X braces. These are for your finger braces depending on your layout.
On the "outboard" side of your X brace grooves you will need to glue on a couple of pads exactly the same thickness as your bridge plate. These are to account for the fact that the main part of your caul rests on the bridge plate, and the little pads will rest against the top itself, allowing you to pull the wings of the bridge tight to the top. If you have left over bridge plate material it's perfect for these pads.
Place caul inside the body, and hold it in place prior to clamping with some tape or a wedge stick. I use a 1 x 1 X 4" chunk of that cheap white packing foam that everything comes packed in these days (styrene?) This is most easily done with the body lying sound hole down. Check it for alignment and fit using a little mirror.
For mounting the bridge, I use the technique you described of tape marking the bridge and drilling the two outer holes with the following caveats. I position the bridge, and tape the wings to the top so it won't move when I drill. Clamp the wings and the inside caul before drilling. This holds the inside caul tight to the bridgeplate, and keeps your drill bit from making a ragged hole in your bridgeplate when you drill through. I drill the holes with a 3/16" bit, and use a pair of the same bits flipped upside down in the holes as locator pins. Pull 'em right after you glue and clamp so they won't get glued in. I like the drill bit shanks because they're not tapered, they're exactly the same size as the holes, and they hold the bridge in alignment rock solid until you can get your clamps tight. The tapered pins can be a bit fussy and you have to ream with tapered reamer to get an exact fit. If your top caul covers the whole bridge, drill a couple hole for your locator pins. Some people just use little wooden pads on top or cork pads instead of a top caul. If you do use a top caul, make sure it's the same size or slightly smaller than your bridge because any overhanging caul will make it very difficult to clean up glue squeeze-out.
I also leave the inside caul clamped at the wings the next day when it's time to pull the clamps. Remove the top caul (if any), re-clamp the inside caul to the wings, and drill the other four holes that way for the same reason... no tear-out in the bridge plate.
When I get home I'll post a picture of one of my cauls.
sounds good, Larry.
Your instructions seem about perfect.
I wonder how I could use a couple of 3/4 rare earth magnets to help this process. Anybody using those to help hold the caul in place.
Thanks,
Michael, here's a pic of a couple cauls. Also shows high tech caul retention device (4" chunk-o-foam ) Note all the holes drilled in the middle of the caul. I keep meaning to make a caul with a removable "sacrificial" piece there in the middle that I can change in a fresh one for each new guitar. For now I actually pull it out, tape on a thin piece of stock and reclamp it for the drilling so that I have a nice tight backer for each time the drill bit comes through the bridge plate.
The caul that only has six holes is one I used only once for a very forward bridge placement. I don't recommend that by the way, that's a very tight sounding guitar (and I don't mean good tight either)that I gave to my girlfriend. I've just finished building her a new one which I will post shortly.
Magnets would be cool!! You could superglue one into the pad at either end and just set one on top of each bridge wing to hold the caul up while you attach the middle clamp. (I use three clamps) Then pull the magnets and attach the end clamp.