David Myka's latest carved top electric guitar [Pictures] - created 03-08-2004
Myka, David - 03/08/2004.09:26:22
Myka Guitars
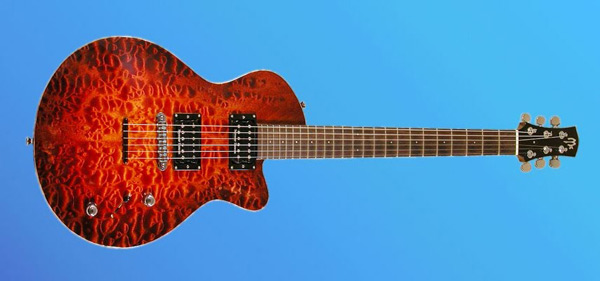
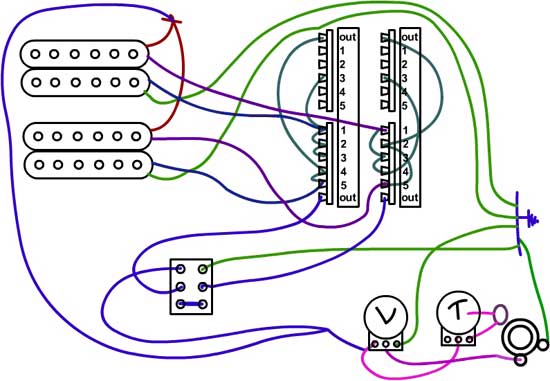
I just completed a new single cutaway electric guitar. This guitar represents my first attempt at a sunburst. I used water soluable anilene dye and approaced it like a watercolor painting. The pickups are humbuckers and the wiring uses a 5-way switch to configure the coils and a DPDT to put the setting into series or parallel mode.
This guitar has a very articulate voice. The cleans are chimy and clear and the high gain settings are sharp and crisp. I love the switching as you can go from the muddy to twang without changing amp settings. This is my first useage of the inner and outer coil settings. I like it so far. The tones are different but definitely humbucker sounding. I wanted to add some coil taps but 10 separate settings is enough.
Here are the specs:
Body: Curly Black Limba (Heavy chambering leaving 3/8" thick back)
Neck: Black Limba (2 1/4" graphite tubes flank the truss rod)
Top: West Coast Quilted Maple
Fingerboard: Indian Rosewood with Indian Roswood binding
Scale Length: 25"
Switching: 5-way, 1 Tone, 1 Volume with series/parallel push/pull
1. Neck Humbucker series/parallel
2. Inner Coils series/parallel
3. Neck and Bridge Humbuckers series/parallel
4. Outer Coils series/parallel
5. Bridge Humbucker series/parallel
Finish: Brushed on Nitrocellulose Lacquer
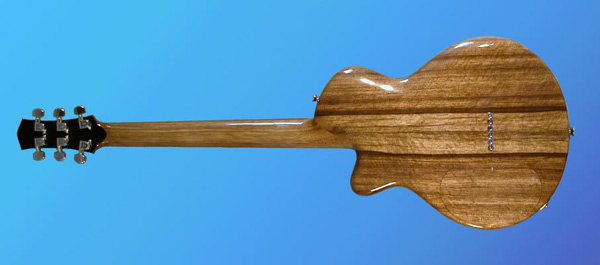
Here is the back:
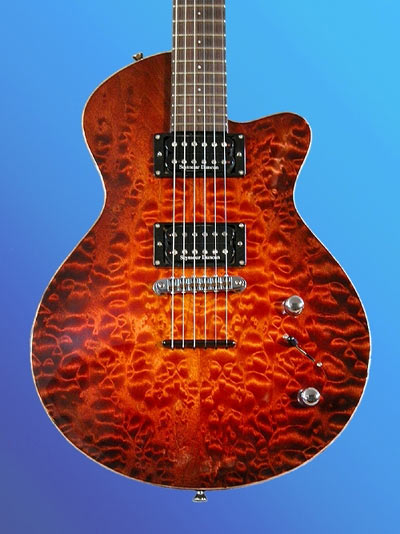
Here is the top closeup:
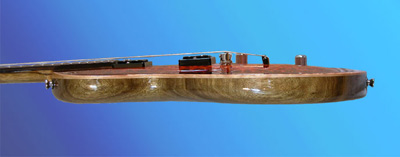
And finally the side view showing the neck angle and faux binding:
Wow! Very cool finish job. I love it!
Very pretty!
I'm interested in your wiring scheme. Do you have a schematic, or can you tell us where you found one? I want to see how you can get series/parallel with one push/pull pot in all the positions of the 5 way.
Nice guitar. Beautiful wood.
Thanks!
Mark: This wiring design came about from trying to work a 2 humbucker with a 5way that has 2 Tones that work all the time in every position. I couldn't figure out how to get that to work in a way that actually did something helpful but this schematic is what I sort of stumbled upon in the process. My approach was to try and separate the coils so I could send them to the tone controls. The problem was that there would be separate tones for each coil of a humbucker and that didn't really seem to make much sense. I did manage to separate the coils so I send the leads to the DPDT instead. So my client didn't get what he wanted but he likes this much better, and so do I.
For each humbucker the positive of one coil and the ground of the other was hard wired. The switching just deals with how the 2 coils connect to each other.
One thing to note is that the series parallel is true for positions 1,2,4, and 5. In position 3 the series setting works with the Neck and Bridge as 2 separate humbuckers. This means that there are not 4 coils in series, only 2 sets of 2 coils. I hope that makes sense.
Here is the schematic (this is my work so please use freely):
Fine looking six string, David.
Could you explain how you built the stop tail?
Andreas: The stop tail is actually a piece of rosewood routed about 3/8" into the body and rising up about 3/8" above it for string clearance. The strings come through from the back and go over the rosewood piece so that they clear the tune-o-matic. This type of setup is lighter in weight than a standard metal stop tailpiece.
Here is a closeup from another guitar with the same bridge:

Wow....you could go swimming in that top figure! Looks very comfy to play, too. Very nice.
Very nice indeed - nice subtle changes to the single cut shape. I particularly like the way you have comfort sculptured the back. Great choice in woods too - Black Limba is a favourite of mine.
You can almost feel the heat off that maple top.
This type of setup is lighter in weight than a standard metal stop tailpiece.
Nice design.
I would imagine the rosewood tail making an interesting contribution to the overall sound.
One of the most iridescent stain jobs Ive seen! WOW is three letters that describe this instrument better than any other combination in the English language. Very comfortable looking, very even, seems to work with its self very very well. What an example! 1000000000 out of ten!
1 question when brushing nitrocellulose lacquer, would a sponge brush be more favourable than a bristled one and do you do one section at a time? (i.e. body top, let dry, sides let dry back and neck let dry etc etc?)
I dont know if this question is appropriate for this string but its directed at Mr. Myka
Thanks Nathan!
I use a 1.5" nylon bristle watercolor brush for no better reason than I had one on hand when I started brushing lacquer. I find that these brushes are very soft and do not leave major brush strokes. I have not yet tried a sponge.
I do approach the job in sections like you mention. I start with the top and then do the back and sides. Then the neck. I don't think the order is crucial. I also will go over the edges a couple times more than the rest just to be sure there is enough material there for sanding and buffing. I usually will apply 2-3 coats and then wet sand it smooth with 400 grit to remove the bristle marks. Before the last coat I will sand to 600 grit. After it cures I wet sand up to 1200 grit before I start buffing the lacquer.
Two words:
"Holy $#!T"
that is one of the finest guitars that I have ever seen... :-)
I love it. The finish is unreal, it looks like granite on fire!
how did you get the finish that color? It is a red color? How many coats of stain did you put on the guitar? after the stain how much did you sand down due to raised grain?
Thanks and again a beautiful guitar!
Thanks Derek!
I used 3 different colors for the staining: brown, red, and yellow. These are all standard from Stew-Mac. After the wood was sanded to 320 grit I raised the grain with a wet rag and then sanded again to 400 grit. After that the staining was approximately a 7 step process:
1. Stained the entire top red, let it soak in.
2. Lightly sand (400 grit) so only the stain that soaked deep remained.
3. Rubbed yellow into the center and brown around the edges and while it was still wet I rubbed red in between to blend the yellow and brown.
4. Let it dry and sanded again to lighten up the top.
5. Rubbed red all over it and brown near the edges.
6. Sanded again.
7. Applied the final staining of brown at the edges, red in the middle and lots of yellow in the center.
I found that these water soluble aniline stains worked a lot like watercolors in the sense that when they are wet you can push the colors around. For instance the last application of yellow in the center actually pushed the red towards the middle more and lightened up the coloring without having to sand away the dye. I applied the dye using cotton rags (and gloves). Also there wasn't much raised grain after the sanding steps were complete.
So you must have used one of those "megaswitches" for your 5 way switch, right?
Sweet work!!!! Looks a lot like the old pictures of a nuke cloud coming up from the bottom with a face (eyes & nose) between the pickups. Beautifull figure!!
Nice design and work on this guitar, David. It looks great. I appreciate the sharing of the finish and wiring procedures. I am working on a guitar for a nephew who requested a figured maple top in blue 'burst so the finish info saved me hours of experiments with the dyes.
David...simply stunning! I don't recall seeing a nicer finish over quilted maple.
Thanks for the staining procedure info. I've read a number of articles that have said DO NOT stain raw wood, rather stain over a few coats of clear lacquer. Your approach sure looks like it works.
Great finish, David. I've seen other rubbed dye finishes that got muddy or had abrupt transitions. When I first looked, I assumed you airbrushed it. Very nice.
OUTSTANDING!
Great David!
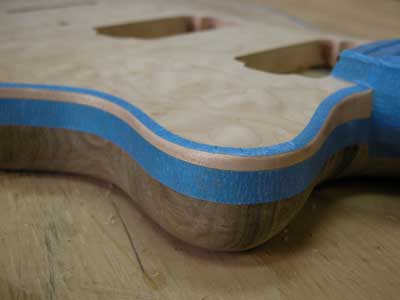
So, I'm curious. The 'binding' I would assume is just taped off top wood. How did you keep the stain from bleeding through the tape into the masked area? Did you use a special jig/tool to keep the width of the binding consistent (I assume you taped with the clean edge along the sides)?
The faux binding was taped off prior to staining and sealed with 2 coats of vinyl sanding sealer and 2 coats of lacquer. This stopped the stain from bleeding into the binding area. Here is a picture of the masking:
Simply luxurious, outstanding.
BTW, I saw your last pic and it seems to me that the tape you used for masking is very pliable and suitable to follow the contour.
While I saw this tape in several pics on the MIMF I have never found something similar in my country. What kind of tape is that, and where found you it ?
Thank you
Mauro, that looks like what we call "masking tape". It is made for painters, to keep finishes away from specific areas.
The blue color is a sort of code that usually means that it will release better than the normal masking tape which is a tan color.
Check with the suppliers that have products for car painters. Our auto parts stores usually carry tape 1/4" 1/2" 3/4" 1" 1.5" 2" wide. That would be from 6 mm to 50 mm wide.
This link is a short article about masking tapes. The blue is the safe release kind. http://www.brightideas.com.au/2002/index.php?e=271&p=3mtape
Dale
David,
Yes. The sealer was applied only to the binding area so that the dye would not penetrate it. I then put the dye on using some scraps of old towel. So I guess I wiped it on. I had 3 separate pieces of towel for for the brown, red, and yellow dye. The way I found to work the dye was to keep the edge wet and the colors would blend really nice.
That is a beautiful piece of artwork you created. The finish looks hot to the touch. I really enjoy the detail.
It appears that you even used a thin piece of wood as the cover to your electrics hollow as shown in the photo of the back of the guitar.
You matched the grain so well it looks invisible. What is holding it on?
I'm a newbie to this stuff. Are there any books out there that you can recommend that might get me jump started as to what materials might be good or bad. How thick is the quilted Maple? What is your technique for laminating it to the Black Limba? Where do you buy your wood stock?
Your guitar has inspired me. Thanks for sharing your finishing techniques, etc.
The cover on the back is a piece of the same wood as the back. I started with a piece of Black Limba 2" thick and cut it on a bandsaw to 1-3/8". I then planed a cutoff piece to 1/4" for the electronics cover plate. It is held on by 5 small screws (the same screws I use to hold down the pickup rings). They are hard to see in the picture.
There are a few good books that are for sale in the bookstore section of this site (http://www.mimf.com/bookstore.htm). Definitely read the top of the page for information on how the MIMF forum gains support from book sales through this page.
There are a couple books I have read and seem pretty good to me:
1. Melvyn Hiscock - Make Your Own Electric Guitar
2. Martin Koch - Building Electric Guitars
The Hiscock book is prbably a more organized approach. This was the first book I ever owned about electric guitar building and it is still a classic (and perhaps a required text).
The quilted maple is 5/8" thick and I laminate it to the Limba with a bunch of C-clamps and yellow wood glue. I buy the wood from Gilmer Wood Company in Portland, OR, on eBay, and at local suppliers when I can find what I am looking for. You can find good deals on eBay if you are willing to scout out the auctions.
Let me know if you want any other information about this instrument. I always take extensive photographs of the construction process.
What tools did you use to sculpt the slopes and curves on the front and back? They flow very nicely.
What is your technique for sloping the front and keeping it balanced and evenly flowing.
Do you step it down with a router?
Belt sander?
Rasp/File?
BTW, I like how you lined up the two darker stripes of grain with the neck. It flows so nicely.
Where do you buy your hardware? StewMac?
Any other recommended sites?
StewMac didn't appear to carry templates for a Les Paul style. (Unless I missed it.) Anyone have any suggestions where to get one.
Thanks.
-John
P.S. The books you mentioned just so happened to be the ones I ordered yesterday. Thanks again.
We have some LP templates in our library.
First off David, that's a FANTASTIC guitar! Bravo! You're making me rethink the 'red' guitar top a friend of mine wants on his guitar (he just said 'red', so it's kinda of up to me). Inspring work, and a beautiful instrument!
John: the way I do carving on backs/neck transitions tends to be rasps, round surform, scrapers and sandpaper. Even fluid strokes make it all flow properly.
I've sloped tops by hand, with nothing more than a plane, as well as by constructing a router jig to flatten an area at the proper angle, after which I carve with a combination of a router (outer ledge/index), a gouge, the occasional chisel, a violin makers plane, but for the bulk of it, an angle grinder with a sanding disc and a light touch. Takes a bit of getting used to, and removes a lot of material quickly and messily, but if you keep it moving you can get plenty smooth lines. Finish up with either a power sander or a scraper and hand sanding. Just finish carved a top and back today, acutally, both sloped (one done by router, one by block plane) and fairly heavily carved. Hopefully I'll have it completed within the month.
I slope, or carve, the top with routers and hand planes. The planes I use are designed for carving archtop guitars and are available from LMI (google search lmii). I also have one that I made out of maple that works very well. I do find that the metal planes have a nice weight to them.
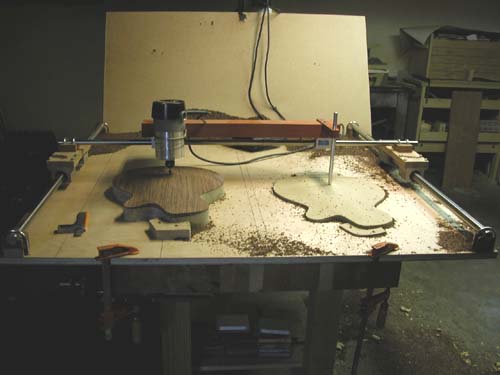
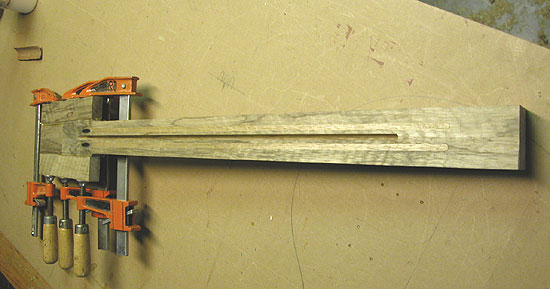
I also attached a picture of my newest method using a home build duplicating router. It is essentially a pantograph router that follows a chape and routes in into a new piece. I now carve the tops using particle board or MDF which is much easier to carve. Then I replicate the shape using the router. Then I finish the job with arching planes, scrapers, and an orbital sander.
For the contours on the back and neck I use rasps and files. It is just like Mattia says, just keep the movements fluid to make the lines smooth. The best method I know of is to feel it and look at it from all angles. It will start to look right to you and then you know you have it. It will go much easier too if you draw things out first.
I do use StewMac for parts. I also use Guitar Electronics which has an extensive wiring diagram section of their site. Check with your local music store too. If they have a Harris Teller catalog they can get almost anything for you. The small guitar shops will almost always be willing to order stuff for you.
Wow is right!
David, I don't know whether to be more impressed by the overall body design, that really cool string-through "tailpiece", the dye work, or the electronics layout. I may have to use a variation of your wiring on a dual humbucker guitar that's my next project - your approach solved a problem I've been wrestling with.
Thanks so much for sharing the pics, etc.
Chip
if you don't mind me asking how much did it cost you to make that copy router (minus the router its self)? and where did you get the metal work from? are the sections that run along the bars just wood or do you have some kind of metal washer in there too. I've been wrestling with getting my head around making one of these things for months, but trying to keep it cost effective and not having to have metallic pieces custom made by precision engineers. any advice would be vastly appreciated
I built the router using some 2" x 3" wood for the frame (the red is Padauk). The linear bearings are Thomson Bearings (google search). They are pricey but you can find them used on eBay for a steal. I got the linear shafting from Dock Hrdware in Rochester, NY. They sell the Thomson hardened steel shaft. Th rest of the assemblies I made out of wood and machine screws. The counter weight is a brick. I attached a picture of some more details.
Now the accuracy is not 100% but it does get you close. The slop in the machine is from the shafting. It could be 1-1/2" diameter but that would shoot the cost way up for the bearings. The way I see it is if you want 100% repeatability then go CNC. This machine took a 6-12 hour job and reduced it to about 2 hours finished. I finish it by hand and use an orbital sander to smooth things out but the result is pretty good. Also my wrists don't hurt anymore from carving maple :)
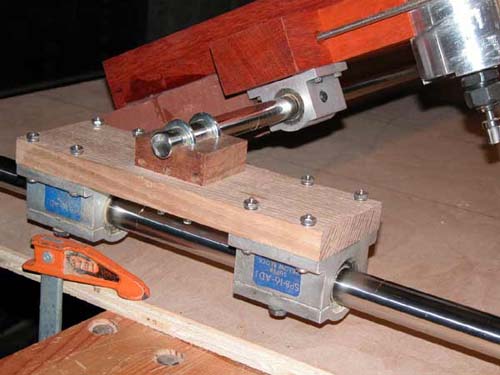
Dave, what can I say that hasnt been said already...WOW! I would like to ask what kind of router bit are you using on your duplicator?
I use a stadnard round nose bit. I tried the square bits but they really wanted to dig in to the wood. The round bits work much, much better. The stylus that traces the pattern is the same diameter as the bit and it is also rounded. The diameter I used is 1/2".
Nice outfit David.
Dave,
Do you have any special tricks or tips on how you build the necks and fingerboards.
You seem to have a lot of good tricks-of-the-trade and was wondering what procedures you might take in crafting that end of the guitar.
I hope you don't mind all these questions.
This thread of messages is packed with all sorts of good info.
I'm sure it will be highlighted in the library here eventually as a great "How-To" lesson.
I don't mind the questions at all. I have received so much from the forum myself and I have appreciated it all. I am glad this has been helpful.
My necks are fairly straight forward with the addition of running 2 graphite tubes down the length of the neck for added rigidity, increased resonance, and stability. The resonance is subjective and debatable but I like what it does for me. I don't get dead spots on my necks since I started using them. I install these with a 1/4" round nose router bit cutting 5/16" deep. I run the slot 1/4" in from the end of the fretboard and right out the end of the headstock where they get sanded back to the headstock angle. This should add some strength to the headstock joint. In addition to this the headstock is veneered on both sides with ebony, rosewood, or whatever. I do this to add strength as well as to spruce it up a little bit.
The graphite tubes are glued in using wooden caps with the same 1/4" round to completely hold the tube in place. Some people use epoxy. Either way works I just use the wooden filler pieces so I can use wood glue instead of epoxy. The filler strips have to be made to fit pretty snug. The tubes are scuff sanded (120 grit) and covered in glue prior to clamping. In place. Once installed and the neck is planed flat again I route the truss rod channel. I also use a 1/4" rounded bit to route the truss rod channel. I then have to round the square blocks at the ends of the truss rod to get it to fit into the slot but I like using a round bottom slot. From a structural perspective cracks usually start and migrate from sharp corners so I try to avoid them in my neck construction.
Once the truss rod channel is complete I can then taper the neck. I have templates of MDF board for the headstock shapes and some standard fretboard tapers. I double stick tape these to the neck and can then run the template on my router table with a straight cutting templating bit with a bearing guide.
I then install the truss rod by simply setting it into the slot. I put a small piece of wood at the nut end to fill the slot over the adjustment screw. Once complete I glue the slotted fingerboard on and trim the edges with a flush cutting router bit.
Before I taper the fingerboard I cut 2 1/8" strips for the binding. After the fret slots are cut (using the slotting system from LMI) I glue the strips on as binding. These serve to cover the fret ends. Other woods can be used but I do this even if there is not to be any fingerboard binding. It makes for a cleaner fingerboard.
I then radius the fingerboard using radiused sanding blocks. If I want to do any inlay I radius to 80 grit then do the inlay. Then I sand it the rest of the way up to 320 grit. Side dots are installed after the radiusing so I can center the dots on the edge of the fingerboard.
I inlay the headstock, drill tuning machine holes, and finally fret the neck. I fret it using a piece of the radius block chopped off and fitted to my drill press for a fretting arbor. Works great!
The neck carve is done with a spokeshave, rasps, small bock plane, a gouge, and sandpaper. Whatever works I guess. A drawknife also works good if you like that. My main tools are rasps. I have a rough and fine cut rasp with both flat and curved surfaces. If you use a spokeshave go very slowly. These things are great but they can work too fast if you aren't paying attention. Draw out little templates and use these to check your progress as you go along.
Most of the supplies are available from StewMac. I get the graphite tubes from a kite supply shop (google: Into The Wind - go to: kite making supplies -> Graphite Tubing-Avia (Pultruded)). They are cheaper than graphite bars and should be just as strong. Vintage guitars don't even use then so there technically isn't a need for them at all if you want to save a few steps.
So, do you think the hollow tube is as strong as a solid piece would be? Stronger than the wood if you had simply left it out?
What I am asking is, how does the solid bar of CF fiber differ from a tube?
Dave, more on the duplicator. Did you have any problems with tearout on the quilted maple? How deep a cut were you able to use without problems?
A tube is many times stronger than a rod due to how the pressures are evenly distributed to the walls of the tube. I tried bending a piece of brass rod and a hollow tube of the same diameter and I found the same result. It was harder to bend the tube.
As far as the wood being stronger without the graphite that would depend on a comparison of the flexural strengths of the two materials. Even if wood is as strong the tube configuration is stronger. Add to that the composite structure of inlaying the tubes into wood and it goes well beyond the strength of the wood itself.
Try a Google search for flexural strength and/or modulus of rupture for an engineer's take on this. I know I probably wasn't as clear as necessary but I hope this helps.
Chris, I use a 1/8"-3/16" deep cut and I don't get any tearout. I suspect that as long as the router bit is sharp you should be fine.
I'm an engineer. A hollow tube cannot resist bending more than a solid tube. This is assuming that they are the same materials. The example above probably involved work hardening of the brass tube which might allow it to feel stiffer than the soft rod.
WOW! I'm so glad I decided to look at this forum! David, I must say that this is the first piece I'v seen from you and I must say that i'm a fan of your work. I just started building and you inspire me. Thanks!
Barry, I stand corrected. In fact I also used incorrect terminology. I did not mean stronger but stiffer (although in the confusion of terms I certainly thought stronger). A tube is much less *flexible* which was the misperception I had of the brass tube being stronger. The tube just didn't flex until it was ready to buckle while the solid rod flexed under less stress.
To be more clear with what I want to say about this I looked up the definition of flexural strength. It is "the maximum stress in the outer fiber at the moment of crack or break." This point of breakage is not approached by string tension so the stiffness can be utilized. It is this stiffness that adds to the resonance of the system much in the same way as soundboard braces work in an acoustic guitar.
It appears you prefer Seymour Duncan pickups (at least that is what I think I see while squinting to read them). What model numbers? Both the same?
Do you have a favorite set of p'ups for blues? Jazz?
When you thread your strings through the body, is the hole sleeved with a bezel or anything or does the end of the string sit inside the wooded recess touching nothing but the wood?
I like your graphite tube idea.
How far apart are they spaced from the truss rod? Evenly spaced from the edge of the neck to the rod? Got any pics of the neck before the fingerboad was attached?
I do like Seymour Duncans. I used the JB Model (SH-4) for the bridge and the Jazz Model (SH-2) for the neck. They are a good pair. The Jazz model is noce and clean but can really growl when run into an overdriven amp. The JB is also a great pickup with a biting tone. Placed in parallel mode these pickups have some good single coil tones too.
I have string ferrules into the back of the guitar body that are like inlayed cups with a hole in them for the ball end of the string to set into. The rest of the hole is just wood. I thought about using a sleeve of some sort but haven't gotten that far yet.
The graphite tubes are 1/8" away from the truss rod on either side and parallel to it. I attached a picture of the neck with graphite installed but without a truss rod. You can see the filler strips and truss rod channel.
Hi Dave. I thought up another question or two for you.
Is there a trick that aids you in figuring out the proper angle of the cut of the neck cavity that gets cut into the body?
Is the base of the neck cut a right angle and then you visually lay it out and figure the proper angle to notch out of the body?
Then after you figure your angle do you use some sort of small degree wedge to allow you to rout it properly? Or is the angle already established on the body top near the neck base?
Any other tips would be appreciated.
I give up.
I use a 2-3 degree angle for the neck. The way to figure that is to draw out the profile of the guitar with the arch, bridge, fingerboard, and string height. Then measure the angle with a protractor. There isn't any substitue for a complete drawing of the instrument you plan to build.
To route the neck pocket I clamp the body down and set up 2 stright edges propped up over the guitar at the determined angle. A bearing guided router bit is used to cut the pocket. The pocket goes into the guitar body and into the neck pickup cavity. The neck is fitted into the pocket very snug. It should press fit for the best contact and transmission of string energies.
Barry, with all due respect I was hoping that you might want to share your insights so that others may understand as you do. I do appreciate your comments but the take it or leave it attitude is just not conducive to learning. While I understand what you are saying I have found conflicting information on this forum and on the internet. So please, before you give up could you point us in the direction of any information on the physics of tubes, solid rods, bars, etc and ideally some test data?
Hi Dave. I thought up another question or two for you.
Is there a trick that aids you in figuring out the proper angle of the cut of the neck cavity that gets cut into the body?
Is the base of the neck cut a right angle and then you visually lay it out and figure the proper angle to notch out of the body?
Then after you figure your angle do you use some sort of small degree wedge to allow you to rout it properly? Or is the angle already established on the body top near the neck base?
Any other tips would be appreciated.
John, you can do it either way. If I'm doing something Les Paulish with a carved top then I'll plane the angle into the top then use that to cut the mortice at an angle. When I did my most recent guitar (the metal-topped one in the thread below) I cut the angle into the tenon, for that guitar it was just simpler to tweak it that way. After the neck was glued in I glued on the wood for the little angled "risers" under the end of the fingerboard then planed them to match the top of the tenon, after that the fingerboard was glued on. There is no "trick" to working out the angle, draw it out to scale either on paper or in the computer then work out the angle necessary to achieve the bridge height you want. The art is in doing a clean sharp neck joint not in working out the angle.
David, Fair enough. Sorry if I sounded obtuse. I guess I was frustrated because my previous explanations appeared to have fallen on deaf ears.
A tube does add some stiffness and is a more efficient shape but once again we have to consider the amount of material per unit length. This is the key factor. The more material you can place in the neck the stiffer it will be.
If one is dealing with a free member (such as a beam in a frame) and we want to maximize strength and bending resistance, then a tube shape is great and an I-beam is not to bad either. But if we are digging a chunk of wood out of a neck and want to add something to add flexural strength, then an efficient shape is a solid bar (the taller the better). The tube is this type of application is missing the core material that could add strength. The advantage of the shape of the tube is mostly lost because it is surrounded by wood. You have removed wood and replaced it mostly with air.
I don't have and data to support this hypothesis, just my training, experience and common sense.
Thanks Barry. That explanation clears up my confusion. The information I was finding had to do with an unsupported tube (free member). This makes sense since the info came from bicycle frame makers and RC airplane sites where the tubes are free members. If surrounding the tube in wood decreases its effectiveness then I can see why a tube is not the best choice. This is exactly the missing piece of information that I needed to make sense of this. It just clicked for me when I read your post.
If I am correct in my thinking, it helps me visualize what Barry is saying if you think of the glued-in CF and the wooden guitar neck as one unit. In one example, it's a solid CF/wood laminate, and in the other it has holes in it. The tube isn't a free member any longer when it's made a part of the neck. That's why I asked a while back if the neck would be stronger if it were never routed at all, unless a solid bar was put in. I suppose that would be a hard question.
I can see now that by embedding and gluing the carbon fiber into the neck wood it would change its characteristics and no longer act like a tube. It took a little rethinking but I see it now. I'll be thinking of the CF as part of a composite from now on. I am going to put this to the test on my next acoustic instrument and purchase some solid CF bar stock. Thanks for the insights, it really helped.
Thanks for the explanation John.
Btw, Love your new guitar.
I have a few questions about a guitar I just noticed on your website but I'll ask it on the other thread featuring your new one.
I have a supposition. Mr. Myka stated that since he started using graphite tubing he stopped getting dead spots on the necks of his guitars. Wouldnt it seem that by having a graphite tube in the neck of a guitar you are effectively chambering it (please note effectively)? And I wonder what values this adds to the resonance in the neck (if any; please remember this is all just a thought pattern and may be as far off the mark as a drunken game of pin the tail on the donkey)? And seeing as the necks David has built stand up to tension well, having perhaps smaller diameter tubes as well as rods may keep the resonance factor up (if it affects it at all that is).
Could this be a way to counteract dead spots? I dont know.
Folks have reported the same results when using solid CF rods.
As Deb says, just about anything you can do to stiffen a neck will reduce or eliminate dead spots.
that's great to know - i'm using CF rods in my next guitar and that's something i didn't know about em!
Dave, what diameter graphite tubing do you use?
Is it the Avia .240" x 32.5" Avia pultruded graphite tubing?
Can you cut it using a regular hacksaw?
I assume they are cut to the same size as your truss rod or a touch longer.
What length Truss rods do you use? 18 inch?
I use an 18" two way truss rod. The graphite tube is Avia .240. I would now suggest a solid rod in light of the graphite tube discussion above.
The graphite goes from about 1/4" from the end of the fingerboard at the body and all the way through and out the end of the headstock where it is sanded to the headstock angle. Refer to the picture is post #53 for a visual. I cut the graphite with a hacksaw and shaped it with a file or sanding block. DON'T USE a bandsaw it will dull the blade.
I just have to say great job Myka. Very impressive work. About your stain job, since you was doing a maple top you didn't have to use grain filler. But on the back and neck what did you use as a grain filler? Or did you have to use any at all. I think I read that you used Stew Mac dye, did you mix with water or alcohol and what mixture did you use?
I didn't use any grain filler at all. There are some grain lines on the back but the neck filled in pretty well with the vinyl sanding sealer coats. I don't worry so much about getting a dipped in glass look so I don't usually use a filler, especially on acoustics. I like to use a nice thin finish.
The dyes are water based and I used the yellow, red, and brown. I applied them with a cotton pad and mixed the colors on the wood. Think watercolors and you have an idea of the approach. The dyes are very forgiving and easy to blend if you keep the area wet while you are blending the colors. I applied about seven applications of dye sometimes sanding lightly after the coats dry to bring back the wood color. It makes for the color variations and variations in dye intensity in the end grain portions of the top.
Damn, that's the cherry-est cherry-burstin' top I've seen! Beautiful.
In regards to CF use, Rick Turner has mentioned here (probably can be found in the library) that he dadoes his CF rods (very tall stuff) into the underside of his fingerboards, creating a TT beam. In an AL article from a few years ago he claimed that this construction could withstand his body weight. Now that's a stiff friggin' neck!
what kind of nitro do you use to brush on the finish.
i've been looking but have only found nitro that is for spraying.
I use McFaddens spray lacquer :)
I get it from LMI. Sometimes I will thin it a little bit to help it flow out. I also use McFaddens sanding sealer. Great stuff and easy to use.
I was just thinking how beautiful the guitar is now, but just think if it was sprayed with the kinda poly that fender, prs, etc. etc uses. Wow..
BTW... Stew Mac sells two different red colors in the concentrate. The cherry red and red mahogany. Which one did you use?
David, wow! I'm just seeing this for the first time.. Awesome guitar. Simple, non-technical question... How'd you get such good pictures of the guitar?! They look very professional/studio quality. Again, great guitar... and I LOVE the router jig... possibilities are endless!!
Ben, I am very fortunate to share a shop with an excellent furniture maker whose father is a photographer of 50 years. What he told me was about lighting and reflection: "The angle of reflection is equal to the angle of incidence." So to avoid glare the light sources should be over to the side of the subject. For lighting I used 2 lamps with full spectrum bulbs on each side of the guitar at about 30 degrees so the reflection will not enter the lens. The guitar was propped up in front of a backdrop of dark green fabric. I use Adobe Photoshop for image manipulation. I chose green because I could select the background and remove it easily because of the contrast of colors. I could then put a blue gradient behind it on a separate layer (in Photoshop). I used a digital camera set to 1600x1200 resolution with no flash. Use a tripod to avoid blur. The camera I use is a Nikon CoolPix 5700. Any digital camera with at least 3 megapixels will do. I didn't do any color enhancements or adjustments in Photoshop except for the background removal. What you see is what the camera captured.
Photoshop is unnecessary if you can use a piece of backing paper. Any gray, blue, or whatever color paper that is large enough to provide a backdrop should work.
Photoshop does make it easy to remove the guitar stand, etc. You can get decent prices on older versions on the web.
"The angle of reflection is equal to the angle of incidence."
You know, I've heard this, but in all the years I've been shooting pool, it just doesn't seem to hold up.
Hi,
Great guitar David!
Back on the tubes, here's a bit of materials theory, although I am no scientist these days, yet I am a qualified engineer. I was having a think about the tubes versus the solid CF rod versus not doing anything. I wrote this up for my own benefit also as I wasn't convinced about rods being better than tubes or not.
I'll post this in two messages as it is so long - sorry but David was interested to see some theory on the subject and was promoting the sharing of info.
My training tells me that by adding the CF tubes in, you have created a composite that I think will stiffen the neck, even if hollow, compared to leaving the neck as a solid chunk of wood. This assumes that CF has a significantly higher modulus of elasticity than the original wood, which it does. The modulus of elasticity is a measure of a material's resistance to deformation. Low modulus materials deform more easily than high modulus materials. You have increased the modulus of the wood by adding the tubes so it will not flex as much as it would have if it was just wood under the load of strings
There are different types of the moduli of elasticity (Young's modulus for tensile strain (i.e. stretching an object), shear modulus for shear strain (opposing forces across an object trying to rip it apart across the middle- e.g. like ripping a sheet of paper in half)and 'bulk' modulus for dilation (objects under water). Obviously we are only concerned with the first two types as the neck is under compression and a slight sideways force from the string tension.
The general formula for stress is:
stress = Force / Area
The general formula for moduli is:
stress = Modulus x strain
... incorporating the stress formula:
Modulus = Force /(Area x Strain).
or Strain = Force / (Area x Modulus).
If we apply the formula above to rods and tubes with the same outer diameter under the same force, the rod strains (flexes) less. So, Barry, you are right,if the tube and rod have the same outer diameter. If the tubes are larger and thicker walled, the outcome could be different - all depends on area as you said in one of your posts. The modulus is the same for both cases - the same material.
Regarding the neck itself, by adding a couple of tubes, you have changed the modulus of the neck. By adding two rods, you have changed it again. In theory, it has to flex less than for the tubes. As it is a composite and has to be taken as a single 'material' now, with two different configurations, the modulus is different. I hope this is making sense because it has taken me a couple of hours to nut through all of this. Hopefully it is of some benefit to someone other than me!
Part 2 coming up!
James
The second bit!
Interesting and very applicable, Young's modulus can be measured using the frequency of oscilation of a solid rod of the material being measured. There's a formula that is used to determined the modulus that is dependant on the frequency of oscillation (when a known mass is applied) and the diameter of the rod which are measurable. Maybe, if you had a rod versus a tube of the same material and did this test, you could determine the modulus for each to really see whether the tube is 'stiffer' than the rod.
Even more applicable, a more accurate way to measure the modulus in a piece of material, is to measure the velocity of sound in the material (the velocity of the longitudinal waves).
Velocity = (Young's Modulus / density)**1/2
So, by changing the make-up of the neck (tubes or rods), the modulus of elasticity is altered (as is the density) and it is going to behave differently to a wood-only neck. I am not sure whether the air in the tubes means that the neck is less dense or not? In any case, if you stiffen the neck, the modulus goes up and the sound waves travel at a different speed depending on the density. This must be why David and others get a better/different result than if it was just wood.
So, there you go. I've had enough of theory for one night so I'll leave it there. I hear a sigh of relief from everyone else also!
James
Real slick looking guitar. I just saw your newest guitar and wanted to check back on this one.
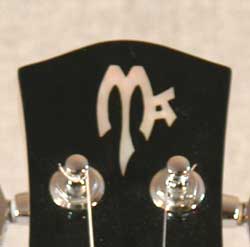
Any chance we can get a close up of the headstock inlay?
Sure. The inlay is a liguature that my grandfather came up with. It has all of the letters of my last name put together to make the symbol.
pretty cool idea, i see creativity spans many generations in your family.
Thanks, grandpa would be proud! My grandfather was an autobody craftsman. He would restore old cars and when he couldn't find replacement parts (fenders, door panels, etc) he would just pound them out of sheet metal instead. He came up with an entire Myka coat of arms and the symbol was in the middle of it all. My aunt, sister, and cousin all use the same symbol on our art. If you see this symbol on a painting it isn't mine :)
In response to James Southwell:
That is an interesting idea regarding hollow tubes. The way i see it is this. neck undergoes combined loading. Tensile stresses resulting from pure tension of strings, as well as bending stresses. So for carbon rods to be effective, one would have to optimize the following.
Area (to withstand the stress more easily) as well as second moment of area (or moment of inertia) to aid against the bending. But in bending, all the mass close to the neutral axis is pretty much useless. It would be interesting to see something like an I beam made out of fibers.