Chris Paulick's Radius Dish Photo-Essay [Pictures, Video] - created 07-20-2008
Paulick, Chris - 07/20/2008.21:10:16
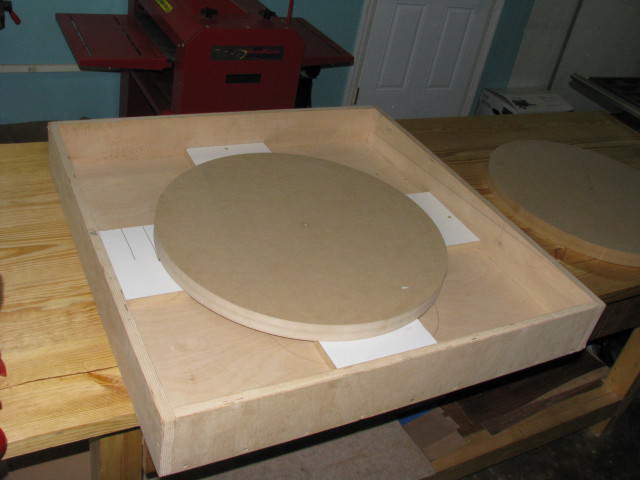
A quick essay on how I made my radius dish.
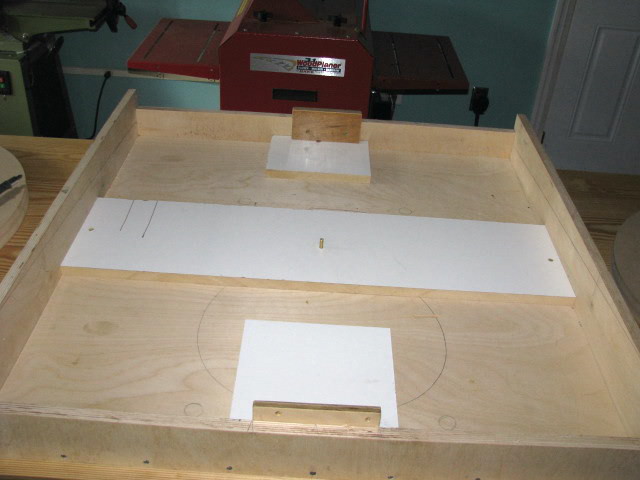
First I glued two 2' X 2'X 3/4" MDF together. Then I made this quick circle cutting jig. A piece of Melamine with a 1/4" brass dowel pivot point. It's just clamped to the band saw table and supported at the other end on some wood sitting on the table saw. And a shop vac hose for the top dust, we know how dusty MDF is.
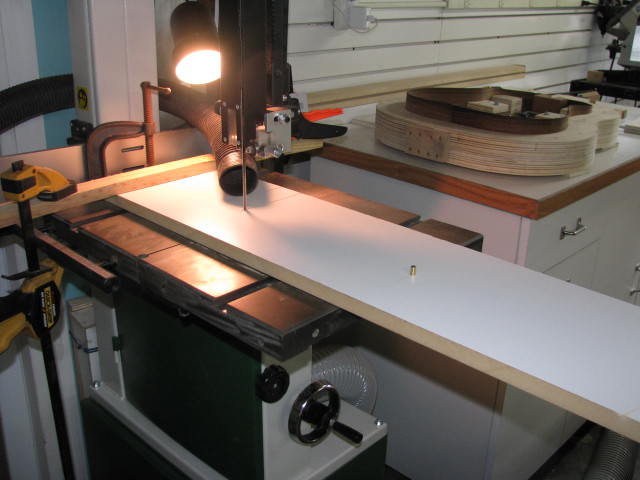
Then it's cut the dish blank.
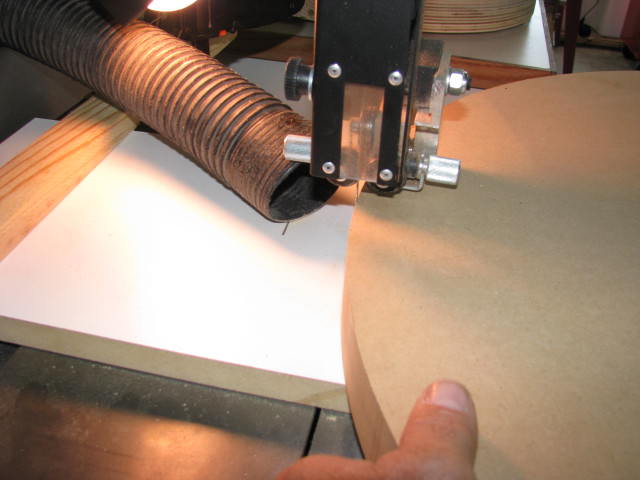
My pivot hole were a bit off center and there was some flat point on the edge so I taped the jig a little closer to the blade and refined the cut.
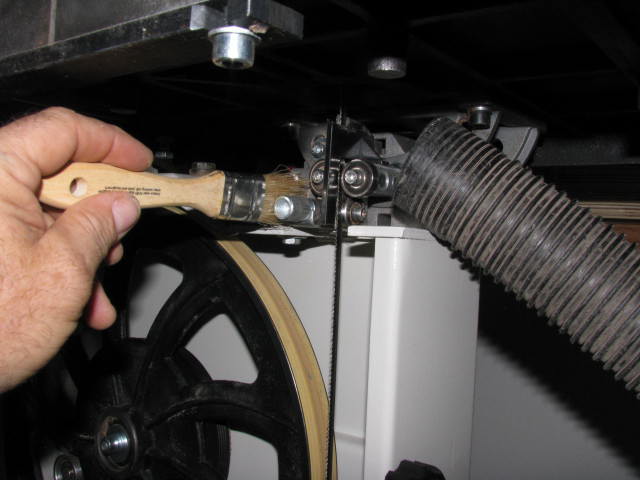
Cleaned the bearing and the saw up since the shop vac was there. I didn't want all that MDF dust getting all over the belts and bearing guides.
The Melamine really let the MDF slide easy so I decided to us it as a Lazy Susan and installed it in a box I had from before.
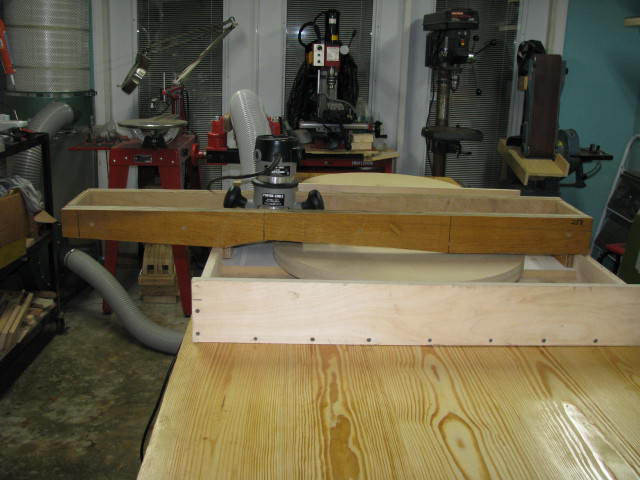
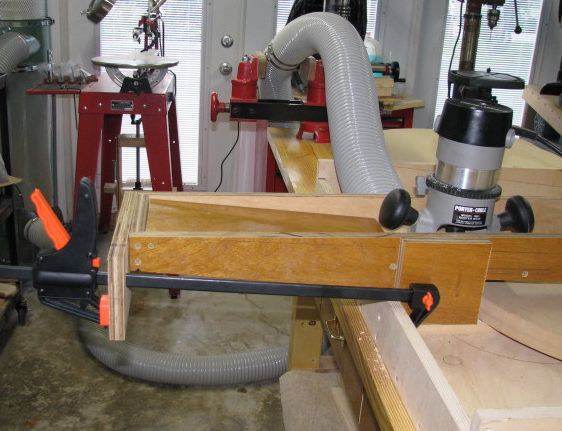
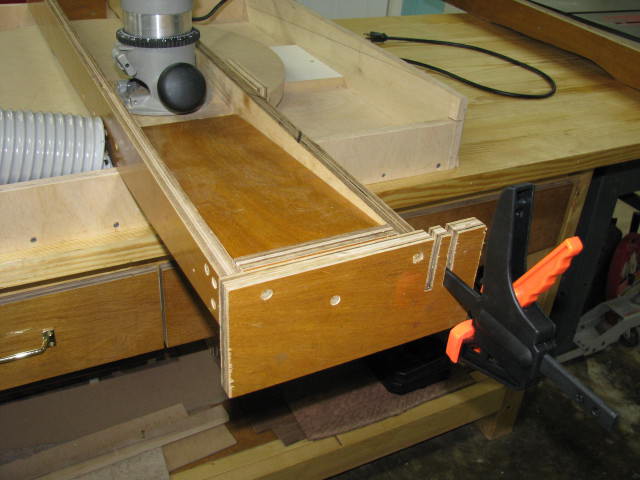
Here is the sled I built that's based on John Cross' method of making radius dishes without curved rails.

What I also did was mounted the 25'radius sled rails on the outside of the 15'radius rails so when it comes time to route the 15' dish all I have to do is unscrew 4 screws on each side and I'm ready to go and it stores away nicely. The taper long side of the rails aline and the short side of the 15' radius is a greater angle as you can see here.
I have it set up so that all have to do is lower the router bit to touch the dish and that's the apex of the angle of the side rails. I had to then cut out part of the side rails from the center line of the bit to the point of where the rails and the box sides intersected at the end of the sled travel. I had to cut that out so the bottom of the sled rails wouldn't bottom out on the top of the dish.
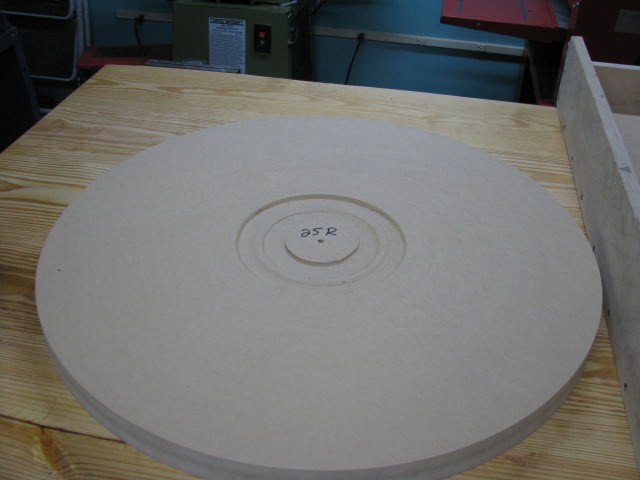
This was the first dish I did today. I was doing good until the 1/4" shaft bit I had slipped down and screwed up the board. It was blocked from my view being it was under the router. I was wondering why it started to get harder to turn the dish and turned the router off and surprize. The dust collector sucked up the fine dust and the box pretty well kept the larger pieces from getting thrown all over the shop. Really no problem with that. I'll pick up a 1/2" shank bit tomorrow. That should help with the bit slipping. I actually went and bought a 1/2"dia. cut with 1/2" shank at Lowes but it was 4" long and too long as the router motor wouldn't lock into the base. I'm wondering if I could take a pile of the MDF dust and mix it with some tite bond and fill the groves in and re route the dish and use it for the sanding dish?
Alright! That's good, saves me from posting again.
Chris, you can use the dust with epoxy for a fill. I usually use auto body filler for such things since it is so easy to use and all it has to do is hold shape and stick to the abrasive disc.
Nice demo. Much cleaner shop (both before and after) than mine.
We just did this same thing. Only we used a simular arched jig, but added a center brace to the jig. Them mounted a dowel rod in the center of the jig that went downward into the dish center. This allowed us to turn the jig and not the dish. Starting at the edge of the dish, we made our first pass around the circle. We pushed the jig around once and then moved the router a half inch closer to the center and repeated. Each time moving closer to the final destination. When done, only a small circle in the center was left. With a chissel and some sand paper, the center was knocked out and sanded to shape. Worked great. You really only need half a template/jig doing it this way.
This "long compass" method of cutting dishes works surprisingly well, even with a fairly crude setup. My jig was 100% scraps, and it came out rather accurately (well, as accurate as MDF can be).
The only problem I ran into was the dust getting under the dish. Chris was smart in having the dust collector positioned to suck up as much as possible. I did this procedure outside, which kept my shop clean, but still meant there was chip interference. Specifically, little pinhead-sized chunks get under the dish and become like ball bearings, allowing the disc to turn faster, but also raising it a little. Before I figured this out, I was confused as to why there was a step in the middle of my first dish. It was because the chips built up and raised the dish up a tad, changing the projection of my cut from periphery to center. I just worked with the chips and cut the whole thing again and it turned out fine.
One thing I also learned the hard way is that it's ok to let the router turn the disc as it's cutting, but don't let it get spinning too fast! The intertia of the disc can get a little ahead of an appropriate feed rate and make the bit dig and jump!
The math to figure out the long compass isn't that scary, and I'm sure it's just a quick Library search away.
Thanks for posting this, Chris.
I didn't seem to have a problem with chips under the dish. But my dish is raised by the melamine strip with the pivot pin and the other perpendicular strip is just blocks that don't go completely to the center. The chips probably get scraped off the bottom of the dish. Yeah if you climb mill it will spin the dish especially at the start. I let my hand slow it down. I think that may have contributed to pulling the bit loose from the collet and digging in by spinning to fast. I'm off to get a 1/2" shank bit now. I have another idea that I might try and if it works I'll post a picture later tonight.
Here is an applet for figuring out the amount the center drops between the two points.
http://www.liutaiomottola.com/formulae/sag.htm
According to this you square the radius you want the dish to be and square the length from the center of your span to your outside point of contact. Subtract the two, take the square root of that number, then subtract the radius. This gives the amount of drop.
I'm pretty sure that if you don't want to make two cuts, you can double the drop and take it all off of one side for the same result. So for a 25 foot radius and a 30 inch span you could either have each side be .375 inches higher than the center, or just have one side be .75 inches higher than the center and leave the other side alone. Anybody know that for sure?
I think that's correct Bill. I used a span of 33" because that is what the box was that I used awhile back to taper the back of my Tricone wood mold. But for 33" span the 25' radius came out to .0454" for my rise at 16.5" for the run(1/2 the 33" span). You can the calculate the rise for your run depending how long you cut the rails. And you can double it as you said to make one cut. What I did was just mark over 16.5" from my center point and doubled the rise @ .908" and drew a line from the center point through the rise point and continued to the end of the board. If you look you will see the center point is off center of the rail. It's like 18" from the center to the short side. Just enough from the center of the span and center of the dish to about an 1 1/2" extra . And the long side is 30". It's the same for the 15' radius on the long side and the edges aline because I didn't cut that side of the rail. the rise on the short side was .7578" and I doubled that to 1.515".
Here's a picture of the box to show what I was saying in post#17.
I added a piece of wood between the rails to keep some chips from flying out and a piece on the side too. I think the dust collector will draw more dust that way. I also add a clamp that will advance the sled and hold it in place while I spin the dish. I also stack a 10# weight on the sled near the router to help hold it down. This way after one turn I give a squeeze and it advances a max of 5/16". One of the problems was advancing it a 1/4" and holding in place and spinning the dish.
I have a loose screw at the end at the box that keeps it in place but allows me to release the clamp and lift it from the guide slot so I can easily remove the sled.
Probably a dumb question, but how do you adjust for the router bit extending a little below the V?
In case anybody is copying you, you said .0454 but did you mean .454? Plugging your numbers into the applet you get .454.
Good thinkin' there, Chris, on many points. I couldn't make out in the first shots (and didn't understand from your description) that those were melamine blocks elevating the disc above any potential chips and dust. I thought they were just strips for low-friction spinning. That would make my low-fi setup work a lot better. Also, putting the deflection of your sled into one side REALLY simplifies the whole rig.
Bill, you can adjust for the bit projecting beyond the sled, but I think folks crunched the numbers in a previous thread and figured that this was insignificant. Someone please correct me if (maybe I should say "when") I'm wrong.
Yeah Bill, that should be .454" I can't take credit for elevating the dish, that just happened by chance.
You're done some cool things with this jig Chris. The clamp advance and screwing the Vs for both radius onto the same sled - I wish I had thought of those.
Very nice essay. I ended up buying some dishes to avoid the mess (found a good price) but I had a thought and was wondering if anyone's tried this: I was planning on motorizing the dish for sanding at some point. I would think that using a ball tip cutter, long compass and the motorized dish would make fabrication pretty darn easy. Anyone ever try that?
Motorized dishes are good for sanding guitar rims but not for routing during fabrication.
Why not?
In case you want to see it in action.
Don't laugh.
http://www.youtube.com/watch?v=tvGemvizrz4
Andy, if you set up your dish right, when you cut it with the router in a sled, the dish will spin from the action of the router as it cuts. If things go smoothly, you can route out a dish in very short time. You don't need to go through making a motorized fixture. It would be much better to build a motorized fixture for sanding the guitars, like Mario's nice design.
Yeah, if you climb mill it will take off on you. Depends how much you take at a pass and how deep it is getting into the dish. You can hear it and see it in the video. There are times when I'm slowing it down from going too fast.
A star is born! Slick setup, great vid. The thing I like most about your rig is that the rails look to be 3"-4" in height and highly resistant to any deflection (stiff). Are John's plans available from GAL?
I tried making circular passes with my jig (a Coleman/Proulx hybrid)and was very uncomfortable not having both hands on the router, especially after the dish almost took off on me. After that, I took the more deliberate route of making radial cuts. I assume your jig would allow making radial passes too, if you remove the advance clamp, right? Having been nipped by a chainsaw years ago, I learned my lesson...hold onto tools that have 2 hand grips with both hands.
Are John's plans available from GAL?
I assume your jig would allow making radial passes too, if you remove the advance clamp, right?
I can't answer any of your questions being that I'm not sure what you mean by radial cuts and what plan you are asking about. I had no plan just designed it myself on the fly from left over wood I had laying around. And I had printed out John Cross' discussion from Aug. 2006 because I knew I would use that info when it came time to make the dishes. I know how the library is backed up so when I see a discussion that I want I print it out. The same for side bending, adjustable neck joint and others. I just need to put them in binders.
Glad to hear the video was of some help.
I know how the library is backed up so when I see a discussion that I want I print it out.
Very good Chris! Everyone should do that.
My terminology may be off, but when I say radial I mean straight passes from the dish center to the outer edge (or visa versa).
I also save threads that I know will come in handy (one day) ..Barry Daniel's motorized dish, and your dish essay most recently. I've got a bunch of stuff on the long compass (made my rail templates using one), but since I'm a newbie and didn't even know of MIMF until after John Cross' discussion, I unfortunately missed it. Your design's so cool I just thought I'd ask. The essay and vid should be enough to help me "connect the dots" next time I'm in dish carving mode.
Bob, no it won't work that way. You have to start at the outside and revolve the dish working towards the center. If you try and go in toward the center the rails will ride up on the dish from the left and right of the router bit. As a matter of fact depending what the span is the rails may still hit with the long compass design. What I didn't do is explain very clearly about how I determined what part of the side rail I removed was partly because of time restraints and the fact that I didn't script the video as it was done on the fly as you probably can tell. Let me see if I can explain it a bit better. The rails are cut at an angle and the apex is the point where the router bit tip is located. Half the span is the center of the dish and the deepest point to be routed in the dish. Now the apex of the rails can be off set by a minimal length of 12" (for a 24" dia. dish) + 1/2 the router bit dia. That would put the apex at the outside edge of the dish. At this point your rails are just the length of the span . Now you need to add what ever distance you off set the apex(12"+) to the short end length of the rail. That's how much rail you need in length to stay on the span points. In other words the minimal rail length is the span + 12"+ 1/2 bit dia. Now I had a 33" span and I would suggest that the span should be 36" or more and here's why. Once I had the rail angle cut and the router mounted, I mounted the router base 1" above the apex point (and higher an 1/2" + would have been also better) I put the sled on the box at the start position and marked the rails at the bearing point. Then pushed the sled to the finish point and marked the bearing point on the rails on the other side. Then I removed the wood from the apex or router bit to the lines I marked. Since that part of the rails isn't needed as it doesn't ride on the span bearing points. I cut it out to just under the router base. Now with the 33" span bottom of the rails just nearly cleared with the 15' radius rails. As a matter of a fact when routing the last dish I got half way in and the rails on the short side didn't clear the dish so I had to set the bit 1/8" deeper and re cut it and it cleared so I have a 15'1/8" radius. Not that it would really matter. And I'm not really sure if the long compass works that way or not. Could be it's parallel. But I think if you used a 36" span and raised the router base a little higher it would give a little more wiggle room for clearance. Also I had the walls of the box at a certain height so I set the dish in the box at finish height. Then put the sled at the start position or where the apex was over the outside edge of the dish. Then measured from the apex down to the top of the dish. Then I cut that measurement off the bearing walls so the apex was touching the top of the dish. Do this before removing that part of the rails as discribed above. That is why and how come I can set the router bit height to the top of the dish. I hope this makes sense.
Plans for this design never got sent to GAL. It never occured to me as I posted it here first. Like Chris, I made mine out of scraps wiht no pre-drawn plans. I did do radial cuts but had the bit poking out a bit further than the point of the v so my radius is off by a few thousands of a inch around the edges (I don't think it make enough of a difference to be able to even measure). Chris' design has some improvements over mine and his explaination is just as good or better than the original post. Anyone wanting to try it should print off this thread for future reference.
John, The fact about double the rise and cut once sort of threw me off at first but I finally got it. That's when I got the idea about off setting the apex and that lead me the thought, Hey the un cut sides of the apex are the same length and that led me to sister the 25' rails to the 15' rails. That stuff just seems to happen sometimes.
I too saved John's old post for future reference... and I made a little spreadsheet for the math involved. You can find it here: http://www.maxmonte.com/utilities/radiusing.xls
it's on my website, which is not commercial, and that link only triggers the download, without actually taking you to the site.... I hope it's fine for the MIMF policy...
ciao
Excellent spreadsheet. Thanks. I have one question though. Is the rise measured at the end of the carriage or at the end of the riser blocks? I'm pretty sure it's at the end of the carriage but I want to be sure.
You are right, it's measured at the end of the carriage. In fact the value changes with the length of the carriage.
So I guess you need to have excel to read the sheet? I can't open it since I don't have excel.
Yes Chris... or at least you need a spreadsheet software that can read Excel files. You can try the openoffice suite, it's free and it should work all right.
Sorry, I forgot about you, Chris. Max is right, I believe, download it here for free:
http://download.openoffice.org/index.html
Thanks for the link Deb, always watching over us... saint Deb, protector of lost guitarmakers :-)
Chris,
I have some questions as I try and wrap my head around the details for constructing this jig. Most of these in some way or another lead back to accurately setting the router bit depth.
1. Did you say that the outside of your box where the rails ride is equal in depth to the surface of the dish when it is placed in the box?
2. Is the depth of the rise significant from the perspective of the rail only, or do you need to have the router bit extended to this depth? Or, if you have the rail cut properly, does the calculation change if you have the router bit extending beneath the apex?
3. At one point in this discussion there was talk about only making one cut for the rail. Are you saying one side of the rail can remain square (uncut) to the apex and then the angle can be cut on the other side if the rise is doubled?
4. Seeing the section that you have cut out for clearance I am thinking that the angle only needs to be cut in the rail at the section that is going to ride on the box.
5 What type of router bit are you using? You might have said this and I missed the detail.
Thanks for you help on this. I'm going to watch your video a few more times and hopefully get moving.
John
1. Did you say that the outside of your box where the rails ride is equal in depth to the surface of the dish when it is placed in the box?
No, that's not correct. At the time what I did to get that box edge height(let's call it the rail support height) was to put the dish into the box on the center pin. I put the rail on before the center wood was removed and the apex point was still there. Being that my box wasn't built for this and I was adapting it the sides were higher then needed. Then I pulled the rail so that the apex was over the outside edge of the dish. I measured the gap from the dish to the apex of the rail and removed that from the Rail support to give me the RSH. As a result the RSH is higher then the top of the dish. Now having done it that way I would say that if you were wanting to calculate it then you would take the top of the dish height and add to it the rise for the run from the outside edge of the dish to the RS edge. You will have your rise and run figures already because that's what you cut the angle of the rails from. Come to think of it, I'm not to sure which rail I used for that. It must have been the 25'radius rail. That would explain why I had to lower the bit some to get the 15' rail to clear because the RS height should have been a little higher. See, I'm even learning things here. I suppose if you are concerned with being real accurate you could make shims for the difference in RS height but I don't think it would matter. You could double the rise difference and just shim the start side.
2. Is the depth of the rise significant from the perspective of the rail only, or do you need to have the router bit extended to this depth? Or, if you have the rail cut properly, does the calculation change if you have the router bit extending beneath the apex?
I would say the bit should be at the same point as the apex. That's why I set the apex point of the rail to touch the outside edge of the dish as in above. That way once I removed the part of the rails that didn't ride on the RS then all I had to do to set the router bit tool heigth was to have it touch the top of the outside edge of the dish. Now if the bit extends lower then I don't think it changes things all that much as John Cross stated. I've never did the math on it but John or his wife may have.
3. At one point in this discussion there was talk about only making one cut for the rail. Are you saying one side of the rail can remain square (uncut) to the apex and then the angle can be cut on the other side if the rise is doubled?
Yes, If you decide where your apex point is at and you mark it on the rail edge. then let's say 1/2 your span is 20". So you mark the rail 20" to the the short side of the rail if you are going to offset the apex as I did. Then say your rise was 1/2" for the run(1/2 the span). You can double that to 1" and measure up the at the 20" point 1" and mark it and draw a line from the apex through that point and just cut that one section instead of marking a point 20" on each side of the apex and up 1/2" and making 2 cuts. That's why the long sides of the two different radius rails (15'/ 25') match up and I can just sister them together.
4. Seeing the section that you have cut out for clearance I am thinking that the angle only needs to be cut in the rail at the section that is going to ride on the box.
Yes, but you probably have figured that out by now. The section that is going to ride on the Rail Support is what I am assuming you mean.
5 What type of router bit are you using? You might have said this and I missed the detail.
I used a 1/2" dia. X 1" straight carbide bit from Lowes.
Hope this helps.
Oh yeah, as a side note if you are making a box then making the lower right side corner a bit higher will catch and prevent more chips from being thrown out of the box.
Chris,
Thanks. That clears a bunch up for me.
John
Chris,
Within 48 hours of seeing the vid I had my dishes.
I used Massimiliano's spreadsheet for calculating a 15' and 28'
Another thank you is in order!
My question is, now that I have my dishes (glued back to back), is there an easy method to confirm the radius?
Thanks
You're welcome Bob. I'm glad it helped someone.
I suppose if you lay a straight edge across the dish and check the depth at the center and if the numbers are right for the math then it's right. Or get a tape measure and stretch it out in the driveway to the radius and draw the radius out on a piece of cardboard and cut it out and check it to that is another way. But If you made the sled right then it is more then likely close enough. If you have a cad program and can print out a page with the radius on it then you could also check it that way. Maybe someone here has a file they could post or send you. I don't know if the are any templates in the library . But I don't think so.
Just hold it up against a 28' sphere! Simple, one-step operation. ;o)
And put sand paper on the sphere and rotate it. Do you have a video Lauren?
I don't have a radius dish, but I do like math. If this is at all useful to you...
It occurs to me that if you can center it and spin it, you should be able to drop a pencil straight down at a fixed height and draw circles on it.
Let's see... if we know
sr = sphere radius
dr = dish radius
then we can find
dd = dish depth at center = sr - sqrt (sr*sr - dr*dr)
and if we know
cr = some other circle's radius we want to check the depth of
then we can find
cd = circle's depth = sqrt (sr*sr - cr*cr) - sqrt (sr*sr - dr*dr)
= = =
Example:
sr = 15' = 180"
dr = diameter/2 = 12"
dd = 180 - sqrt (180*180 - 12*12) = 0.400"
cr = 6" (half way out):
cd = sqrt (180*180 - 6*6) - sqrt (180*180 - 12*12) = 0.300"
cr = 9" (three-quarters of the way out):
cd = sqrt (180*180 - 9*9) - sqrt (180*180 - 12*12) = 0.175"
Not too bad -- no sines or cosines required! :) (But I did verify the equations using them.)
Yeah, That's a pretty simple way to check it.
Goodness gracious, it's easier than building a guitar! Multiply... add, push the sqrt button... C'mon. :)
glad to help out!