Bad back cracks! (hard to say) - created 01-07-2009
MARZIN, Pierre - 01/07/2009.07:25:54
Hi! And a happy new year!
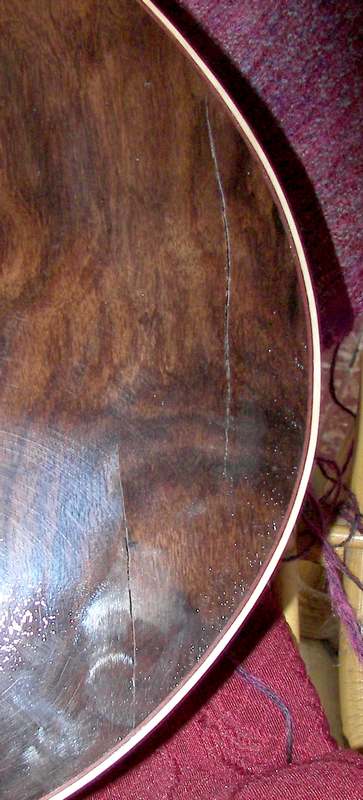
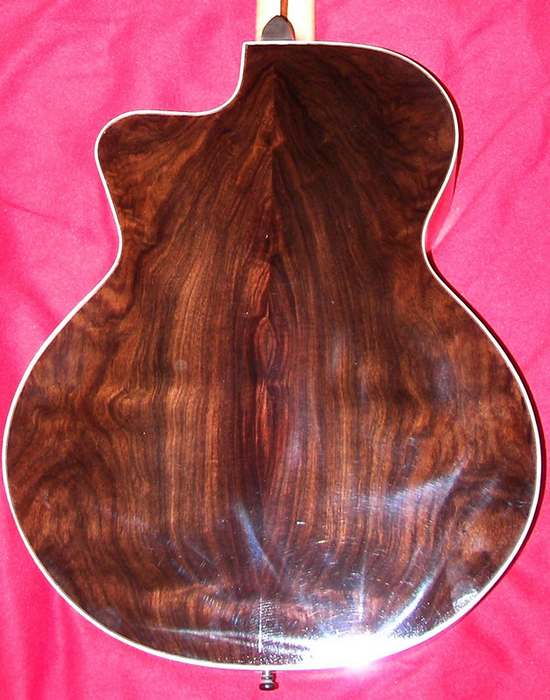
My first 2009 days are a bit bitter: my last acoustic guitar back is cracking badly, due to lack of humidity... We're having a cold weather (heating system on 24h/24) and two of my guitars are experiencing problems. I've solved the dryness problem but I need to repair this nice Indian rosewood back. It suddenly cracked in several places: 2 cracks at the lower bout and 2 close to the neck block. Should I remove and replace this back or do I have a chance to fix it durably? I know I must rehumidify the box but how should I process? Any tip or advice welcome!!!
Pics...
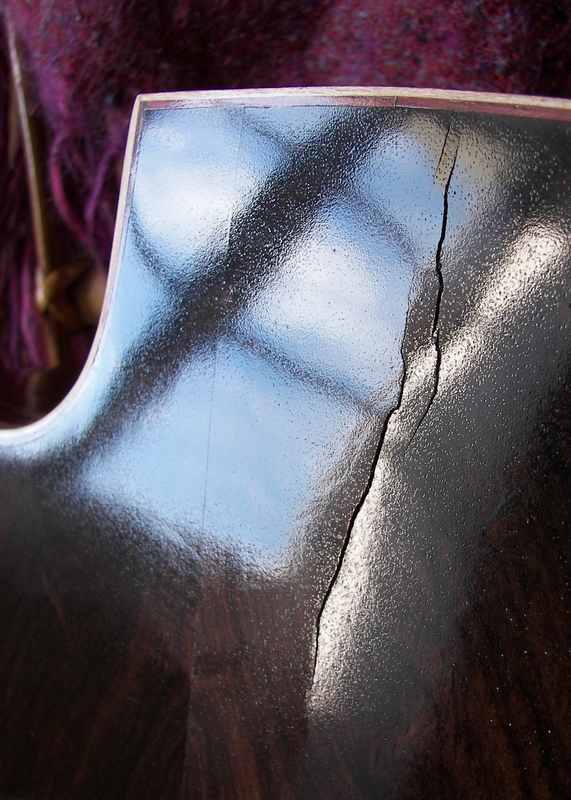
and the lower bout.
Is that back flatsawn?
Need more input.
Is the guitar complete(looks to be sprayed, but not buffed out). Is it for you to keep, or for sale?
At any rate, you have a serious RH issue, both now, and when you built it. Proof once more that the most important tool you'll ever own is your hygrometers. Yes, plural; we all need more than one, as one is useless.
Yikes!!
Yes Deb it's flatsawn and used to show nice patterns. You're right Mario, it's not buffed out. I've finished it 2 months ago and it was supposed to be a gift for a good friend of mine... What does RH mean exactly? Why one hygrometer would be useless? I've built it on a 5 month period (april to august) and didn't expect such a dry and cold weather! I just started rehumidifying it but I'm afraid to go too fast...
Pierre, you really need to educate yourself on humidity issues. You built the guitar using the least-stable cut (flatsawn) during the most humid part of the year (April-August), and it sounds like you did so with no humidity control in your shop. If that's the case, it's no surprise your guitar is committing suicide now that the humidity is dropping.
Controlling humidity in your shop is critical to successful lutherie, you will need to add some humidity controls before you begin your next instrument.
OK Deb, I learned something! But what can I do for this one?
I have to leave that answer to the more experienced.
RH is Relative Humidity.
One hygrometer is useless because if it fails, and drifts, which even the most expensive hygrometer will do, you'll never know, thus, you cannot trust it. If you have at least two, both are calibrated, and both read the same, you can rest assured that they are correct. Yet, the moment one of them reads differently than the other, you know something is wrong, and it's time to check the calibration.
I have 3 of them. Increases the odds.
If this were mine--I would be disappointed and frustrated, then I would have to keep it as one for my own purposes.
I would rehumidify and place a splint on the inside of the guitar. You might consider placing a sliver of wood into the crack on the surface, or simply fill with shellac or wood putty, and try to finish over this.
Replacing the back would be almost as much work as building a new instrument. With the repair it should still be an instrument which sounds and plays well. It may not be quite as pretty, but has more "character" now.
The important lesson here is to start with dry wood. It must be measured for moisture content for which you will need a moisture meter. We all have had things go wrong due to lack of humidity control, and those are painful lessons. We do learn from our pain much more than from our successes, so consider this an educational experience.
You can try your hand at making the repair, and hopefully that will be good. If not, you can replace the back. The signs of the wood shrinking that much show it was not dry, so what about the other wood in the guitar? It has probably been stressed enough to make me wonder about the glue joints. I would test all the seams I could reach with a palette knife or feeler gauge.
..those are nasty looking cracks, and I think Deb's comments are right on. I don't have lots of experience w/ new building, but if you have cracks like that now, it may mean a lifetime of problems with that wood. As some above comments suspect, the wood was probably a little 'wet' when the guitar was built.
I can comment on the RH/Hygrometer issue. In a climate with a wide range of humidity, you need a hygrometer, or two as mentioned above, to watch your RH level. To calibrate, buy a cheap 'sling psychrometer', this instrument will give you a pretty reliable RH reading, then you can set your hygrometers to that reading.
Good luck with your repair..Tom
Thanks for your kind words. It's true it's a painful experience, but also very useful! I thought this wood was dry enough (I don't have the equipment to mesure it's dryness). I bought it in India 3 years ago and stored it in a warm and dry place until last spring. I removed all the guitars from the "dry" room and mesured RH using a psychrometer: about 37%! I'm going to purchase a humidifier...
After kkeping the box 3 days in a plastic bag with a wet sponge, the cracks are almost tight now and the arches look quite better. All the glue joints I've been able to check seem OK. I'm going to wait 2 more days and glue the cracks. I guess this guitar will need to be kept in a more than usual wet environment!
I'd like to add thin patches under them, at least around the neck block. I can't figure how to clamp these during glue cure time? Or should I use CA? Any tip or jig? Thanks again for sharing.
Patch with Hot hide glue, small pieces of spruce, cross grain.
You can hot hide glue the surface crack first, Glue inside later.
To keep the little patch in place, you can simply hold it for five or ten minutes until the hide glue "grabs", and then place some masking tape over the surface. (The masking tape helps hold it in place, and keeps the moisture differential on the two surfaces of the splint from making it curl up.)
You can figure where the crack is, get your glued splint in place, and use a magnet on the inside of the guitar and on the outside of the guitar. You can make a thin flexible stick to hold the splint in place. You can place the guitar so gravity holds the patch down, and place a weight on top of the splint. (Use a chunk of metal, or make a sand bag small enough to slip in place.)
The big issue is getting the patch exactly where you want it. This gets tricky, and you have to be creative.
You can take a mirror, place it inside, and bright light. These will allow you to visualize what you are doing better. If you have tiny hands, you might be able to get your splint easily where you want it.
Another trick is to put a small pin or needle on the end of a stick. Put the needle into the splint, and use it to position it where you want it.
After it is glued, reach in and sand the surface a little so it looks tidy and professional.