
About a year ago, the Archtop category of the forum carried a pretty good discussion on steam-bending tops for arched guitars. Earlier this week, I came across a compelling PDF from violin-maker Helen Michetschlager on the bending of viola tops:
http://www.helenviolinmaker.com/talks_a ... 20pics.pdf
I'm wondering if this might be a worthwhile method to consider for guitar tops as well, or if the scale and size of guitar plates (8" or wider per half) would make this too cumbersome and perhaps unstable a process. Anyone?
Reboot - Steam-bending Tops
-
Alan Peterson

- Posts: 127
- Joined: Sat Jan 07, 2012 5:32 pm
- Location: Washington DC USA
Reboot - Steam-bending Tops
Alan Peterson
Name in Anagram Form: "Resonant Peal"
Name in Anagram Form: "Resonant Peal"
-
Jason Rodgers
- Posts: 1554
- Joined: Fri Jan 06, 2012 4:05 pm
- Location: Portland, OR
Re: Reboot - Steam-bending Tops
Say, that clamping procedure is really cool. I'll let others with experience/knowledge chime in regarding guitar tops, but it sure would work for mandolin family instruments.
-Ruining perfectly good wood, one day at a time.
-
Paco Jimenez
- Posts: 37
- Joined: Sun Jan 08, 2012 7:25 am
Re: Reboot - Steam-bending Tops
Interesting reading. Thanks for sharing, Alan.
-
Dennis Duross
- Posts: 132
- Joined: Sun Jan 08, 2012 12:46 am
Re: Reboot - Steam-bending Tops
Maybe this is the discussion you were searching for?
http://www.mimf.com/phpbb/viewtopic.php?f=5&t=706
http://www.mimf.com/phpbb/viewtopic.php?f=5&t=706
-
Chris Reed
- Posts: 168
- Joined: Thu Feb 02, 2012 6:26 pm
Re: Reboot - Steam-bending Tops
I've just started bending my ukulele backs, and I worked by clamping the back into a form for the desired shape and then simply piling on sandbags heated in the oven to around 150C. Leave to cool, and you have bent wood.
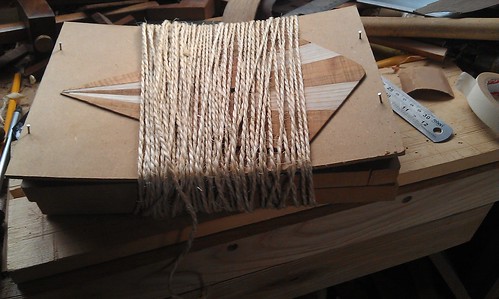
The string didn't put quite enough pressure in the centre so there was a slight dip there - for the next one I simply clamped a piece of wood across the form.
It bent very nearly to the shape of the form:
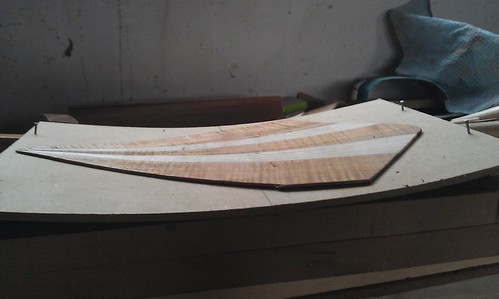
and glued onto sides sanded to shape in the form with no trouble at all.
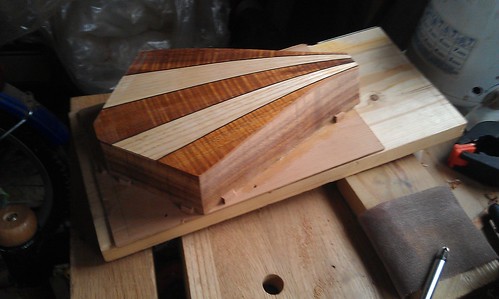
Clean sand comes from the pet shop, sold for use in parrot cages. Added oyster shell for glossy plumage, which must be a help here! The bags are roasting bags from the supermarket (hint, double them against splits, and discard after the third use as they start to break down).
This is an 11 inch scale sopranino, but I can't see a problem with larger backs, just buy more sand.
The seams here were glued with Titebond, and stayed glued. On the second back I had some seam separation which I was able to re-glue OK, but in future I'll use HHG for the seams, which should hold as this is all dry heat.
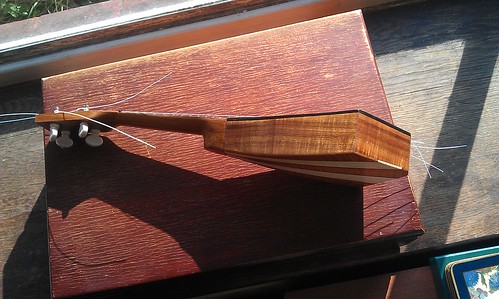
And I guess I should show how it turned out - cedar top, koa and ash for the body.

The string didn't put quite enough pressure in the centre so there was a slight dip there - for the next one I simply clamped a piece of wood across the form.
It bent very nearly to the shape of the form:
and glued onto sides sanded to shape in the form with no trouble at all.
Clean sand comes from the pet shop, sold for use in parrot cages. Added oyster shell for glossy plumage, which must be a help here! The bags are roasting bags from the supermarket (hint, double them against splits, and discard after the third use as they start to break down).
This is an 11 inch scale sopranino, but I can't see a problem with larger backs, just buy more sand.
The seams here were glued with Titebond, and stayed glued. On the second back I had some seam separation which I was able to re-glue OK, but in future I'll use HHG for the seams, which should hold as this is all dry heat.
And I guess I should show how it turned out - cedar top, koa and ash for the body.
-
Chris Reed
- Posts: 168
- Joined: Thu Feb 02, 2012 6:26 pm
Re: Reboot - Steam-bending Tops
I should have added that this wood was thin enough to be bent on an iron (<2mm) - not sure it would work with thicker wood (actually, pretty sure it wouldn't so you'd need steam there).
-
Bill Raymond
- Posts: 367
- Joined: Fri Jan 06, 2012 5:37 pm
- Location: Red Bluff California
Re: Reboot - Steam-bending Tops
Cute little uke, Chris!
-
Steve Senseney
- Posts: 673
- Joined: Fri Jan 06, 2012 2:45 pm
Re: Reboot - Steam-bending Tops
I like your uke also.
-
Chris Reed
- Posts: 168
- Joined: Thu Feb 02, 2012 6:26 pm
Re: Reboot - Steam-bending Tops
Thanks guys. I tried the uke out at my local pub, and it's loud enough to fill the room so I'm happy. Now it goes to my niece for her birthday this coming weekend.
The sandbag bending was an experiment, but I was surprised how easy it was - clamp back to form, dump sandbags on top. go away and do something else. Cheap digital meat thermometer to check the temperature (I kept the temperature at 120C because of the multiple joints). Just after this one I made a figure 8 koa soprano, and put a couple of bags on the waist before bending in my light bulb bender - hotter this time, around 150C. Soprano waists are tight, and thus the most likely place for cracks, but this one bent really easily.
The sandbag bending was an experiment, but I was surprised how easy it was - clamp back to form, dump sandbags on top. go away and do something else. Cheap digital meat thermometer to check the temperature (I kept the temperature at 120C because of the multiple joints). Just after this one I made a figure 8 koa soprano, and put a couple of bags on the waist before bending in my light bulb bender - hotter this time, around 150C. Soprano waists are tight, and thus the most likely place for cracks, but this one bent really easily.
Re: Reboot - Steam-bending Tops
Frank Finocchio steams tops and backs. He has some info on this in his DVD series on archtop building but also has a DVD dedicated to techniques for steaming tops and backs. here is his web http://finocchioguitar.com/
-
Jason Rodgers
- Posts: 1554
- Joined: Fri Jan 06, 2012 4:05 pm
- Location: Portland, OR
Re: Reboot - Steam-bending Tops
I used Helen's technique on the experimental mando I'm building right now. It was really easy, and with a bit of trial and error with the clamps and wedges, it could yield predictable and repeated results.
-Ruining perfectly good wood, one day at a time.
-
Simon Magennis
- Posts: 471
- Joined: Sat Jan 07, 2012 7:51 am
- Location: Menorca. Spain.
Re: Reboot - Steam-bending Tops
Very interesting article. It is the first time I had ever heard of a "fish kettle". I looked them up. Essentially an elongated saucepan for steaming. I doubt if you'd find one big enough for an archtop however a big old fashiond floor standing boiler would be just what is needed.
Depsite the bending, there is still a bit of carving to be done. She bends at 5mm and works the top to 2.4mm. I wonder how backs would hold up to this treatment. Carving a maple back is hard work.
Depsite the bending, there is still a bit of carving to be done. She bends at 5mm and works the top to 2.4mm. I wonder how backs would hold up to this treatment. Carving a maple back is hard work.
-
Jason Rodgers
- Posts: 1554
- Joined: Fri Jan 06, 2012 4:05 pm
- Location: Portland, OR
Re: Reboot - Steam-bending Tops
For my little project, I used 3/16" Doug fir for the top and 3/16" oak for the back. My wedge pushed a 3/8" dome in the plates (5/16" that stayed). My 10" diameter plates fit in a my wife's largest pan with lid on the stove, but I think finding a suitable dish/container for steaming larger plates is a pretty modest challenge to overcome for this otherwise simple technique. I've seen some good-sized fish pans for cooking salmon that would work, even if you had to do your steaming on the BBQ.
EDIT: A quick glance at amazon (search "fish pan" or "fish poacher") reveals that most pans of this variety are 18" long, but a few can be found in 20" and 24" lengths for less than $40.
EDIT: A quick glance at amazon (search "fish pan" or "fish poacher") reveals that most pans of this variety are 18" long, but a few can be found in 20" and 24" lengths for less than $40.
Last edited by Jason Rodgers on Sun Jul 07, 2013 12:27 pm, edited 1 time in total.
-Ruining perfectly good wood, one day at a time.
-
Mario Proulx
- Posts: 821
- Joined: Fri Jan 06, 2012 12:08 pm
Re: Reboot - Steam-bending Tops
Interesting article and method. While I've not tried it(yet..!), a few thoughts came to mind as I read it.
The (dried and bent)plates could be jointed as a pair while still in the steaming form. This should yield a perfect, and simple to accomplish, join.
A simple one or two(or three...) piece clamp that uses bolts and wing nuts could be fabricated to hold the edges instead of all the little U-shaped ones. Basically, a full-length version of the C-bout clamp.
A steam box can be made with plywood and an electric kettle. Google be your friend.
After the final steaming is done, the whole thing could be placed in an oven and dried completely. Start at about 160°F for the first few hours, then raise it to 200°F(no more than 210°F!) for 12 hours. This will take the wood to 0% moisture content. It will return to equilibrium in the next few days, but can be worked right away. This will not only set the bend and minimize any springback, but it also takes the wood to its minimum dimension, preventing cracks and splits in the future.
I see no reason that it can't work with guitar-sized plates, though it may take more steam-and tap-the-wedges sessions. Or perhaps even fewer as the larger plates may be more compliant. Hardwoods, for backs, should actually be easier to bend.
-
Bobby Burns
- Posts: 2
- Joined: Thu Feb 02, 2012 2:18 pm
Re: Reboot - Steam-bending Tops
I have used this bending method on several mandolins. You don't need and oven to dry them. After steaming, you have to get them clamped quickly, as they dry fast. The joint is done on a form holding the arch. The jointed and glued plate is very stiff. It is thick enough to allow quite a bit of re-curve and graduation. I was told by many "experts" that spruce would not bend well. It bends very well when steamed. A plate can be made with this method, which looks exactly like a completely carved one when finished. It takes some practice to get a good one, and it doesn't save that much time. It was an interesting experiment, and if you take time to get good at it, it will produce as good of an instrument as any other technique. I would rather carve the plate in most situations. Customers seem to think a bent top should be on a cheap instrument, even if it sounds and looks great. I will still use from time to time, when I want to use a specific piece of wood which happens to be too thin to carve. I have made and sold several mandolins with bent tops and backs. I have four or five of the first experimental plates that didn't turn out, and I decided not to use. I started out trying to bend over an inside form. Sometimes the wood would split from shrinking after I clamped it and it started to dry. If I didn't clamp as tight, I had too much spring-back and it was very unpredictable. I settled into a method much like the viola maker mentioned above, where the plates are clamped together and wedged apart. The scroll of an "F" model can be done by bending the scroll area up, and gluing a spruce wedge under it. The wedge is such that it is covered by the binding, and carving the ridge does not go through the top part. Even on an unbound top or back, the joint in the edge under the scroll is hardly visible, and has never been noticed by anyone, until I pointed it out. I still own the mandolin made with the first successful bent plates I made. It's not the best one I made like this, but it works, and has held up well for 14 or 15 years so far. You can see and hear it at www.lonemountainband.com. It's the not quite "F" shaped modern looking 2 point.
-
Bobby Burns
- Posts: 2
- Joined: Thu Feb 02, 2012 2:18 pm
Re: Reboot - Steam-bending Tops
I tried several different bending jigs. I tried pulling the steamed plate down on a form with a piece of canvas in a frame. It took a while to build the form, and took too long to get it clamped down, and it was impossible to line the arch up in the right spot on the piece of wood.
I then decided the canvas was unnecessary, and just used a frame that camped the edge of the plate. In order to have enough room to joint the plates after bending, I was bending one side at a time, and using the same inside form for both sides. It was a little easier to line up the joint, but it was hard to get the arches to match, even though the inside form was the same, the exact placement of the center of the arch, and the amount of spring-back was hard to predict. I still built a few mandolins with this form (including the one on the Lone Mountain Band page). The form was fairly elaborate and time consuming to make. It also was the one that didn't allow the wood to shrink as it dried, and caused cracks in lot's of the parts I bent with it.
I finally settled on a plywood edge form. I clamp the two halves together, with the planned center joint locations lined up, clamped with wing nuts like Mario described. Wedges are driven between them like in the viola link. I steam the parts a while, clamp and start wedging, steam some more, wedge some more, and so on. Since the whole thing can be steamed without removing any forms, I can play with it until it looks good to me without worry of it drying/cooling too much to bend. I can make a jig for a new design in a few minutes,and it works much better. No cracks, more predictable spring back, and since I'm wedging the two side apart at the same time while clamped together, the arches match a lot more often. It seems like the inside form, with the more precise carved arch, is not just an unnecessary amount of work, the simpler method actually gets much more predictable results.
-
Jason Rodgers
- Posts: 1554
- Joined: Fri Jan 06, 2012 4:05 pm
- Location: Portland, OR
Re: Reboot - Steam-bending Tops
Yes, what you guys said. The wedge technique is such an elegant solution. I now have a top and back joined with braces, though both took a couple tries to get the joint right. Your idea, Mario, to joint the plates while they are still in the wedge form is a good one, but it will totally depend on how the clamped edges turn out. Like Bobby's idea, I made a plywood clamp that follows the full edge, clamped like crazy with 8 or 9 bolts with wingnuts. But the plywood deformed in the steam and this discrepancy causes asymmetry in the final plate shape, both in contour and arch height. It was a pain to get them lined up. Getting repeatable, symmetric bends is tricky, and Helen told me that it doesn't always work for her, and she's not sure why. The results sure are cool, though. I will try again.
-Ruining perfectly good wood, one day at a time.