Steve Senseney's photo-essay on cutting up a log without a sawmill (but with a chainsaw) [Pictures] - created 09-16-2007
Senseney, Steve - 09/16/2007.20:47:02
Several discussions have started about cutting up a stump, yard tree or storm damaged tree.
I have done this several times, and started working up a stump this week end. I took some pictures and will show you how I worked it down to boards.
This was an Osage Orange tree. The tree had died before being cut down. Last year, I cut the tree at about 40 inches above the ground. I did that for several reasons. The top part of the stem was a much nicer log than the lower part. The lower part was in a fence line, and probably had fence hardware in the log. I did not have enough time or room in my truck for the entire tree, so I picked the best pieces to work at the time. I went back to get the base this trip.
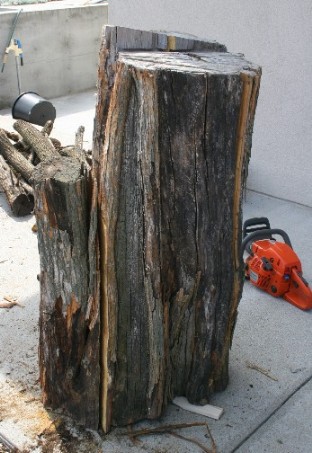
I had a 20 inch bar on my chain saw. The log was about 24-30 inches at the top. It was quite irregular and obviously had some wire sticking out of the side of the stump.
I wanted to split it in half prior to loading on my pickup, because I did not have any one to help me lift it. I planned my first cut by looking at the deep indentations in the stump, and conversely looking at the portion which would have the widest cleanest boards when quartersawn. (Also avoiding any possible hardware.) I made the splitting cut, and then cut the stump at the base. I also cut off a small sucker that came off of the side of the tree. It was of little value for guitar building, and made moving the log and the pieces difficult. I trimmed it off also.
Here is a picture of the reassembled log.
Second view

Third side

This log had some hardware that was visible. It is always hard to guess if there is hardware hidden inside. These can be nails from bird feeders in yard trees, bullets from hunters, rocks placed by squirrels and pack rats and birds.

This a view of how the first cut was done. With using the chain saw, I try to pick a line to follow down the log, and try to look at the horizon and pick a pole or something to look at to keep a straight cut.
I don't have a specific chain for milling lumber. I use the chain and blade which came with the chain saw, and don't use any guide devices. But my logs are fairly short, and usually quite rough.

It is always a mystery what is inside a log as far as the lumber. When it is opened it can be disappointing. I was not happy with the first cut, and wasn't sure I would get much wood out of this stump.
The picture shows lots of cracks in the central portion, with old knots and snags extending out from the center of the log. There is really only a little area on the exterior which shows fairly usable wood.

The second cut on this log was placed to the right of the center rot.

With this cut, the portion on the right side actually had a nice piece of log, which had few defects. It was small enough to take to the band saw. However, it was still pretty rough. I needed to work one face down so that it could be pushed through the band saw. I used the 4 inch makita power plane to clean up the face enough so it would be flat. If I had a 12 inch jointer, I would have used that. Another choice is to attach a flat board to an edge or face which can be used to guide it along the band saw table.

The notch in the board above is where the hardware was removed. The top piece of hardware was removed by cutting off the top 8 inches of the log.
To check if the surface has twist, I used a couple of flat sticks.

After this surface was flattened sufficiently, I took the section into the band saw. I put on my 1" blade. I have a 3 HP motor. I wish I had more power. I had to reset the overload on the switch several times by the time I finished the afternoon.
I used a draw knife to remove some of the bark. I did this so I would have a nicer surface to read the cutting line, and to get rid of a little dirt off of the surface. Dirt on a log quickly dulls your bandsaw (or chainsaw) blade.
I used a snap line to mark a straight line for the first cut.

This last picture finally gives an idea of the wood I can get out of this piece.

The rest of the cutting was done with a fence.
There are always other things about cutting up a log.
Remove the bark from the log. Insects lay eggs under the bark, and the logs can be damaged in a matter of weeks. Osage is unique in that it is quite rot resistant, and bugs don't bother it too much. Ash logs can be ruined in a matter of a few weeks in warm weather.
When you are looking at a log, you want to cut it for the highest value materials. If you are building guitars, look where you can get the back and sides set first. The next largest pieces would be the neck (but with Osage being somewhat heavy, it might be good for laminations, but not for a solid neck). The next biggest pieces needed would be for fingerboards and bridges.
The next smaller pieces would be used for head stock veneers. Side pieces which have defects could be used for smaller instruments, or ripped up for linings or for rosette work.
The smaller pieces could also be used for tool handles, knife handles.
Commercial sellers also sell the smallest pieces for pen blanks.
By the time you have cut the stump up to these sized pieces, there is just a little saw dust remaining.
After all of this is cut up, it needs to be dried carefully. Some types of wood have a tendency to mold or stain if they dry slowly. With osage, it can remain fairly wet and not rot.
I sawed some for side sets, but after a while, as I got more tired, I cut the pieces to about 6/4 size, with the plan to resaw them later.
Great pictures Steve, thanks.
You must live in the osage capitol of the world! And I hear it makes fantastic firewood too!
Thanks for the photo-essay Steve. I could read stuff like this all day, very interesting. Do a Brazilian Rosewood tree next!
Send me the log!!
Excellent tutorial, thanks.
So do you have any space left in the shop when you add this to your previous cache?
Oh, and don't you think we need a shot of the bandsaw that did this work? I think most would enjoy seeing it.
Do a Brazilian Rosewood tree next!
According to Alan, osage is as close to BR as one might ever find outside the rosewoods.
Now that you have a quarter of the stump, do you keep making radial wedges to maximize the quartersawn aspect of the wood or to do you start slicing it up such that some is quartersawn, some riff sawn and some flat sawn?
Especially with such a twisty piece of wood, you look at each piece and maximize the yield. In addition, you try to use each piece to its best purpose. If a piece has run out, you would not be able to use it for a side or back piece. It might be useful for a turning piece, or a plane body.
If this was a straight grained log, you would trim off of each quartered piece alternating from one side to another. This would give the best quarter on each piece until you get down to shorter pieces. At that time, you could split this in the middle again, and cut some sides which would be perfectly quartered and a little narrower. On the other hand, you could use the off quarter pieces for neck blanks, fingerboard pieces or other wood working purposes. These pieces would be great for turning pieces also.
Randy has seen my saw, and wanted me to post a picture. This is the label. The company went out of business quite a while ago.

The saw is a 36" band saw I bought when a lumber yard in central Nebraska sold out about 20 years ago. It was originally built for flat drive belts, and had been run with flat belts off of a 3 phase motor that probably dated from the 1920s. It has babbit bearings. These needed to be recast when I got the tool. I switched to V-drive belts and a 1 phase 3 HP electric motor. The belts on the wheels had to be replaced, and the guide bearings have been updated some. The table is huge and quite stable. I can switch from 1/4 inch blade to 1 inch blade in about 10 minutes.

One more view of the back--
I am certainly happy with this machine, and have no plans to replace it. If anyone has an opportunity to get a similar machine, they are very nice to use.

Randy alluded to my stash. Here is a picture of some of the Osage (from previous cuttings) piled in my garage drying.

Steve, I am insanely jealous. That saw is beautiful!
Please say it's covers and guards have been removed for photo purposes. If not, it's the most dangerous saw I've ever seen to operate.
It had no covers. I have a small guard on the left side of the blade. The V-belts are in back, and I don't cut wood from the back of the saw. When the blade comes off (rarely) the blade has no energy. The power remains in the wheels.
I don't find any blood splatters on the castings.
I really feel quite safe running this saw.
Wow and wow! Cool stuff!
I for one would cut myself on that thing for sure, but it really is cool.
Just to chime in... thanks Steve for the tutorial. One of my "wows" in reading it, was that your 3HP motor struggled to get through this log. That makes me wonder how those 1HP 14 inch bandsaws with extensions can possibly resaw anything? Or is this simply an exceptionally difficult cut, given that you were not able to use a fence for the first cut and that Osage is so dense?
Gerry,
That log he cut looks very dry and hard. A freshly fallen tree with wet wood cuts much easier.
That makes me wonder how those 1HP 14 inch bandsaws with extensions can possibly resaw anything?
That's my setup. It's all but useless for resawing 8"+ anything. I struggled cutting redwood accurately.
I was given a section of seasoned osage orange trunk years ago and burned out the clutch of a small chainsaw trying to cut through it. It's like rock.
Fantastic tutorial Steve! The osage that grows around here is so tiny compared to that thing. I might try the chainsaw technique on some big mesquite or walnut trunks sometime, though. Thanks!